Posted By

In one of our previous blogs Skaffold – Kubernetes-native app development simplified, we talked about the basics of Skaffold and how it is responsible for quick & automated deployment of Kubernetes applications. Skaffold is an amazing tool when it comes to working around application source code locally while having it continually updated. And, simultaneously it also gets prepared for testing in the local or remote Kubernetes clusters. As a developer, all of us must be running large Kubernetes cluster with hundreds of QA cluster nodes. In this blog, I will try to elaborate more on using Skaffold to create a separate kube (isolated environment) for both development and testing as per the requirements. This provides developers and testers with the freedom to run their tests easily without hindering cross commits between multiple developers. Jenkins being an open source automation server that automates the parts of software development here, triggers the CI/CD pipeline only when a pull request is made into the mainline branch.
Hackernoon, in one of its interesting blogs has represented a visual of the master branch, and it’s working as below -
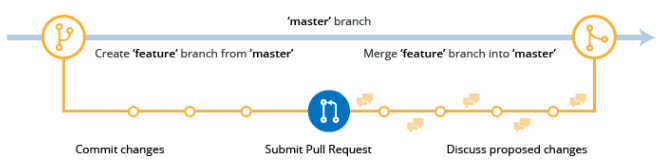
Whenever a developer is about to complete an application feature, a pull request is made, which triggers the Jenkins CI/CD pipeline. Now consider a scenario where a developer wants to get the code deployed as well as tested without creating a pull request, do you think it will be possible? The answer is no. Even if the team finds out a solution for the developer, the developer still has to wait until the build gets deployed. Now, what if, during the deployment, the CI/CD pipeline fails? DevOps looks after the failures, but for a considerable time, the development and testing would have to wait, and this can impact the deliverables.
With the increase in project complexity, there is always a need to have some solutions for continuous development. Something quicker than continuous integration where you can get the changes with each commit on your local machine and do not have to wait & check the CI stage status. Minikube is one such solution where you have to build a Docker image whenever a commit is made. Then you can go on and change the manifests files with the images created.
When it comes to the local development of the Kubernetes environment, you can trust Google Skaffold. It is easy to use and does not require much in-depth technical knowledge. As soon as you run a single command on your local you can instantly see the changes on your namespace.
When to use Skaffold, and how can it help you speed up local development?
Consider that you have multiple microservices where each developer is working on them separately. Few developers are working on the front-end (React), and few of them are on the back-end (Node.js) services which might have a separate database for each of them respectively. Your product has been deployed into production successfully. But your work doesn’t end here as you are also responsible to speed up the DevOps process. This is important as your team would be waiting to test the CI pipelines and get it deployed into the QA environment to get the feedback. This wait for the commit results leads to wastage of your team’s time. DevOps is all about getting recurring feedbacks about your process, codes, and testing. What if you could somehow speed up the feedback arrival process? Here, I would like to mention that before heading toward Skaffold, you should have a very clear understanding of the CI/CD process along with a basic knowledge of YAML. Whenever changes are required to be done in the microservice, just create a feature/fix branch.
In this blog, to explain how you can run the continuous integration, I have created a pull request into master, as depicted in the image mentioned earlier. Now, let’s discuss how you can start with Skaffold continuous development on your local machine. First, clone your microservices on your local machine and create a skaffold.yaml file. Below I have cloned two microservices one is for the front-end and the other one for the back-end. You should have a similar repository structure while using the Skaffold. The repository should have a Dockerfile, Kubernetes manifests or Helm charts, skaffold.yaml, and at last a service source code.
Microservice-1 repository:
Ubuntu@OPLPT058:~/service-1$ ls -lrt
total 28
drwxr-xr-x 8 Ubuntu Ubuntu 4096 Jun 30 23:09 .git/
-rw-r--r-- 1 Ubuntu Ubuntu 310 May 28 09:18 .gitignore
-rw-r--r-- 1 Ubuntu Ubuntu 2884 Jul 7 10:49 READM.md
drwxr-xr-x 2 Ubuntu Ubuntu 4096 Jul 7 10:49 public
-rw-r--r-- 1 Ubuntu Ubuntu 1023 Jul 7 10:49 Dockerfile
-rw-r--r-- 1 Ubuntu Ubuntu 1562 Jul 7 10:49 values.yaml
drwxr-xr-x 2 Ubuntu Ubuntu 4096 Jul 7 10:49 src
drwxr-xr-x 4 Ubuntu Ubuntu 4096 Jul 7 10:52 service-1-chart
-rw-r--r-- 1 Ubuntu Ubuntu 303 Jul 7 11:02 skaffold.yaml
Microservice-2 repository:
Ubuntu@OPLPT058:~/service-2$ ls -lrt
total 28
drwxr-xr-x 8 Ubuntu Ubuntu 4096 Jun 30 23:09 .git/
-rw-r--r-- 1 Ubuntu Ubuntu 310 May 28 09:18 .gitignore
-rw-r--r-- 1 Ubuntu Ubuntu 1562 Jul 7 10:49 values.yaml
drwxr-xr-x 2 Ubuntu Ubuntu 4096 Jul 7 10:49 src
-rw-r--r-- 1 Ubuntu Ubuntu 2884 Jul 7 10:49 README.md
drwxr-xr-x 2 Ubuntu Ubuntu 4096 Jul 7 10:49 public
-rw-r--r-- 1 Ubuntu Ubuntu 1023 Jul 7 10:49 Dockerfile
drwxr-xr-x 4 Ubuntu Ubuntu 4096 Jul 7 11:01 service-2-chart
-rw-r--r-- 1 Ubuntu Ubuntu 303 Jul 7 11:01 skaffold.yaml
You can use any one of the methods - either Helm or kubectl for local development using Skaffold as mentioned below.
Skaffold using Helm:
Here, I am using Helm for the deployment stage in skaffold.yaml.
apiVersion: skaffold/v2beta2
kind: Config
metadata:
name: hello-world
build:
artifacts:
- image: react-new-app # image name should be docker-repo/image-name:tag
deploy:
helm: # other options are kubectl
releases:
- name: hello-world-app
chartPath: ./mychart # path to your helm charts
namespace: default # if not mentioned it will take default namespace
values:
image: react-new-app #image should be present on docker repo or in casminikube it should be on local
recreatePods: true # skafold run command creates new pods
Skaffold using kubectl :
Given below is an example of Skaffold using kubectl. You should have required manifests files stack in the single file like deployment.yaml/service.yaml under Skaffold home.
apiVersion: skaffold/v2beta2
kind: Config
metadata:
name: hello-world
build:
artifacts:
- image: react-new-app
deploy:
kubectl:
manifests:
- react-new-app.yaml
Setting up Continuous Development:
Now that you have cloned both the services, it becomes easy to check the interdependencies between both the services when you have a single developer (I have considered both microservices are used by a single developer here.)
Once you have all the files placed inside the Skaffold home, you are ready to get the latest changes on your Kubernetes cluster.
$cd ~/service-1/
$docker build t new-react-app.
Note: If you are using Minikube for local development, then make sure you have set Minikube docker-env (run “minikube docker-env” command for more details) before building the Docker image. Else you will not be able to pull the Docker image, as both Minikube docker-env and local Docker environments are different.
$docker images
Ubuntu@OPLPT058:~$ docker images
REPOSITORY TAG IMAGE ID CREATED SIZE
react-new-app latest 1ec481cc6980 2 days ago 25.4MB
node-new-app latest 3rc401cc6xs1 2 days ago 32.6MB
Once the Docker images are created successfully, update your skaffold.yaml file with the exact Docker image name. If you are using any remote repository like Docker Hub or Nexus, then you have to mention the full image in skaffold.yaml. e.g., dockerhub-repo/react-new-app.
At this point, you should have everything that is required to run the Skaffold (ensuring you have - running K8s cluster, Helm charts/Kubernetes manifests, application source code) commands.
$cd ~/service-1/
$skaffold dev (runs Skaffold pipeline in the development mode)
The output for “skaffold dev” command will look like the one given below. If you see it is running into undetached mode, then the commands keep running. Whenever you go into the source code and make the changes, the Skaffold dev command will capture and compile those changes.
Ubuntu@OPLPT058:/react/hello-world$ skaffold dev
Listing files to watch...
- react-new-app
Generating tags...
- react-new-app -> react-new-app:2c2c55d-dirty
Checking cache...
- react-new-app: Found Locally
Tags used in deployment:
- react-new-app -> react-new-app:8e9d18dcc91c233eccd889b622c7c23fd186c5d0990d9d0ff576cd7f1cebbac5
local images can't be referenced by digest. They are tagged and referenced by a unique ID instead
Starting deploy...
- deployment.apps/react-app created
Waiting for deployments to stabilize...
- dev:deployment/react-app:
- dev:deployment/react-app: waiting for rollout to finish: 0 of 1 updated replicas are available...
- dev:deployment/react-app is ready.
Deployments stabilized in 11.434246293s
Watching for changes...
[react-app-6f655c695d-lx66s react-new-app] 172.18.0.1 - - [29/May/2020:10:37:26 +0000] "GET / HTTP/1.1" 304 0 "-" "Mozilla/5.0 (X11; Linux x86_64) AppleWebKit/537.36 (KHTML, like Gecko) Chrome/75.0.3770.100 Safari/537.36"
[react-app-6f655c695d-lx66s react-new-app] 172.18.0.1 - - [29/May/2020:10:37:27 +0000] "GET /static/css/main.5f361e03.chunk.css HTTP/1.1" 304 0 "http://172.17.0.3:31505/" "Mozilla/5.0 (X11; Linux x86_64) AppleWebKit/537.36 (KHTML, like Gecko) Chrome/75.0.3770.100 Safari/537.36"
Now, you can see that a new pod has been created inside your namespace. Make sure it is in the “Running” state. Open your browser and access your running application.
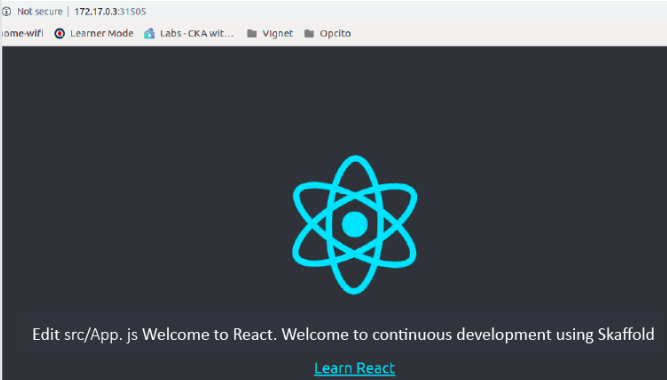
Let’s play with the application now. Access the source code and add a message that says, “Welcome to React. Welcome to continuous development using Skaffold”. Your pipeline will resume with the changes that you just made. Now, open your React application in the browser and look for the changes. This demonstrates how local development works on the Kubernetes platform using Skaffold build. Skaffold will quickly capture your changes and update them in the running application. Skaffold gives you the ability to do runtime changes. You will be able to see your application running in the browser, as shown in the image given below:
Now, let me state a scenario where a back-end developer makes a few changes in the service-2 repository at the same time. Go inside the service-2 repository and run the “skaffold dev” command. Open another terminal and pull service-2 changes done by the other developer. You will find that Skaffold will quickly capture the changes and update them in the running application.
Skaffold was introduced to simplify Kubernetes development and in my opinion, it is doing a fair job at the moment. It provides flexibility and very extensive on what kind of integrations it should be used with. With its extensible & pluggable architecture, it provides developers with the liberty to choose an appropriate tool for each step that is involved in building as well as deploying the application. I hope with this blog; you will be able to leverage Kubernetes by combining it with Skaffold. Do share your queries and experiences in the comments section. Stay safe and happy coding!


Related Blogs