Posted By

Kubernetes has been a go-to tool for orchestration for most DevOps folks. And to manage Kubernetes components, most of us prefer Helm. Now, consider a scenario where the codes in the file, Docker images, and manifest files need to be amended; then, the coder will have to restart the current application in the Dev environment. What if the coder doesn’t want to restart the application after every amendment along with manually updating the Kubernetes manifests? What if there are some minor changes to be made? What if the coder expects the app to automatically undergo those continuous changes, which we refer to as Continuous development? Well, I would like to tell you that all these things are possible with the help of a DevOps automation tool named Skaffold.
What is Skaffold?
Skaffold, a command-line tool, is mainly used to facilitate continuous development for Kubernetes-native applications. Skaffold eases the workflow for building, pushing, and deploying applications. In addition, it works as the main source of building blocks required for creating CI/CD pipelines. While you focus on your application's iteration in a local environment, Skaffold can help you with the deployment part on your local or remote Kubernetes cluster continuously. Here are some of the highlighting features of Skaffold that make it so popular amongst DevOps aficionados:
- Skaffold provides a toolkit to create CI/CD pipelines.
- It tracks the changes in the source code. Also, it initiates an automatic procedure of building code into container images. It pushes these images to the Docker registry and deploys these images on the Kubernetes cluster.
- Skaffold assists in synchronizing files in the repository with the working directory within the container.
- With container-structure-test, it automatically validates the images.
- Skaffold reads the logs of the application that runs in the container.
- Applications that are written in Java, Node.js, Python, Go are easily debugged by Skaffold.
Now that you know Skaffold’s features, let’s see how its workflow.
How Skaffold Works?
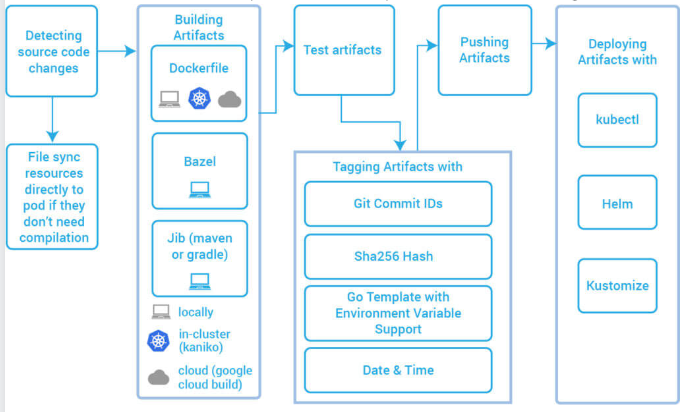
Following are the typical steps involved in a Skaffold workflow:
- Collect and monitor your source code for changes.
- If the user marks them as synchronizable, then file directly to pods.
- Build artifacts from the source code.
- Test the build artifacts using container-structure-tests.
- Tag the artifacts.
- Push the artifacts.
- Deploy the artifacts.
- Monitor the deployed artifacts.
- Clean deployed artifacts on exit (Ctrl+C).
Skaffold Documentation has explained these steps in the form of an image -
Skaffold automatically manages the utilities mentioned below:
- port-forwarding of deployed resources to local machine using kubectl port-forward command.
- Log aggregation from the deployed pods.
Let’s have a look at the practical working of Skaffold to understand its utilities in a better way. So, before you begin, follow the procedure mentioned below:
Firstly, install Skaffold. Then install Kubectl and Helm if needed. You can run Skaffold on a simple local cluster (Minikube) or on remote clusters like EKS, GKE, etc.
Once the above-mentioned steps and installation are completed, follow the aforementioned steps:
FROM ubuntu

COPY file.

CMD sh file
2. Write the mentioned content in the file:
echo "Hello World"
The above code is for the build phase.
3. Now, create a pod.yaml Kubernetes manifests file with the following code:
apiVersion: v1

kind: Pod

 metadata:

  creationTimestamp: null

  labels:

  run: helloworld

  name: helloworld

 spec:

  containers:

  - image: helloworld

  name: helloworld
Now you have three files viz. Dockerfile, pod.yaml, and file.
4. Set a default repo for the Skaffold to refer to the images with the following command:
“skaffold config set default-repo ”
and then run the command:
skaffold init.
5. It will check for all the resources in the current directory like build content(Dockerfile), Deploy content(*.yaml files), and will create skaffold.yaml with the below configuration.
apiVersion: skaffold/v2beta2
kind: Config
metadata:
name: skaffold
build:
artifacts:
- image: helloworld
deploy:
kubectl:
manifests:
- pod.yaml
6. Now run the “skaffold dev” command. This command will go through all the phases mentioned in the “Skaffold Workflow” section and will give you the output as given below:
Listing files to watch...
- /helloworld
Generating tags...
- /helloworld -> /helloworld:v1.8.0-23-g855223622-dirty
Checking cache...
- /helloworld: Not found. Building
Building [/helloworld]...
Sending build context to Docker daemon 3.072kB
Step 1/3: FROM ubuntu
---> 4e5021d210f6
Step 2/3: COPY file.
---> Using cache
---> 90cb8b4a7ffc
Step 3/3: CMD sh file
---> Using cache
---> add8a0786161
Successfully built add8a0786161
Successfully tagged /helloworld:v1.8.0-23-g855223622-dirty
The push refers to repository [docker.io//helloworld]
ad3e253d31d2: Pushed
16542a8fc3be: Pushed
6597da2e2e52: Pushed
977183d4e999: Pushed
c8be1b8f4d60: Pushed
v1.8.0-23-g855223622-dirty:digest: sha256:12c3295aa67e912b1d419483f75031577b4cd2f87e30477355dfe2fe972b2cf6 size: 1359
Tags used in deployment:
-/helloworld->/helloworld:v1.8.0-23-g855223622-dirty@sha256:12c3295aa67e912b1d419483f75031577b4cd2f87e30477355dfe2fe972b2cf6
Starting to deploy...
- pod/helloworld created
Waiting for deployments to stabilize...
Deployments stabilized in 1.773677168s
Watching for changes...
[helloworld] Hello World
[helloworld] Hello World
[helloworld] Hello World
[helloworld] Hello World
7. Now change the code file to the one given below:
echo "Hello World!!!"
8. Once you change the code, Skaffold will automatically go through all the phases again:
.
.
.
[helloworld] Hello World
Generating tags...
- /helloworld -> /helloworld:v1.8.0-23-g855223622-dirty
Checking cache...
- /helloworld: Not found. Building
Building [/helloworld]...
Sending build context to Docker daemon 3.072kB
Step 1/3: FROM ubuntu
---> 4e5021d210f6
Step 2/3: COPY file.
---> bad20db35975
Step 3/3: CMD sh file
---> Running in f932e48132b3
---> 97d995f7e5ee
Successfully built 97d995f7e5ee
Successfully tagged /helloworld:v1.8.0-23-g855223622-dirty
The push refers to repository [docker.io//helloworld]
72d0d97d3ec2: Pushed
16542a8fc3be: Layer already exists
6597da2e2e52: Layer already exists
977183d4e999: Layer already exists
c8be1b8f4d60: Layer already exists
v1.8.0-23-g855223622-dirty:digest: sha256:562bbf163789ce7b9e18721c5978310fbe23b52e4f40fc0c02a27a460a32fb2c size: 1359
Tags used in deployment:
-/helloworld->/helloworld:v1.8.0-23-g855223622-dirty@sha256:562bbf163789ce7b9e18721c5978310fbe23b52e4f40fc0c02a27a460a32fb2c
Starting deploy...
- pod/helloworld configured
Waiting for deployments to stabilize...
Deployments stabilized in 260.130701ms
Watching for changes...
[helloworld] Hello World!!!
[helloworld] Hello World!!!
9. Now type ctrl + C to exit from Skaffold, and the deployed pod will be deleted.
 ^CCleaning up…

- pod "helloworld" deleted
The procedure has been completed now. One concept I find very interesting and important is Profiles. Creating profiles is now easy as you can do it in the profiles section of skaffold.yaml. Profiles can be created with any build, test, and deploy combination. Each profile has six parts:
- Name (name): Denotes the name of the profile
- Build configuration (build)
- Test configuration (test)
- Deploy configuration (deploy)
- Patches (patches)
- Activation (activation)
Example of creating a Profile:
- k8s-pod

 profiles:

 - name: gcb

   build:

      googleCloudBuild:

       projectId: k8s-skaffold
Now you can run “skaffold dev -p gcb”.
You can follow Skaffold documentation for more information on Profiles.
The main goal of Skaffold is to offer the best industry-related tool for Skaffold Kubernetes development. Since the inception of Skaffold many organizations have started to engage just to ensure that Skaffold evolves in line with the requirements of users. Thus, leveraging this tool will surely assist in improving your productivity as it makes sure that you have quick automated deployments of the Kubernetes applications. This was just a general introduction to Skaffoled. In my next blog, I will be talking about practical scenarios using Skaffold.


Related Blogs