Posted By

In my last blog, I talked about the blue/green deployment and the use of AWS services in blue/green deployment. In this blog, I will mainly talk about blue/green deployment using the DNS redirection with Route 53.
The web application for blue/green deployment consists of the front and the backend; UI is developed in AngularJS and served by Nginx and the backend mainly consists of multiple microservices. Each microservice is an independent deployable unit and consists of a web server and a database, either a relational database or a NoSQL database.
In order to automate the deployment of the complete application, you can use the following deployment architecture.
This will consist of the AWS VPC, Public and Private Subnet, Route 53, Application Load Balancer (ALB), EC2 instances to deploy the services, RDS, and DynamoDB for the database. You can create different subnets for blue and green deployments to separate one application deployment from the other.
You can choose between various build and deployment tools like Jenkins or code deploy to build and deploy this application. In this application, we chose Jenkins. You can create different deployment pipelines for each environment, i.e., test, stage, and prod.
You can use wrapper scripts to expose the different operations like deploying, updating, and destroying the application. The structure of deployer.sh will look like this:
#!/bin/bash
# A simple script that creates a VPC and deploys application services.
function usage
{
cat <<EOF
Usage:
-a Action: The action you want to perform (deploy, upgrade, test, delete)
-c Component: The application component you want to perform the action on
-n Name: The name of the environment you want to operate on.(dev, preprod, prod)
-r Repo: The artifactory repo to use for installing the application components
-p Properties: Path to file containing additional environment variables to append to the env.cfg file on build server
-o Override: The override version to use for specific components. The format is <component>:<repo>:<version>;
-e Email: The user Email for user running the installer.
-d (optional) To be used with action=delete only. If used, will not delete the stack like VPC, subnet, bastion host, buildserver, NAT
Examples:
deployer.sh -a deploy -n application_stage -c all -k user_id -r stage -e <email address>
Creates a Application environment called application_stage using artifacts stored in the stage repo
EOF
}
# main
function main
{
initScript "$@"
case "$ACTION" in
deploy)
deploy | tee -a ${logfile}
;;
upgrade)
upgrade
;;
test)
test
;;
delete)
delete
;;
*)
usage
;;
esac
}
function deploy
{
[ x"$COMPONENT" == "x" ] && echo "ERROR: component must be specified" && exit 100
[ x"$DEPLOYMENT_NAME" == "x" ] && echo "ERROR: deployment name must be specified" && exit 101
[ x"$REPO" == "x" ] && echo "ERROR: repo must be specified" && exit 102
[ x"$KEY" == "x" ] && echo "ERROR: aws key must be specified" && exit 103
[ x"$EMAIL" == "x" ] || [ ${EMAIL##*@} != "<company_domain.com" ] && echo "ERROR: company EMAIL must be specified" && exit 104
[ x"$VERSION" == "x" ] && echo "ERROR: Version must be defined" && exit 105
setup_env
setup_build_server
deploy_component
}
function deploy_component
{
#Deploy steps components.
}
function setup_env
{
#Environment setup for the application / component
}
function init_ssh
{
# Setup the ssh config file for bastion server access
}
function setup_build_server
{
# Install jfrog, jq, and ansible
}
function upgrade
{
# Upgrade Application/Components.
}
function test
{
# Upgrade Application/Components.
}
function delete
{
# we may not want to destroy everthing everytime.
# making sure that nothing else gets deleted unless we want to delete them.
# So do the undeploy first and then ask.
undeploy_components
}
function undeploy_components
{
#Used case to handle deletion of specific component only.
}
function initScript
{
ACTION=""
COMPONENT=""
DEPLOYMENT_NAME=""
REPO=""
TARGET_ACCOUNT="dev"
PROP_FILE=""
OVERRIDE=""
KEY=""
EMAIL=""
VERSION=""
while getopts h:da:c:n:r:t:p:o:k:e:v: opt
do
case "$opt" in
h) usage "";exit 1;;
a) ACTION=$OPTARG;;
c) COMPONENT=$OPTARG;;
n) DEPLOYMENT_NAME=$OPTARG;;
r) REPO=$OPTARG;;
t) TARGET_ACCOUNT=$OPTARG;;
p) PROP_FILE=$OPTARG;;
o) OVERRIDE=$OPTARG;;
k) KEY=$OPTARG;;
e) EMAIL=$OPTARG;;
d) DFOUND=1;;
v) VERSION=$OPTARG;;
\?) usage "";exit 1;;
esac
done
}
main "$@"
You can use a config file to configure the green and blue deployment-specific details. Internally you can use AWS CloudFormation Templates (CFT) or Terraform to create infrastructure and Ansible or Chef for configuration. Also, you can store the application artifacts on the artifacts server like JFrog.
You can automate the process to deploy similar applications in a green environment.
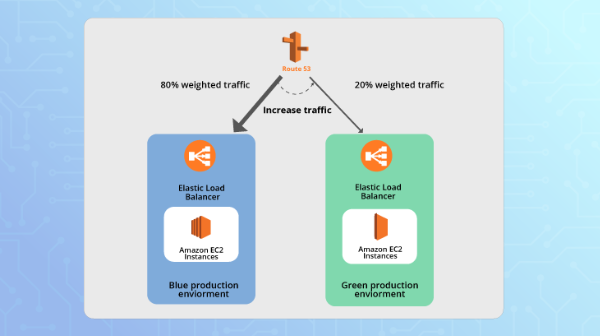
Once you are positive that your green environment is prod-ready, you can start to shift traffic from the blue environment. You can shift the traffic using DNS service Route 53 in two ways. The first option is, you can use the weighted DNS routing abilities of Amazon Route 53 to slowly switch a set percentage of the traffic over to the green environment. Same time, you can monitor the wellness parameters of your green environment to ensure the new application is working properly. To route domain traffic to an ELB load balancer, use Amazon Route 53 to create an alias resource record set that points to your load balancer.
The other option is simply to change the DNS to point to the new green environment without a gradual shift.
In weighted DNS routing, start routing 40% of your traffic to the new green environment. Once you have tested the new green environment for 40% traffic, you can start increasing the traffic step by step until it reaches 100%.
Terraform code:
resource "aws_elb" "main" {
  name              = "blue-app-elb"
  availability_zones = ["us-west-1a"]
  listener {
    instance_port     = 80
    instance_protocol = "http"
    lb_port           = 80
    lb_protocol       = "http"
  }
}
resource "aws_route53_record" "www" {
  zone_id = "${aws_route53_zone.primary.zone_id}"
  name    = "blue.application.com"
  type    = "A"

  alias {
    name                   = "${aws_elb.main.dns_name}"
    zone_id                = "${aws_elb.main.zone_id}"
    evaluate_target_health = true
  }
  weighted_routing_policy {
    weight = 20
  }
}
resource "aws_elb" "main" {
  name               = "green-app-elb"
  availability_zones = ["us-west-1a"]

  listener {
    instance_port     = 80
    instance_protocol = "http"
    lb_port           = 80
    lb_protocol       = "http"
  }
}
resource "aws_route53_record" "www" {
  zone_id = "${aws_route53_zone.primary.zone_id}"
  name    = "green.application.com"
  type    = "A"

  alias {
    name                   = "${aws_elb.main.dns_name}"
    zone_id                = "${aws_elb.main.zone_id}"
    evaluate_target_health = true
  }
  weighted_routing_policy {
    weight = 80
  }
}
myDNSOne:
 Type: AWS::Route53::RecordSetGroup

  Properties:

    HostedZoneName: example.com.

    Comment: Weighted RR for my frontends.

    RecordSets:

    - Name: green.application.com.

      Type: CNAME

      TTL: '5'

      SetIdentifier: Frontend One

      Weight: '4'

      ResourceRecords:

      - green.application.com

    - Name: blue.application.com.

      Type: CNAME

      TTL: '5'

      SetIdentifier: Frontend Two

      Weight: '6'

      ResourceRecords:

      - blue.application.com
The weighted routing operation is slower than the second approach. You can utilize the time between the two steps to verify the health of the green environment. You can introduce automation for gradual change in traffic to the new environment. This can be done by using CloudWatch alerts, and Amazon Route 53 health checks will monitor the health and performance of your application and infrastructure.
You can create one of the following health check monitors:
- Health of a specified resource, such as a web server
- Status of an Amazon CloudWatch alarm
- Status of other health checks.
Most of the organizations are using blue/green deployments. These methods are well-tested on small and large deployments and help reduce the risk of deployments of new features or updates in production. This will also help to reduce deployment downtime and to roll out your feature in the market quickly.