Posted By

User authentication is necessary to safeguard your organization's data and systems. Granting system/data access to a person that he is not supposed to access can be disastrous. A Verizon report suggests that 82% of breaches are caused due to human elements such as misuse, errors, and social attacks. Organizations have seen a growth of 13% in ransomware breaches – more than the last five years combined. In a world where data security tops the list of priorities for any organization, you must take measures to confirm the authenticity of the user before they gain access to your network and systems.
Today, where data security is a top priority for every business, you must take measures to confirm the authenticity of the user before they gain access to your network and applications. This is where Keycloak Role-Based Access Control (RBAC) becomes critical.
Keycloak, a leading open-source identity and access management (IAM) solution, helps organizations safeguard their systems by providing RBAC. Let’s dive deeper into how Keycloak supports RBAC, why it matters for securing frontend and backend applications, and the step-by-step process to configure it.
What is RBAC?
Role-Based Access Control (RBAC) restricts user access to a network or application based on their role, job responsibility, and clearance level. Not all employees should have access to company-wide information, and RBAC ensures that employees only access what they are supposed to.
With RBAC in Keycloak, organizations can easily add or modify roles across operating systems, platforms, and applications without paperwork. This access governance becomes even more critical as enterprises increasingly deal with third-party vendors, contractors, and consultants — all of which expand the attack surface. Opcito’s Cyber Security Services complement RBAC by providing advanced protection against unauthorized access, threats, and vulnerabilities, ensuring holistic security for modern enterprises.
In a day-to-day scenario, every system has an admin and users. For example, if you log in as an admin, you should be able to add, edit, or delete users. But if you log in as an employee, you should not be able to delete or update other users. To make sure these roles and access controls function correctly, you need Keycloak RBAC.
How Keycloak supports RBAC
In one of my earlier blogs, I have already talked about Customizing login and signup pages in Keycloak. Keycloak provides an easy authentication mechanism for services and applications. It follows industry-specified protocols and supports SAML 2.0, OpenID Connect (OAuth 2.0 + Authentication Layer) & OAuth 2.0. It uses its user database but can also be integrated with existing user directories like LDAP servers and Active Directory.
By default, Keycloak uses its own user database but can also integrate with external directories such as LDAP servers and Active Directory. This flexibility makes it one of the best tools for RBAC implementation. Let's look at the steps to incorporate Keycloak for RBAC for the frontend and backend.
Step-by-step guide to install & setup Keycloak 15.0.2
To start configuring RBAC in Keycloak, install and set up Keycloak. This can be done either from the zip file or by using Docker.
Create Realm
Create a new Realm to start the RBAC configuration. A master Realm exists by default. Add your test Realm by clicking on ‘add Realm.’ Enter the Realm name and save.

Create user role
Create a role “admin” inside the roles section. Set this role as the default for all employees. Under the default role tab, select the employee role from available roles and click add-selected. Now, the role will be applied to all registered employees.

Create client
To handle Keycloak authorization, you will need two clients — one for the frontend and another for the backend.
Setup frontend client
For this client, you must set a mapper to get user roles in the user info API after logging in. Select the client, go to the mappers tab, and then click on create.

Select mappers type as user Realm role and make sure that your “Add to user info” option is enabled. All other settings like the main URL and logout URL will be the same.
Setup backend client
Create the new backend client by clicking on clients and then on create. Go inside the settings of that client and configure the below settings:
- Client protocol must be OpenID-connect
- Select access type as confidential
- Enable the authorization tab


Save these settings, and a new authorization tab will appear on top.
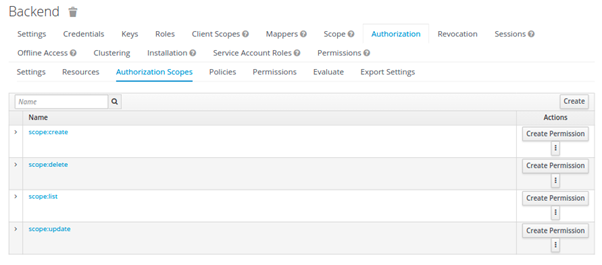
Create scope
In the authorization tab, select the authorization scope and create some new scopes by clicking on create button. Example: scopes:list, scope:create
Create resource
In the resource tab, create new resource res: employee by clicking on create. Add the resource name and then select the scopes you want to assign this resource with. Hit save to save changes.


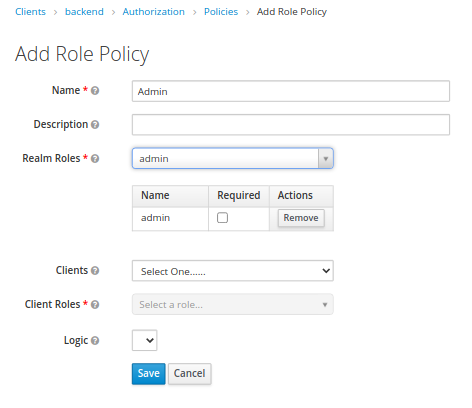
Create policies
Inside the authorization tab, select policies and click on create a new policy. Then select a role in the dropdown. Add the policy name as admin and select the realm role as admin. Hit save to save changes.
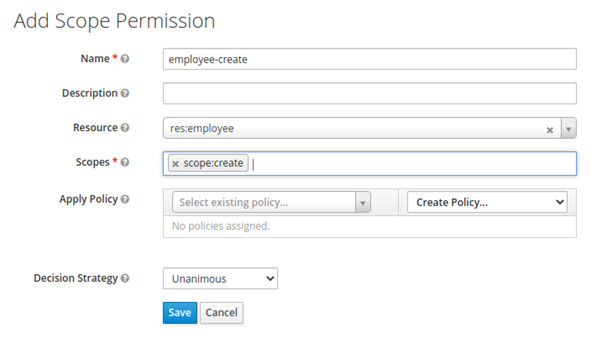
Create permission
Go to the authorization tab and select permission. Click on the create permission dropdown and select the scope-based permission. Add a new permission with the name employee-create and set the resource as res: employee. In scope, select scope: create. Make this change to set all the other permissions like list, update, and delete for employees. Now your backend client is ready to use.
Handle permission in the web app
The Keycloak part is completed. You have configured permission for multiple actions. Now you need to use these permissions to enable and disable the action depending on permission. For example, if the user is an admin, he can do all CRUD operations of employees, but if he is not the admin, he can only list the employee. You need to check the user role and permission to achieve this. If it's not right, disable that particular action. You will need to disable the " add employee " button if there is no employee-create permission.
getUserPermissions() {return axios.get(http://localhost:8080/auth/admin/realms/{realmName}/clients/${backendCLIENTID}/authz/resource-server/policy/role/${policyRoleID}/dependentPolicies`);
},
In the user info API call, you will get the user role, and with this above API call, you will get the permissions associated with that user role.
backendCLIENTID - Id of backend client that we created beforepolicyRoleID -"backendclient->authorization->policies->roles->admin"
On this path, you will get the Id of the admin role policy.
The output of this API will be an array of objects which contain all the permissions. Now you can use those permissions to enable and disable the actions on your UI side. To enable and disable the actions, you can directly use the IF directive and check if the action is present in response or not. By implementing Keycloak RBAC, organizations can strengthen application security, streamline role management, and minimize risks associated with unauthorized access. To take this a step further, explore Opcito’s Cloud Security and Monitoring solutions for continuous protection of your applications and infrastructure.
This is it! You have successfully configured your web application's RBAC from the front-end and back-end. You can customize user roles, resources, and permissions as per the use case. If you face any issues, feel free to comment or contact us directly at contact@opcito.com.