Posted By

One person's mistake or malicious action can compromise an entire system. That's why financial organizations, regulators, and security-conscious enterprises require approval workflows where no single person controls sensitive changes from submission to execution.
The Maker-Checker pattern enforces this. It's a proven authorization architecture that splits every critical operation into two independent steps. One person initiates. A different person approves. The system executes only after approval. In regulated industries, this isn't optional—it's a compliance requirement.
This guide covers how to build, deploy, and maintain queue-based dual-control systems in production. You'll learn the pattern's architecture, see working code for Java applications, handle edge cases like concurrent approvals and stale data conflicts, and understand how to retrofit this into existing systems without rewriting them.
What is Maker-Checker and why financial systems need it
The Maker-Checker pattern—also called the Four-Eyes Principle or dual authorization system—splits every sensitive operation into two independent steps. One person initiates a change. A different person approves it. The operation executes only after approval.
This isn't theoretical. Banking regulators mandate it. SOX compliance requires it. PCI-DSS demands it. If you're building financial systems, regulatory platforms, healthcare applications, or anything where a single compromised account can cause serious damage, this pattern is non-negotiable.
A real scenario: A system administrator with legitimate credentials deletes a critical configuration file. Or an attacker gains access to an operations account and creates an unauthorized admin user. In both cases, the damage is done before anyone notices. Maker-Checker prevents this by forcing a second set of eyes on every sensitive change.
Core principles of dual-control authorization systems
The Maker-Checker authorization pattern rests on four core principles that define how segregation of duties actually works in practice. Understanding these principles is essential before implementing any approval workflow system, as they form the foundation for all downstream decisions about architecture and validation logic.
- No self-approval: The person who initiates a request cannot approve their own request. The segregation of duties is enforced at the code level, not just at the permission layer. This prevents any single actor from controlling the entire workflow.
- Atomic execution: The operation doesn't execute when the maker submits it. It sits in a pending state until the checker approves. Only then does execution happen. This ensures the operation can be reviewed before any changes take effect.
- Full auditability: Every request, approval decision, and outcome is logged with timestamps and user identifiers. You can trace exactly who did what and when. This creates an immutable audit trail for compliance and investigations.
- Reversibility: Makers can cancel pending requests. Checkers can reject them. Nothing is permanent until execution completes. This flexibility reduces friction when mistakes or changes in requirements happen.
Legacy Maker-Checker vs. Modern Queue-based implementation
The approach to implementing Maker-Checker has evolved significantly. Traditional banking implemented this pattern at the table level, which created significant maintenance challenges. Modern approaches centralize approval logic in a queue-based system that operates independently of business tables. Understanding the differences helps you choose the right architecture for your platform.
Table-level maker-checker: the banking industry standard
Traditional banking systems implemented Maker-Checker at the database table level. Every sensitive table carried approval columns. This approach worked for decades and is still used by many institutions, but it has structural limitations that become apparent as systems grow.
In a table-level implementation, approval columns are baked directly into every table that requires dual control:
SQL
-- Legacy approach: approval columns embedded in every table
CREATE TABLE accounts (
    id          BIGINT PRIMARY KEY,
    holder_name VARCHAR(255),
    balance     DECIMAL(18,2),
    status      VARCHAR(20),
    -- Maker-Checker columns baked into the table
    is_approved       BOOLEAN DEFAULT FALSE,
    created_by        VARCHAR(100),
    approved_by       VARCHAR(100),
    approval_status   VARCHAR(20),  -- PENDING, APPROVED, REJECTED
    approval_date     TIMESTAMP
);
This works. Financial institutions have used this approach for decades. But it comes with real problems that scale poorly:
- Schema pollution: Every table needing approval logic gets extra columns. Your data model becomes cluttered with approval metadata. Over time, this makes the schema harder to understand and maintain.
- Scattered logic: Approval handling gets duplicated across every module that touches these tables. Code review becomes harder. Bugs hide in repetition. When you need to change approval behavior, you must update multiple places.
- Tight coupling: Adding dual-control to a new entity means altering its schema and rewriting its CRUD operations. That's slow and risky. Each new entity requiring approval becomes a database migration and code refactor.
- Fragmented audit view: There's no single place to see all pending approvals. You query each table separately to understand what's waiting for approval. Creating dashboards or reports requires joining multiple approval columns.
Modern approach: centralized queue-based maker-checker
The queue-based approach inverts this philosophy entirely. Instead of embedding approval logic into each entity's table, you intercept operations at the API layer and route them into a single approval request queue. The target tables stay untouched. Approval lifecycle lives entirely in a dedicated approval_requests store. This separation of concerns makes the pattern scalable and maintainable.
The shift from table-level to queue-based thinking is fundamental. Instead of mixing business data with approval metadata, you maintain them separately:
Legacy (Table-Level) vs Modern (Queue-Based) Maker-Checker Approach
| Aspect | Legacy (Table-Level) | Modern (Queue-Based) |
|---|---|---|
| Where approval state lives | Spread across every business table | Centralized in a single approval queue |
| Adding Maker-Checker to a new entity | Requires schema migration + code changes | Configuration-only — register the operation type |
| Audit view | Query each table separately | Single dashboard across all operations |
| Payload preservation | Original values may be overwritten | Full request payload stored as-is in the queue |
| Separation of concerns | Business data and approval logic are interleaved | Business tables stay clean; approval is a cross-cutting concern |
This shift treats Maker-Checker as infrastructure rather than a per-entity feature. Think of it as moving from inline validation to middleware. The business logic doesn't know it's under dual control. The interceptor handles it transparently.
From table-level controls to queue-based workflows
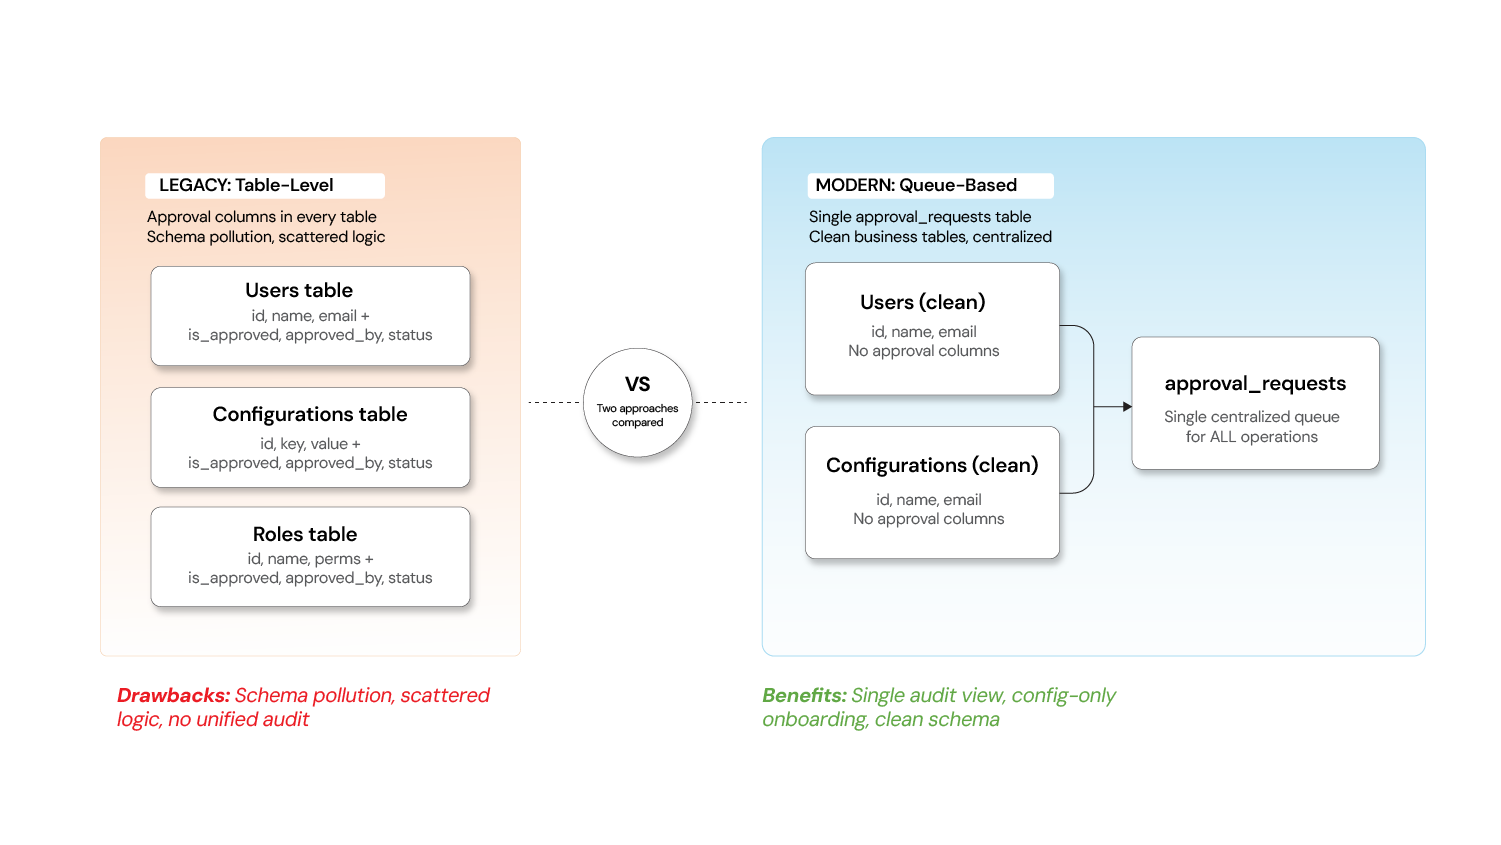
The diagram shows how table-level approval columns (left side) are replaced with a centralized approval queue (right side) that sits between the maker's API request and the actual execution engine.
How maker-checker workflows operate: step-by-step
A typical maker-checker flow involves six distinct sequential steps from initial submission through final execution and notification. Understanding the complete workflow helps you anticipate what needs to happen at each stage and where errors or delays might occur.
The Workflow: Step by step
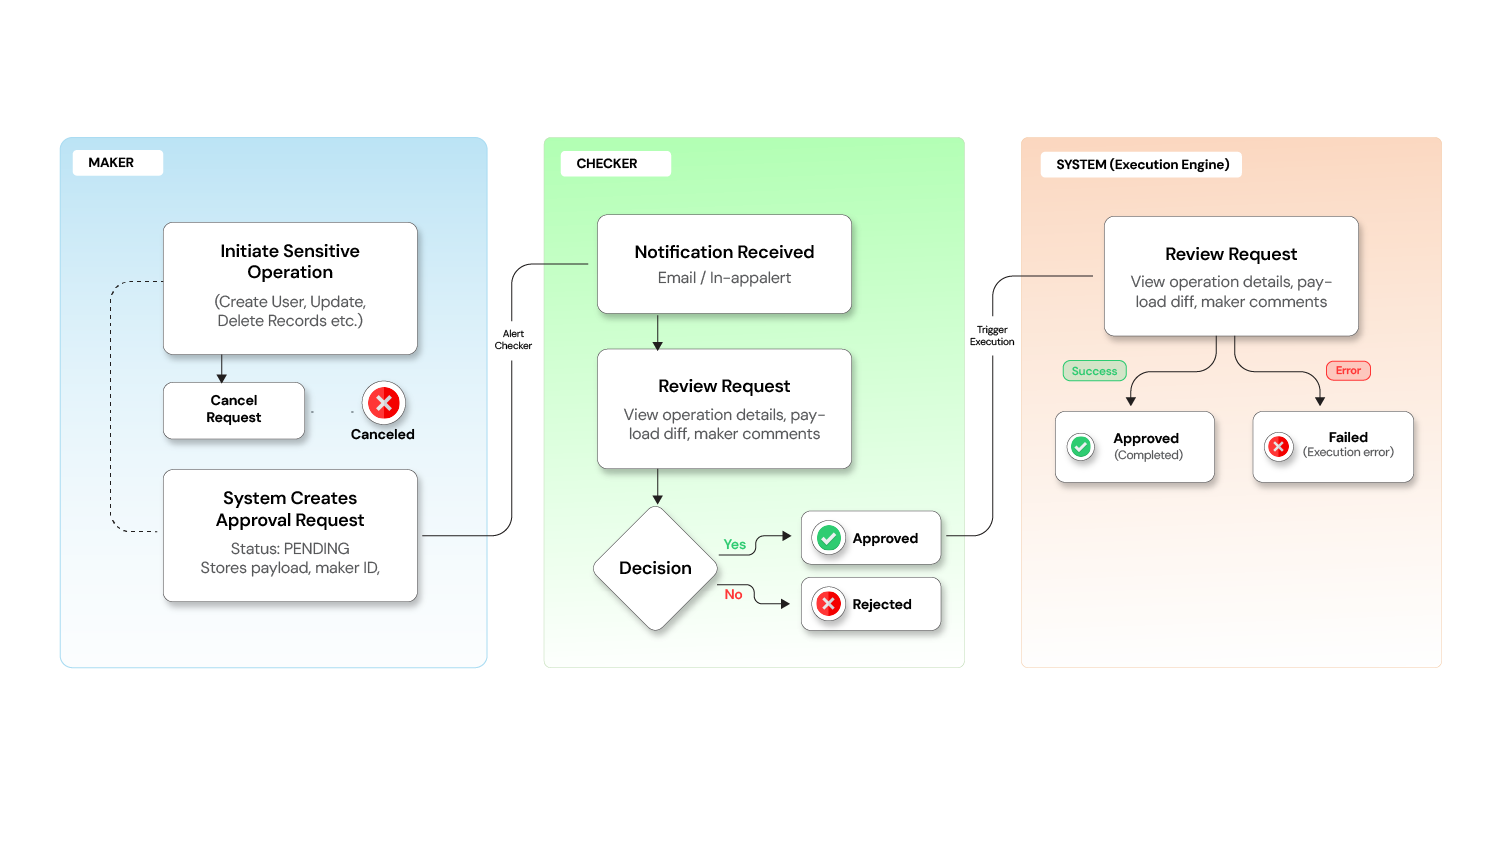
The diagram illustrates all six steps, showing how the request moves from maker to pending queue to checker review to execution.
Step 1: Maker submits a request
A user with the Maker role initiates a sensitive operation. Instead of the action being executed immediately, the system captures the intent as a pending request, storing:
- The operation type (e.g., Create User, Update Configuration)
- The full payload of the proposed change
- The maker's identity and timestamp
- Optional comments explaining the reason
Step 2: Request enters pending state`
The request is now visible to authorized checkers. The maker sees it in their "My Requests" queue, while checkers see it in their "Requests for Review" queue.
At this point, the maker can still cancel the request if they change their mind.
Step 3: Checker reviews the request
A user with the Checker role reviews the pending request. They can see:
- What operation was requested
- Who requested it and when
- The complete details of the proposed change (before vs. after, if applicable)
- The maker's comments
Step 4: Checker takes action
The checker has three options:
- Approve - The system automatically executes the original operation
- Reject - The request is declined with a reason; no changes are made
- Skip - Leave it for another checker to review
Step 5: System executes upon approval
Once approved, the system executes the operation in the background. The request status moves through:
PENDING -> APPROVED -> PROCESSING -> Completed (or FAILED if execution encounters an error)
Step 6: Notifications close the loop
Both the maker and checker receive notifications about the outcome, creating a closed feedback loop.
Request lifecycle: state machine and transitions
Every maker-checker request follows a defined state machine with clear transitions between states. Understanding the lifecycle helps you handle edge cases, implement proper error handling, and build dashboards that accurately reflect request status.
Request Lifecycle: States and Transitions
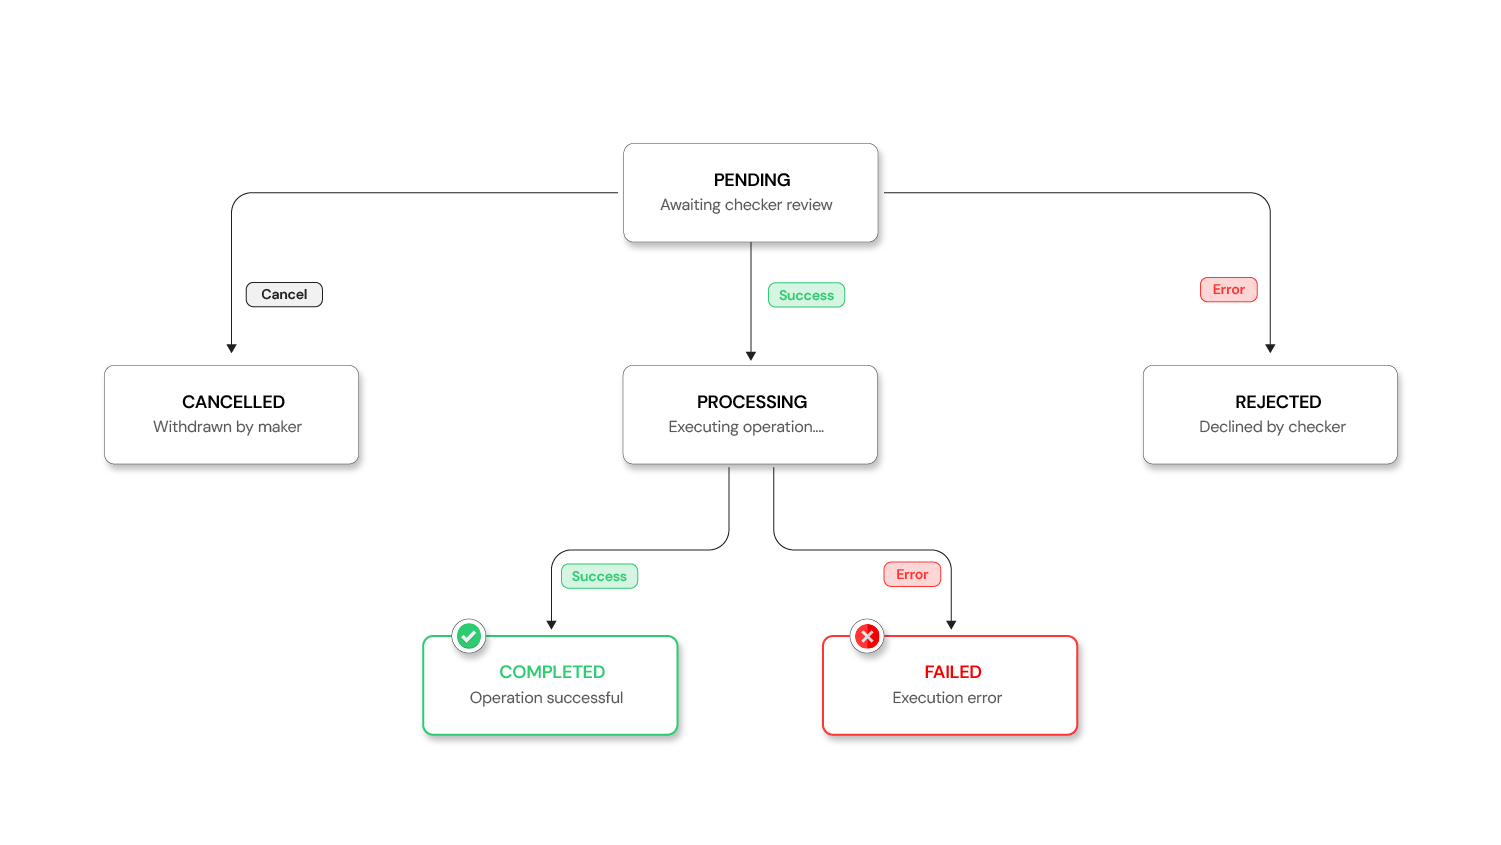
The diagram shows all possible states and how requests move between them. Note that some transitions are terminal (REJECTED, CANCELLED, FAILED) while others lead to execution completion.
Request Lifecycle States and Transitions
| Status | Description |
|---|---|
| PENDING | Awaiting approval from a checker |
| APPROVED | Request has been approved and executed successfully |
| REJECTED | Request has been declined by a checker |
| CANCELLED | Request was cancelled by the maker |
| PROCESSING | Request is currently being executed |
| FAILED | Execution failed after approval |
A request enters as PENDING when the maker submits it. From PENDING, it can transition to APPROVED (checker approved), REJECTED (checker declined), or CANCELLED (maker withdrew). If APPROVED, it moves to PROCESSING while the operation executes, then either completes (ending in APPROVED) or encounters an error (ending in FAILED). If REJECTED or CANCELLED, the request is terminal and no further action happens. If a request stays PENDING longer than the configured timeout, it moves to EXPIRED and is automatically closed.
Which operations require maker-checker authorization
Not every action needs dual approval. The overhead of mandatory approval for every operation would create friction and slow down the entire system. Apply this pattern strategically to high-impact operations where a mistake or malicious change would cause significant damage or regulatory violation.
The decision to require maker-checker should be based on impact, not just sensitivity. Operations that affect multiple users, change system behavior, or control financial resources should require approval. Operations that are reversible, affect only one user's preferences, or have low blast radius should remain immediate.
Operations that require maker-checker authorization
| Category | Operations |
|---|---|
| User Management | Create User, Delete User, Update Roles, Change User Status |
| Configuration | Create/Update/Delete System Configurations, Toggle Feature Flags |
| Role Management | Create/Update/Delete Roles and Permissions |
| Organization Management | Approve/Reject Organization Registrations |
| Financial Operations | Transaction approvals, Limit changes, Account modifications |
| Access Control | Grant/revoke admin privileges, Change access levels |
Low-risk operations like viewing data, generating reports, or updating personal preferences should remain immediate.
Architecture: building queue-based maker-checker systems
Building a queue-based Maker-Checker system requires several key architectural components working in concert. The design centers on intercepting requests before they reach business logic, storing them in a queue, and replaying them only after approval. This section walks through the complete architecture and shows how to implement it.
The interceptor pattern: core design
The interceptor pattern works because HTTP request handling in most frameworks (Spring, Express, etc.) uses middleware that executes before route handlers. By intercepting at this layer, you can:
- Check if the endpoint requires approval
- Capture the full request payload
- Create an approval record
- Return a 202 Accepted response
- Never invoke the actual endpoint
Interceptor in action
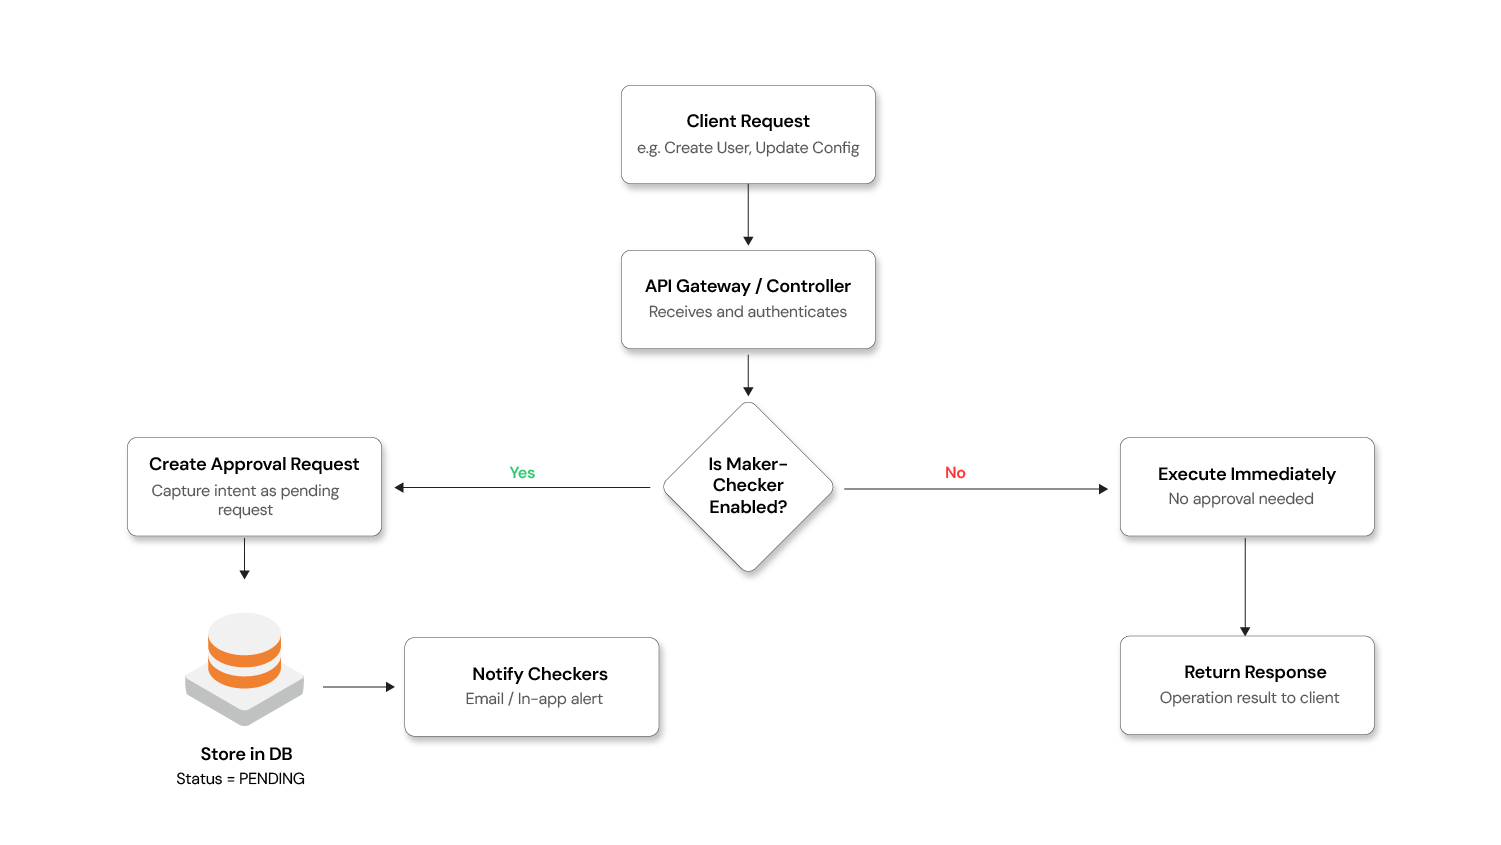
The diagram shows the request flow: maker sends request → interceptor catches it → creates approval record → returns 202 → request sits in queue → checker approves → execution engine replays request → actual endpoint executes.
Implementing the interceptor pattern
Here's how the interception works at the API layer using a Spring Boot–style implementation.
Step 1: Define a custom annotation to mark endpoints that require Maker-Checker approval.
The annotation marks which endpoints require approval. You add this annotation to any endpoint you want to gate through the approval workflow:
JAVA
@Target(ElementType.METHOD)
@Retention(RetentionPolicy.RUNTIME)
public @interface MakerCheckerEnabled {
    String operationType();   // e.g., "USER_CREATE", "CONFIG_UPDATE"
    String action();          // e.g., "CREATE", "UPDATE", "DELETE"
}
Step 2: Build the interceptor
The interceptor checks every request for the annotation. If found, it creates an approval record instead of passing the request to the controller:
JAVA
@Component
public class MakerCheckerInterceptor implements HandlerInterceptor {

    @Autowired
    private ApprovalRequestService approvalRequestService;

    @Override
    public boolean preHandle(HttpServletRequest request,
                             HttpServletResponse response,
                             Object handler) throws Exception {

        if (handler instanceof HandlerMethod handlerMethod) {
            MakerCheckerEnabled annotation =
                handlerMethod.getMethodAnnotation(MakerCheckerEnabled.class);

            if (annotation != null) {
                // Extract the request body (payload) from the cached request
                String payload = StreamUtils.copyToString(
                    request.getInputStream(), StandardCharsets.UTF_8);

                // Create an approval request instead of executing the operation
                ApprovalRequest approvalRequest = approvalRequestService.create(
                    annotation.operationType(),
                    annotation.action(),
                    payload,
                    SecurityContextHolder.getContext()   // maker identity
                );

                // Return the pending approval response — operation is NOT executed
                response.setStatus(HttpStatus.ACCEPTED.value());
                response.setContentType(MediaType.APPLICATION_JSON_VALUE);
                response.getWriter().write(
                    objectMapper.writeValueAsString(approvalRequest));

                return false;  // Short-circuit: do NOT proceed to the controller
            }
        }
        return true;  // Not a maker-checker endpoint — proceed normally
    }
}
Step 3: Annotate your controller endpoints
Add the annotation to any endpoint you want to require approval. The endpoint code stays the same—no changes needed. The annotation diverts requests to the approval queue instead:
JAVA
@RestController
@RequestMapping("/api/users")
public class UserController {

    @PostMapping
    @MakerCheckerEnabled(operationType = "USER", action = "CREATE")
    public ResponseEntity<User> createUser(@RequestBody CreateUserRequest request) {
        // This method body executes ONLY when called by the execution engine
        // after approval — never directly from the maker's HTTP request.
        User user = userService.create(request);
        return ResponseEntity.ok(user);
    }

    @DeleteMapping("/{id}")
    @MakerCheckerEnabled(operationType = "USER", action = "DELETE")
    public ResponseEntity<Void> deleteUser(@PathVariable UUID id) {
        userService.delete(id);
        return ResponseEntity.noContent().build();
    }
}
Step 4: Build the execution engine
The execution engine replays approved requests. It deserializes the original payload and makes an internal HTTP call to the endpoint, bypassing the interceptor this time so the actual code executes:
JAVA
@Service
public class ApprovalExecutionEngine {

    @Autowired
    private RestTemplate internalRestTemplate;

    @Transactional
    public void executeApprovedRequest(ApprovalRequest request) {
        request.setStatus(Status.PROCESSING);
        approvalRequestRepository.save(request);

        try {
            // Replay the original API call internally, bypassing the interceptor
            HttpHeaders headers = new HttpHeaders();
            headers.set("X-Bypass-MakerChecker", "true");  // skip interception
            headers.set("X-Executed-By", request.getCheckerUsername());

            HttpEntity<String> entity =
                new HttpEntity<>(request.getRequestPayload(), headers);

            ResponseEntity<String> result = internalRestTemplate.exchange(
                resolveEndpoint(request.getOperationType(), request.getAction()),
                resolveHttpMethod(request.getAction()),
                entity,
                String.class
            );

            request.setStatus(Status.APPROVED);
            request.setExecutedDate(Instant.now());
        } catch (Exception e) {
            request.setStatus(Status.FAILED);
            request.setFailureReason(e.getMessage());
        }

        approvalRequestRepository.save(request);
        notificationService.notifyOutcome(request);
    }
}
Critical point: The business controllers remain completely unaware of the approval workflow. The interceptor transparently diverts maker requests into the approval queue. The execution engine replays them only after a checker approves. Zero changes to existing business logic.
Key components of a queue-based system
A complete Maker-Checker system consists of five main components that work together to create the approval workflow. Each component has a distinct responsibility and can be implemented and tested independently.
- Approval request store: A database table capturing every request with its payload, status, maker/checker details, and timestamps. This is the single source of truth for all approval workflows.
- Request API: Endpoints for submitting requests (maker), listing pending requests (checker), approving/rejecting requests (checker), cancelling requests (maker), and searching/filtering requests (both). These endpoints form the interface that makers and checkers use.
- Execution engine: Deserializes the original payload and executes the operation upon approval. This component handles the actual execution with proper error handling and retry logic.
- Notification service: Alerts checkers about new pending requests and notifies makers about decisions. Notifications can be emails, Slack messages, in-app alerts, or other channels.
- Configuration module: Allows admins to enable/disable maker-checker per operation type without code changes. This makes the system flexible and allows gradual rollout.
Database schema for approval requests
The approval_requests table is the core of the queue-based system. It stores everything needed to understand, execute, and audit each request:
approval_requests
├── id (UUID)
├── operation_type (VARCHAR)      -- e.g., USER_CREATE, CONFIG_UPDATE
├── action (VARCHAR)              -- e.g., CREATE, UPDATE, DELETE
├── request_payload (JSON)        -- The full operation data
├── status (ENUM)                 -- PENDING, APPROVED, REJECTED, etc.
├── maker_id (UUID)               -- Who submitted
├── maker_username (VARCHAR)
├── maker_comments (TEXT)
├── checker_id (UUID)             -- Who reviewed
├── checker_username (VARCHAR)
├── checker_comments (TEXT)
├── created_date (TIMESTAMP)
├── reviewed_date (TIMESTAMP)
└── executed_date (TIMESTAMP)
Security requirements for dual authorization systems
Implementing dual-control correctly requires attention to several critical security boundaries. These aren't optional security features—they're foundational to the pattern. A Maker-Checker system with weak security can create a false sense of security while actually creating new vulnerabilities.
- Role separation - Enforce at the API level that a maker cannot call the approve endpoint for their own request.
- Permission granularity - Use fine-grained permissions:
a)MAKERrole: Can submit requests
b)CHECKERrole withREADaction: Can view pending requests
c)CHECKERrole withAPPROVEaction: Can approve/reject - Payload integrity - Store the exact payload at submission time. Never allow modification of a pending request's payload; require cancellation and re-submission instead.
- Audit trail - Log every state transition with immutable timestamps and user identifiers.
- Timeout policies - Consider auto-expiring requests that remain pending beyond a threshold.
Benefits of implementing dual-control authorization
Dual-control systems provide tangible business and operational benefits beyond regulatory compliance. These benefits accumulate over time as the system prevents incidents, catches errors, and creates accountability across the organization.
Benefits and impact of implementing dual-control authorization
| Benefit | Impact |
|---|---|
| Fraud Prevention | No single person can execute unauthorized changes |
| Error Reduction | Second pair of eyes catches mistakes before they go live |
| Regulatory Compliance | Meets SOX, PCI-DSS, banking regulations, and audit requirements |
| Accountability | Clear paper trail of who requested what and who approved it |
| Operational Control | Centralized view of all pending changes across the system |
A single unauthorized change could cost millions in fines or damage to customer trust. The cost of implementing Maker-Checker is far less than the cost of a single compliance violation or security incident.
Common mistakes when implementing maker-checker
These mistakes are common because they seem like reasonable shortcuts during initial implementation, but they create problems that become obvious only after deployment.
- Over-applying dual-control - Don't require approval for low-risk read operations. It creates friction without value.
- Single checker bottleneck - Ensure multiple users have checker permissions to avoid workflow stalls.
- Ignoring the FAILED state - Approval doesn't guarantee execution. Handle post-approval failures gracefully with retry mechanisms or alerts.
- Missing the cancel flow - Always let makers withdraw their own pending requests.
- No notification system - Without alerts, pending requests pile up unnoticed.
Advanced patterns and production concerns
Production Maker-Checker systems must handle complex scenarios beyond the basic six-step workflow. These advanced patterns address real-world requirements like high-value transaction approval, risk-based routing, performance at scale, and failure recovery.
Multi-level approval for high-risk operations
Not all operations carry the same risk. A routine user account creation might need one checker. A $1 million transaction transfer should require multiple levels of review. Risk-based routing automatically routes requests to different approval chains based on the operation's impact.
Use threshold-based routing: Route requests to different approval chains based on operation risk. A user can set up policies that say "transactions under $10K need one checker, transactions $10K-$100K need two checkers, transactions over $100K need three checkers and a manager."
Multi-level and hierarchical approvals
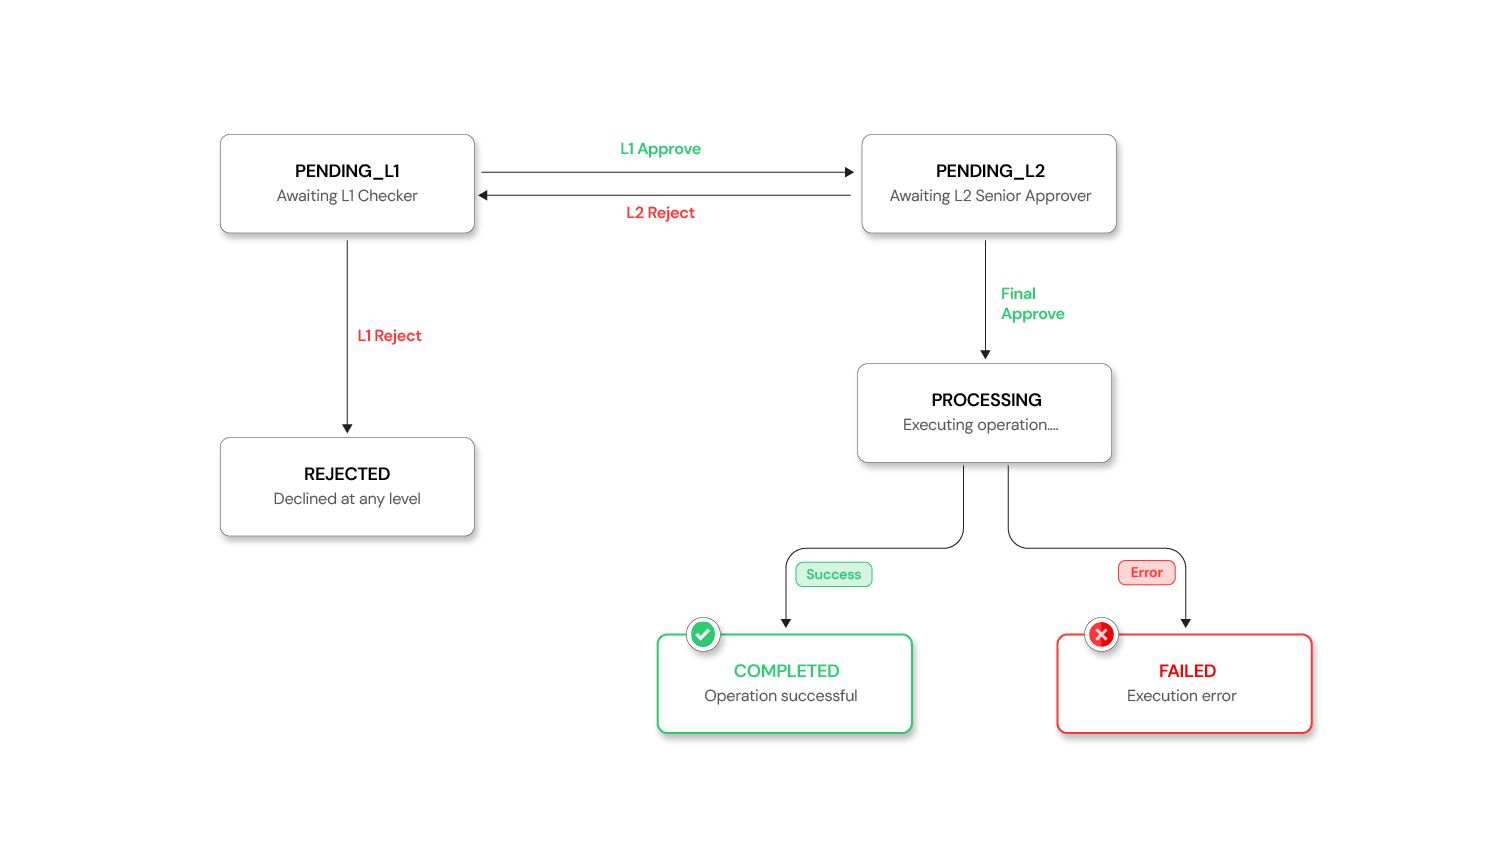
The diagram shows how requests branch to different approval chains based on their risk level or value.
Here's how to implement threshold-based routing:
JAVA
@Component
public class ApprovalChainResolver {

    @Autowired
    private ApprovalPolicyConfig policyConfig;

    public ApprovalChain resolve(ApprovalRequest request) {
        ApprovalPolicy policy = policyConfig.getPolicyFor(
            request.getOperationType());

        if (policy.requiresMultiLevel(request)) {
            // High-risk: L1 checker → L2 senior approver
            return ApprovalChain.builder()
                .addLevel(Level.L1, policy.getL1ApproverRoles())
                .addLevel(Level.L2, policy.getL2ApproverRoles())
                .build();
        }

        // Standard: single checker
        return ApprovalChain.singleLevel(policy.getDefaultApproverRoles());
    }
}
Configuration example with thresholds:
Approval policy configuration with thresholds (YAML)
YAML
approval-policies:
  TRANSACTION:
    default-level: 1
    thresholds:
      - condition: "amount > 10000"
        levels: 2
        l1-roles: [CHECKER]
        l2-roles: [SENIOR_APPROVER, COMPLIANCE_OFFICER]
      - condition: "amount > 100000"
        levels: 3
        l1-roles: [CHECKER]
        l2-roles: [SENIOR_APPROVER]
        l3-roles: [BRANCH_MANAGER]
  USER_DELETE:
    default-level: 2    # Always requires two levels
    l1-roles: [CHECKER]
    l2-roles: [ADMIN]
The state machine extends naturally — a request moves through PENDING_L1 → PENDING_L2 →PROCESSING → APPROVED, with each level having its own approve/reject capability:
Schema extension — add a current_approval_level and required_approval_levels column to approval_requests, and an approval_steps table to track each level's decision:
SQL
CREATE TABLE approval_steps (
    id                  UUID PRIMARY KEY,
    approval_request_id UUID REFERENCES approval_requests(id),
    level               INT,
    approver_id         UUID,
    approver_role       VARCHAR(50),
    decision            VARCHAR(20),   -- APPROVED, REJECTED
    comments            TEXT,
    decided_at          TIMESTAMP
);
Preventing concurrent approval race conditions
What happens when two checkers click "Approve" on the same request simultaneously? Without safeguards, the operation executes twice.
Concurrency and Race Conditions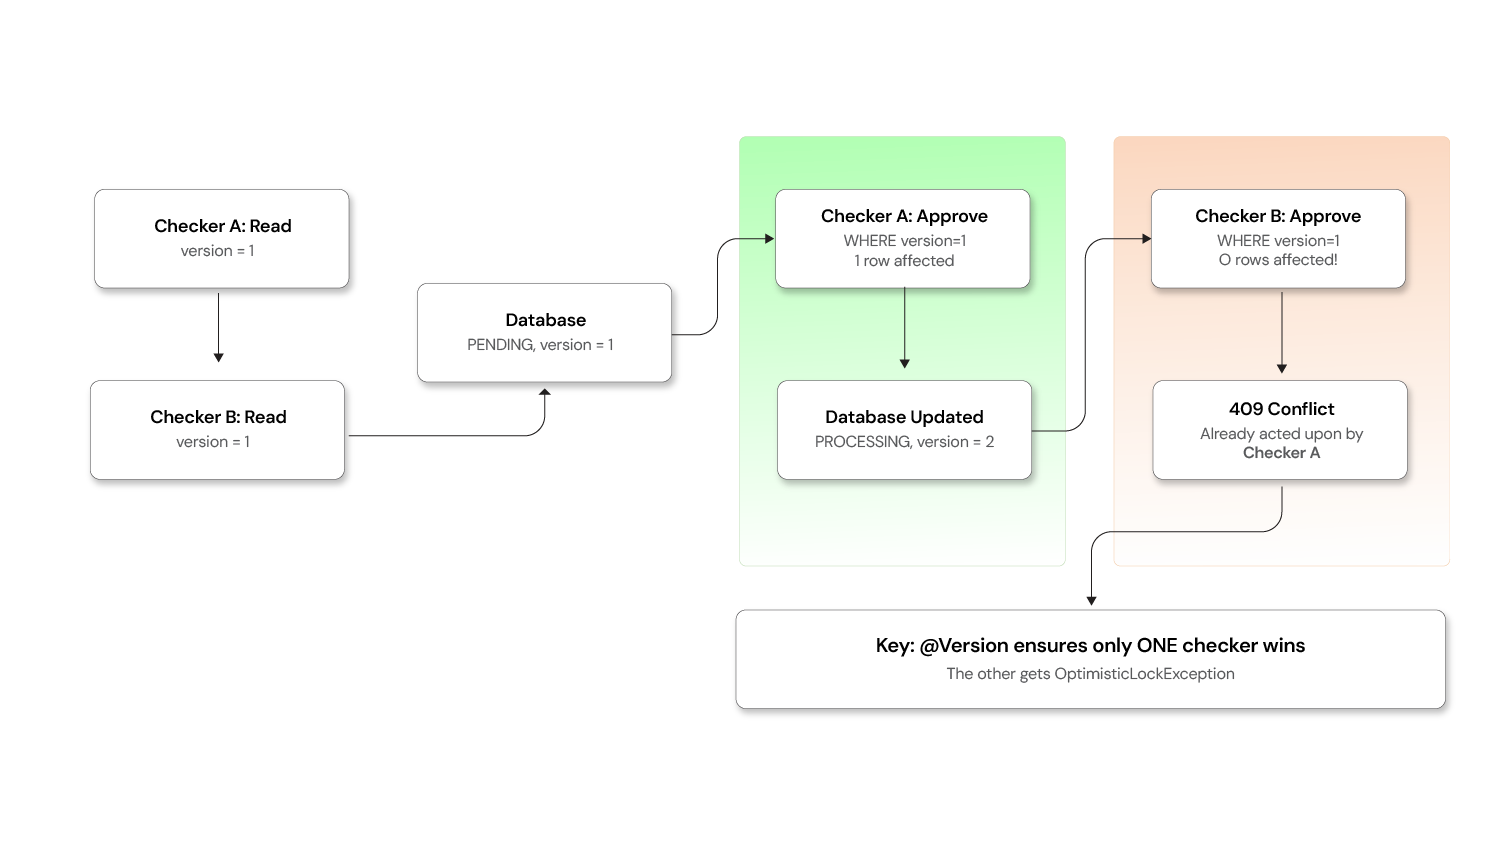 Use optimistic locking:
JAVA
@Entity
@Table(name = "approval_requests")
public class ApprovalRequest {

    @Id
    private UUID id;

    @Version   // JPA optimistic lock — auto-incremented on every update
    private Long version;

    @Enumerated(EnumType.STRING)
    private Status status;

    // ... other fields
}
When two checkers attempt concurrent updates, the second one gets an OptimisticLockException:
JAVA
@Service
public class CheckerService {

    @Transactional
    public ApprovalRequest approve(UUID requestId, UUID checkerId, String comments) {
        ApprovalRequest request = repository.findById(requestId)
            .orElseThrow(() -> new NotFoundException("Request not found"));

        if (request.getStatus() != Status.PENDING) {
            throw new IllegalStateException(
                "Request is no longer pending. Current status: " + request.getStatus());
        }

        request.setStatus(Status.PROCESSING);
        request.setCheckerId(checkerId);
        request.setCheckerComments(comments);
        request.setReviewedDate(Instant.now());

        try {
            return repository.save(request);  // Version check happens here
        } catch (OptimisticLockException e) {
            throw new ConflictException(
                "This request was already acted upon by another checker.");
        }
    }
}
Database-level safeguard as a belt-and-suspenders approach:
SQL
-- Ensure only one checker can transition a request out of PENDING
UPDATE approval_requests
SET    status = 'PROCESSING',
       checker_id = :checkerId,
       reviewed_date = NOW(),
       version = version + 1
WHERE  id = :requestId
  AND  status = 'PENDING'
  AND  version = :expectedVersion;

-- If affected rows = 0, another checker already acted
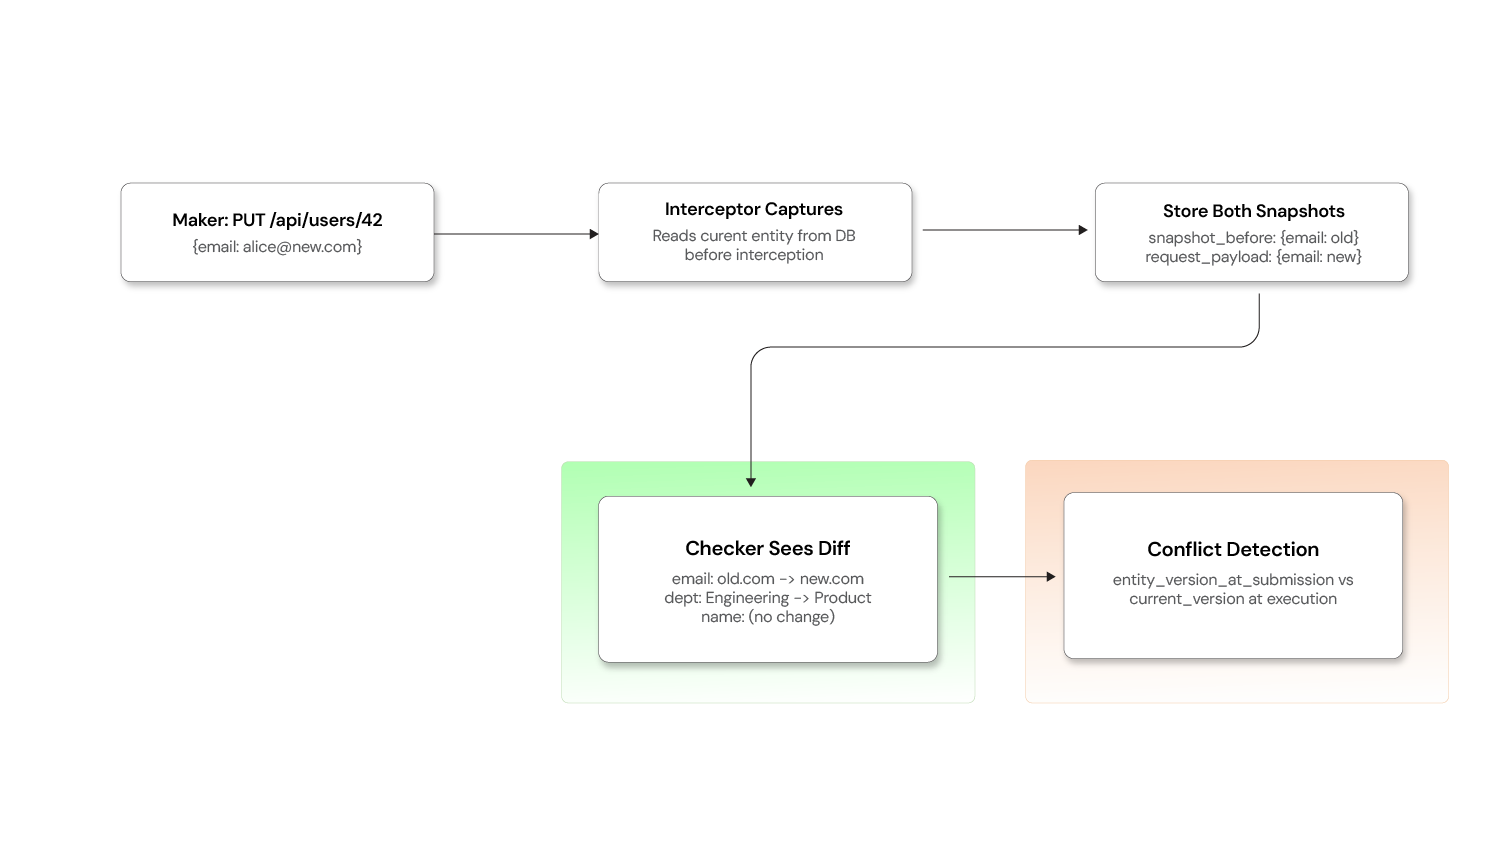
Detecting stale data and conflicts
A maker submits "change user email to alice@new.com". Before the checker approves, someone else updates that user's phone number. The approved operation could overwrite the newer phone number if it replaces the entire record.
Capture a version snapshot at submission time:
JAVA
@Service
public class ApprovalRequestService {

    public ApprovalRequest create(String operationType, String action,
                                   String payload, Object targetEntityId) {
        ApprovalRequest request = new ApprovalRequest();
        request.setOperationType(operationType);
        request.setAction(action);
        request.setRequestPayload(payload);

        // Capture the entity's current version at submission time
        if (action.equals("UPDATE") || action.equals("DELETE")) {
            Long entityVersion = entityVersionResolver.getCurrentVersion(
                operationType, targetEntityId);
            request.setEntityVersionAtSubmission(entityVersion);
        }

        return repository.save(request);
    }
}
At execution time, verify the version hasn't changed:
JAVA
@Service
public class ApprovalExecutionEngine {

    @Transactional
    public void executeApprovedRequest(ApprovalRequest request) {
        // For UPDATE/DELETE, check that the entity hasn't been modified since submission
        if (request.getEntityVersionAtSubmission() != null) {
            Long currentVersion = entityVersionResolver.getCurrentVersion(
                request.getOperationType(), request.getTargetEntityId());

            if (!currentVersion.equals(request.getEntityVersionAtSubmission())) {
                request.setStatus(Status.FAILED);
                request.setFailureReason(
                    "Conflict: the target entity was modified after this request "
                    + "was submitted. Please cancel and re-submit.");
                repository.save(request);
                notificationService.notifyConflict(request);
                return;
            }
        }

        // Safe to proceed — entity is unchanged
        proceed(request);
    }
}
Add entity_version_at_submission and target_entity_id columns to approval_requests to support this.
Escalation and SLA enforcement
Pending requests that linger without action become a silent bottleneck. Implement time-based escalation:
JAVA
@Component
public class EscalationScheduler {

    @Autowired
    private ApprovalRequestRepository repository;

    @Autowired
    private NotificationService notificationService;

    @Scheduled(fixedRate = 3600000)  // Run every hour
    public void escalateStalePendingRequests() {
        List<ApprovalRequest> staleRequests = repository.findByStatusAndCreatedBefore(
            Status.PENDING, Instant.now().minus(Duration.ofHours(24)));

        for (ApprovalRequest request : staleRequests) {
            int hoursPending = getHoursSinceCreation(request);

            if (hoursPending >= 72) {
                // Auto-expire after 72 hours
                request.setStatus(Status.EXPIRED);
                repository.save(request);
                notificationService.notifyExpired(request);

            } else if (hoursPending >= 48) {
                // Escalate to manager after 48 hours
                notificationService.escalateToManager(request);

            } else if (hoursPending >= 24) {
                // Remind checkers after 24 hours
                notificationService.sendReminder(request);
            }
        }
    }
}
Configure SLA thresholds:
SLA Escalation Configuration (YAML)
YAML
escalation:
  reminder-after-hours: 24
  escalate-to-manager-after-hours: 48
  auto-expire-after-hours: 72
  expired-status: EXPIRED         # or auto-reject
  notify-maker-on-expiry: true
  notify-admin-on-expiry: true
Add an EXPIRED state to your state machine alongside PENDING, APPROVED, REJECTED, CANCELLED, PROCESSING, and FAILED.
Handling bulk and batch operations
When a user uploads a CSV to import 500 records, choose your strategy based on atomicity requirements.
Bulk and batch operations
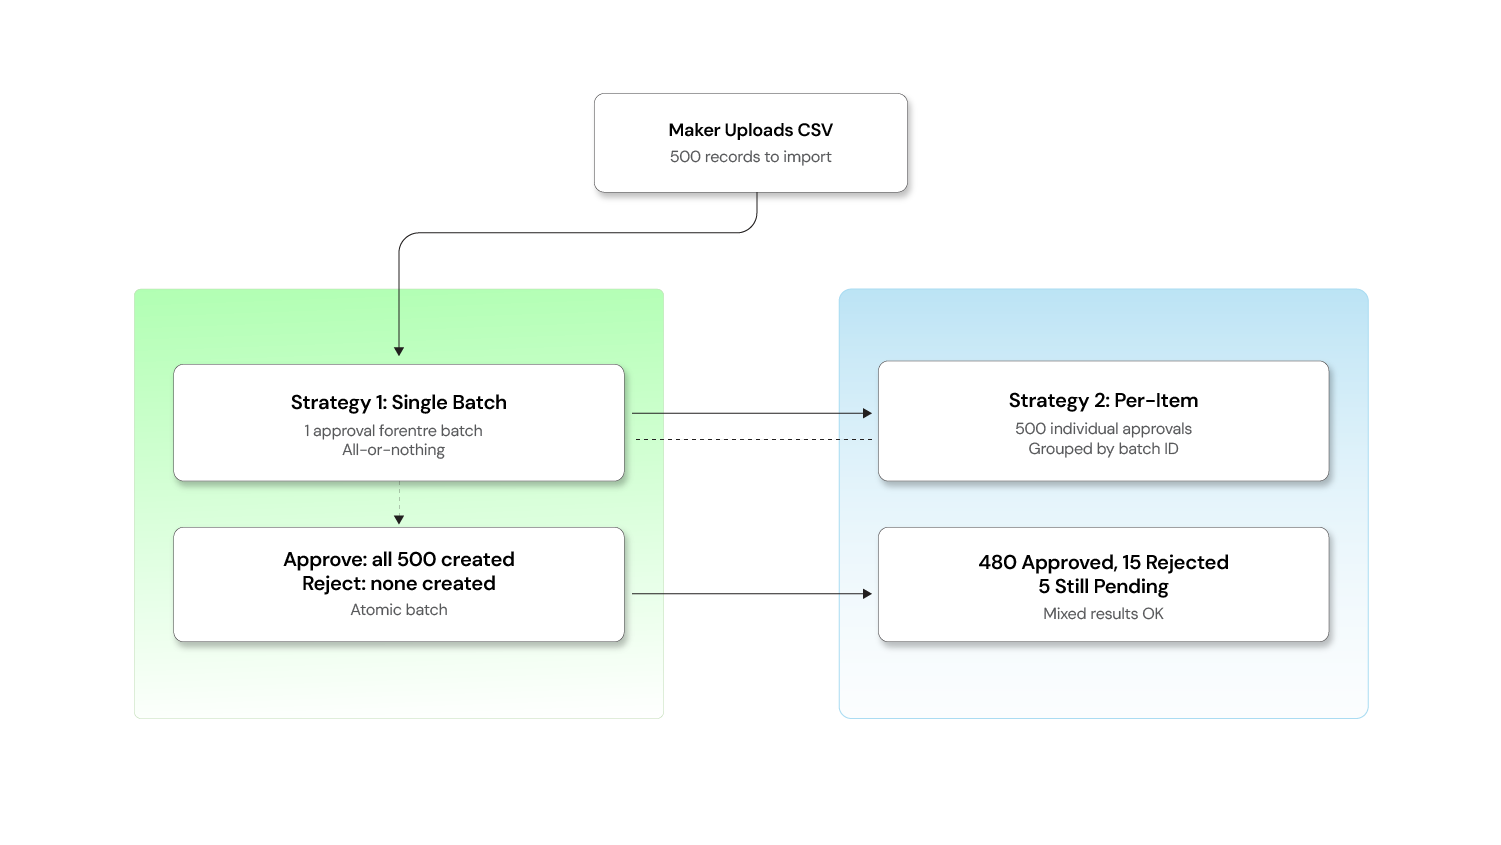
When a user uploads a CSV to import 500 records, you have two strategies:
Strategy 1: One approval for the entire batch
Best when the batch is atomic — either all records go through or none do.
JAVA
@PostMapping("/import")
@MakerCheckerEnabled(operationType = "USER_BULK_IMPORT", action = "CREATE")
public ResponseEntity<BatchImportResponse> bulkImport(
        @RequestBody List<CreateUserRequest> users) {
    // The entire list is stored as a single approval request payload
    return ResponseEntity.ok(userService.bulkCreate(users));
}
The checker sees: "Bulk import of 500 users" and can approve or reject the entire batch.
Strategy 2: Individual approval per item
Best when each record is independent and some may be valid while others are not.
JAVA
@PostMapping("/import")
public ResponseEntity<BatchSubmissionResult> bulkImport(
        @RequestBody List<CreateUserRequest> users) {

    String batchId = UUID.randomUUID().toString();
    List<ApprovalRequest> requests = users.stream()
        .map(user -> approvalRequestService.create(
            "USER", "CREATE",
            objectMapper.writeValueAsString(user),
            batchId    // Group them for the checker UI
        ))
        .toList();

    return ResponseEntity.accepted()
        .body(new BatchSubmissionResult(batchId, requests.size()));
}
The checker sees a grouped view: "Batch abc-123: 500 items pending" with the option to approve/reject individually or in bulk.
Hybrid approach: Use Strategy 1 for small batches (< 50 items) and Strategy 2 for large ones, configurable per operation type.
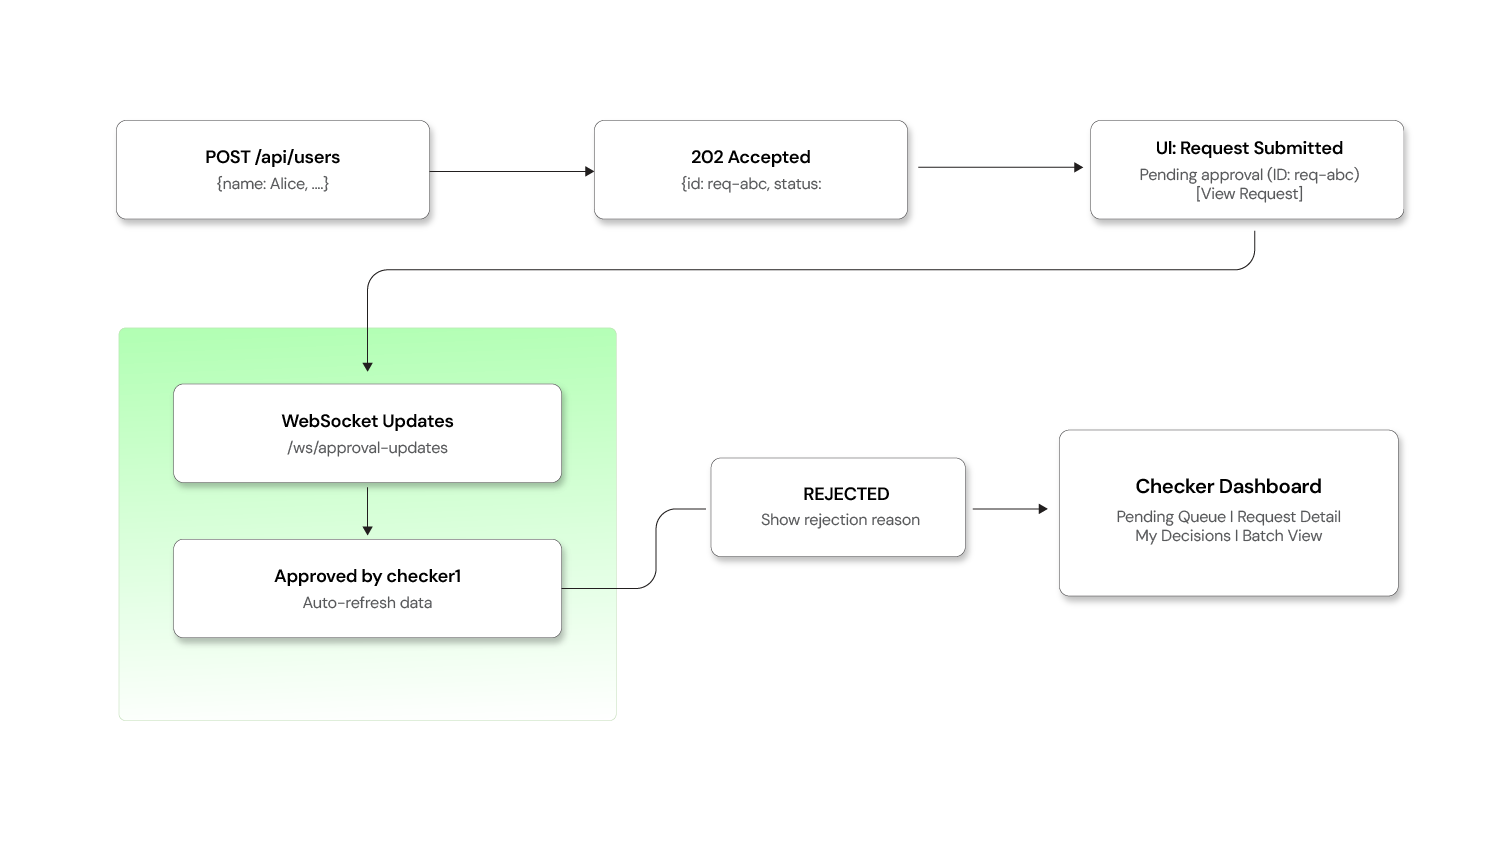
Frontend handling of 202 accepted responses
The backend returns 202 Accepted when a request enters the approval queue instead of the usual 200 OK. The frontend needs to handle this gracefully.
Frontend and client-side patterns
Handling the 202 response:
JAVASCRIPT
async function createUser(userData) {
  const response = await fetch('/api/users', {
    method: 'POST',
    headers: { 'Content-Type': 'application/json' },
    body: JSON.stringify(userData),
  });

  if (response.status === 202) {
    const approvalRequest = await response.json();
    // Show a "pending approval" message instead of "user created"
    showNotification({
      type: 'info',
      title: 'Request Submitted for Approval',
      message: `Your request (ID: ${approvalRequest.id}) is pending
                review by an authorized checker.`,
      action: {
        label: 'View Request',
        href: `/approval-requests/${approvalRequest.id}`,
      },
    });
    return { status: 'pending', approvalRequest };
  }

  if (response.ok) {
    const user = await response.json();
    showNotification({ type: 'success', title: 'User Created' });
    return { status: 'completed', data: user };
  }

  throw new ApiError(response);
}
Real-time status updates via WebSocket:
JAVASCRIPT
// Subscribe to approval status changes
const socket = new WebSocket('/ws/approval-updates');

socket.onmessage = (event) => {
  const update = JSON.parse(event.data);
  // update = { requestId, newStatus, checkerName, comments }

  if (update.newStatus === 'APPROVED') {
    showNotification({
      type: 'success',
      title: `Request Approved by ${update.checkerName}`,
    });
    refreshData();  // Reload the page data to show the executed result
  } else if (update.newStatus === 'REJECTED') {
    showNotification({
      type: 'warning',
      title: 'Request Rejected',
      message: update.comments,
    });
  }
};
Checker dashboard — key views and functionality:
| View | Purpose |
|---|---|
| Pending Queue | All requests awaiting review, sorted by urgency/SLA |
| My Decisions | History of requests this checker has approved/rejected |
| Request Detail | Full payload, maker info, timestamps, and diff view for updates |
| Batch View | Grouped view for bulk operation requests |
Diff view for UPDATE Operations
For CREATE and DELETE, the checker's review is straightforward — they see what's being added or removed. But for UPDATE operations, checkers need to see what exactly is changing.
Before vs. after Diff for UPDATE Operations
Capture the "before" snapshot at submission time:
JAVA
@Component
public class MakerCheckerInterceptor implements HandlerInterceptor {

    @Override
    public boolean preHandle(HttpServletRequest request,
                             HttpServletResponse response,
                             Object handler) throws Exception {
        // ... (annotation check as before)

        if (annotation != null && "UPDATE".equals(annotation.action())) {
            // Capture current state of the entity BEFORE the change
            String entityId = extractEntityId(request);
            Object currentState = entitySnapshotService.capture(
                annotation.operationType(), entityId);

            ApprovalRequest approvalRequest = approvalRequestService.create(
                annotation.operationType(),
                annotation.action(),
                payload,
                objectMapper.writeValueAsString(currentState)  // "before" snapshot
            );
            // ...
        }
    }
}
Schema addition:
SQL
ALTER TABLE approval_requests
    ADD COLUMN snapshot_before JSONB;   -- Entity state at submission time
    -- request_payload already holds the "after" state
Generating a readable diff for the checker UI:
JAVA
@Service
public class DiffService {

    public List<FieldChange> computeDiff(String beforeJson, String afterJson) {
        JsonNode before = objectMapper.readTree(beforeJson);
        JsonNode after = objectMapper.readTree(afterJson);

        List<FieldChange> changes = new ArrayList<>();
        Iterator<String> fieldNames = after.fieldNames();

        while (fieldNames.hasNext()) {
            String field = fieldNames.next();
            JsonNode beforeValue = before.get(field);
            JsonNode afterValue = after.get(field);

            if (beforeValue == null || !beforeValue.equals(afterValue)) {
                changes.add(new FieldChange(
                    field,
                    beforeValue != null ? beforeValue.asText() : "(not set)",
                    afterValue.asText()
                ));
            }
        }
        return changes;
    }
}
The checker now sees exactly what changed. This beats a rubber stamp approval.
Ensuring idempotent execution
If the execution engine crashes after executing the operation but before updating the status to APPROVED, a retry could double-execute the request (e.g., creating two users, debiting an account twice).
Idempotency in the execution engine

Solution: Use an idempotency key tied to the approval request ID.
JAVA
@Service
public class ApprovalExecutionEngine {

    @Transactional
    public void executeApprovedRequest(ApprovalRequest request) {
        // Check if this request was already executed (idempotency guard)
        if (executionLogRepository.existsByApprovalRequestId(request.getId())) {
            log.warn("Request {} already executed — skipping duplicate", request.getId());
            request.setStatus(Status.APPROVED);
            approvalRequestRepository.save(request);
            return;
        }

        request.setStatus(Status.PROCESSING);
        approvalRequestRepository.save(request);

        try {
            // Execute the operation
            Object result = executeOperation(request);

            // Log the execution BEFORE marking as approved (crash-safety)
            executionLogRepository.save(new ExecutionLog(
                request.getId(),
                Instant.now(),
                "SUCCESS",
                objectMapper.writeValueAsString(result)
            ));

            request.setStatus(Status.APPROVED);
            request.setExecutedDate(Instant.now());
        } catch (Exception e) {
            request.setStatus(Status.FAILED);
            request.setFailureReason(e.getMessage());
        }

        approvalRequestRepository.save(request);
    }
}
Execution log table:
SQL
CREATE TABLE execution_log (
    id                  UUID PRIMARY KEY,
    approval_request_id UUID UNIQUE REFERENCES approval_requests(id),
    executed_at         TIMESTAMP,
    outcome             VARCHAR(20),
    response_payload    JSONB
);
The UNIQUE constraint on approval_request_id acts as a database-level idempotency guard — even if the application-level check is bypassed due to a race condition, the database will reject a duplicate insert.
Delegation and proxy approval
When a checker is on leave or unavailable, pending requests shouldn't pile up. Support delegation so a checker can temporarily assign their approval authority to a colleague.
JAVA
@Entity
@Table(name = "approval_delegations")
public class ApprovalDelegation {

    @Id
    private UUID id;

    private UUID delegatorId;       // Checker who is delegating
    private UUID delegateId;        // Colleague who receives the authority
    private String operationType;   // Optional: limit to specific operation types
    private Instant validFrom;
    private Instant validUntil;
    private boolean active;
}
JAVA
@Service
public class CheckerService {

    public boolean isAuthorizedChecker(UUID userId, ApprovalRequest request) {
        // Direct checker authority
        if (hasCheckerRole(userId, request.getOperationType())) {
            return true;
        }

        // Delegated authority
        return delegationRepository.existsActiveDelegation(
            userId, request.getOperationType(), Instant.now());
    }
}
All delegation activity should be logged in the audit trail — the approval record should capture both the delegate who acted and the original delegator whose authority was used.
Performance and archival strategy
The approval_requests table grows with every operation. Without a plan, query performance degrades over time.
Indexing:
SQL
-- Fast lookup for checker dashboard (pending requests)
CREATE INDEX idx_approval_status ON approval_requests(status)
    WHERE status = 'PENDING';

-- Fast lookup for maker's "My Requests" view
CREATE INDEX idx_approval_maker ON approval_requests(maker_id, created_date DESC);

-- Fast lookup for search and filtering
CREATE INDEX idx_approval_type_date ON approval_requests(operation_type, created_date DESC);
Archival strategy:
SQL
-- Move completed requests older than 90 days to an archive table
INSERT INTO approval_requests_archive
SELECT * FROM approval_requests
WHERE status IN ('APPROVED', 'REJECTED', 'CANCELLED', 'EXPIRED', 'FAILED')
  AND created_date < NOW() - INTERVAL '90 days';

DELETE FROM approval_requests
WHERE status IN ('APPROVED', 'REJECTED', 'CANCELLED', 'EXPIRED', 'FAILED')
  AND created_date < NOW() - INTERVAL '90 days';
Keep the main table lean (only active/recent requests) while preserving the full audit trail in the archive. For compliance, the archive should be append-only with no update or delete permissions.
Testing Maker-Checker workflows
Maker-Checker introduces a multi-step, multi-user workflow that is difficult to test manually. Invest in integration tests from the start.
JAVA
@SpringBootTest
@AutoConfigureMockMvc
class MakerCheckerIntegrationTest {

    @Autowired private MockMvc mockMvc;
    @Autowired private ApprovalRequestRepository repository;

    @Test
    void makerSubmit_shouldCreatePendingRequest() throws Exception {
        mockMvc.perform(post("/api/users")
                .with(user("maker1").roles("MAKER"))
                .contentType(MediaType.APPLICATION_JSON)
                .content("{\"name\":\"Alice\",\"email\":\"alice@test.com\"}"))
            .andExpect(status().isAccepted())
            .andExpect(jsonPath("$.status").value("PENDING"));

        assertThat(repository.findAll()).hasSize(1);
        assertThat(repository.findAll().get(0).getStatus()).isEqualTo(Status.PENDING);
    }

    @Test
    void selfApproval_shouldBeRejected() throws Exception {
        // Maker submits
        String requestId = submitAsUser("maker1");

        // Same user tries to approve — should fail
        mockMvc.perform(post("/api/approval-requests/" + requestId + "/approve")
                .with(user("maker1").roles("CHECKER")))
            .andExpect(status().isForbidden());
    }

    @Test
    void checkerApprove_shouldExecuteOperation() throws Exception {
        // Maker submits
        String requestId = submitAsUser("maker1");

        // Different checker approves
        mockMvc.perform(post("/api/approval-requests/" + requestId + "/approve")
                .with(user("checker1").roles("CHECKER"))
                .content("{\"comments\":\"Looks good\"}"))
            .andExpect(status().isOk())
            .andExpect(jsonPath("$.status").value("APPROVED"));

        // Verify the user was actually created
        mockMvc.perform(get("/api/users")
                .with(user("admin").roles("ADMIN")))
            .andExpect(jsonPath("$[?(@.email=='alice@test.com')]").exists());
    }

    @Test
    void concurrentApproval_shouldAllowOnlyOne() throws Exception {
        String requestId = submitAsUser("maker1");

        // Simulate concurrent approval attempts
        CompletableFuture<MvcResult> approve1 = CompletableFuture.supplyAsync(() ->
            approveAsUser(requestId, "checker1"));
        CompletableFuture<MvcResult> approve2 = CompletableFuture.supplyAsync(() ->
            approveAsUser(requestId, "checker2"));

        CompletableFuture.allOf(approve1, approve2).join();

        // Exactly one should succeed, one should get 409 Conflict
        long successCount = Stream.of(approve1.get(), approve2.get())
            .filter(r -> r.getResponse().getStatus() == 200)
            .count();
        assertThat(successCount).isEqualTo(1);
    }
}
Key test scenarios to cover:
| Scenario | What to Assert |
|---|---|
| Maker submits | Request created with PENDING status, 202 returned |
| Self-approval blocked | 403 Forbidden when maker == checker |
| Checker approves | Status → APPROVED, operation executed |
| Checker rejects | tatus → REJECTED, no side effects |
| Maker cancels | Status → CANCELLED, only works while PENDING |
| Concurrent approvals | Only one succeeds, other gets 409 |
| Stale data conflict | FAILED with conflict message |
| Expired request | Status → EXPIRED after SLA timeout |
| Delegated approval | Delegate can approve, audit trail shows delegation |
Retrofitting Maker-Checker into existing systems
One of the most common questions teams face is: "We have a running product with no Maker-Checker support. How do we add it without rewriting everything?"
Retrofitting Maker-Checker into an existing product
The queue-based interceptor approach described in this blog is specifically designed for this scenario. Here's a practical adoption strategy:
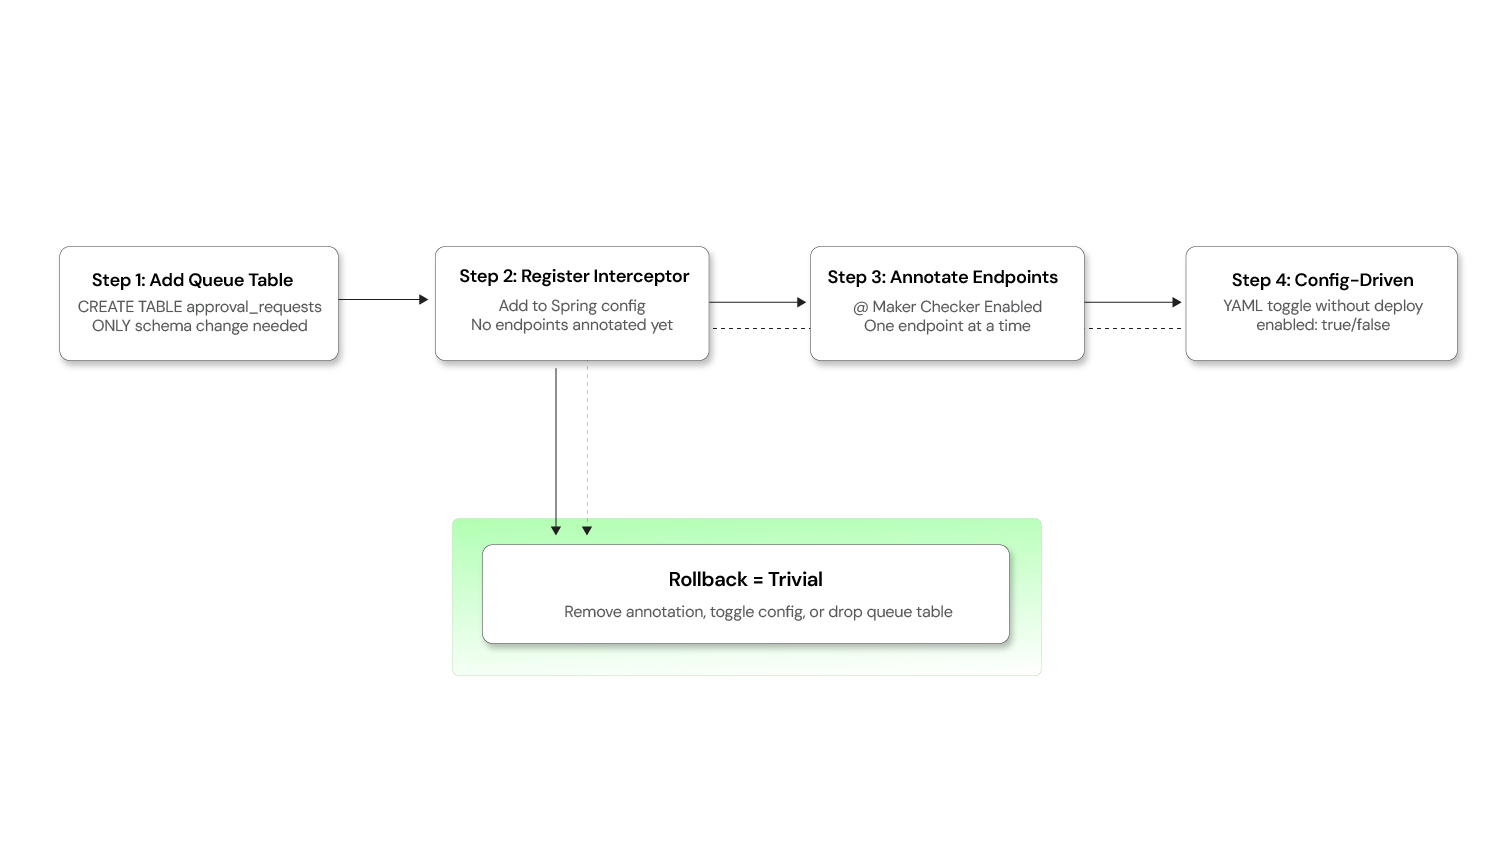
Step 1: Add the approval queue — No schema changes required
Create a single approval_requests table (as described in the schema above). This is the only database change needed. Your existing business tables remain completely untouched.
SQL
-- This is the ONLY new table required
CREATE TABLE approval_requests (
    id                UUID PRIMARY KEY,
    operation_type    VARCHAR(100),
    action            VARCHAR(50),
    request_payload   JSONB,
    status            VARCHAR(20) DEFAULT 'PENDING',
    maker_id          UUID,
    checker_id        UUID,
    created_date      TIMESTAMP DEFAULT NOW(),
    reviewed_date     TIMESTAMP,
    executed_date     TIMESTAMP
);
Step 2: Introduce the interceptor layer
Register the Maker-Checker interceptor in your application (as shown in the code snippets above). At this point, the interceptor is active but no endpoints are annotated — so the system behaves exactly as before.
Step 3: Enable incrementally, one endpoint at a time
This is where the approach shines. You can enable Maker-Checker on a per-endpoint basis simply by adding the @MakerCheckerEnabled annotation:
JAVA
// Before: direct execution
@PostMapping
public ResponseEntity<Config> createConfig(@RequestBody ConfigRequest req) { ... }

// After: routed through approval queue — one annotation, zero logic changes
@PostMapping
@MakerCheckerEnabled(operationType = "CONFIG", action = "CREATE")
public ResponseEntity<Config> createConfig(@RequestBody ConfigRequest req) { ... }
No changes to the method body. No changes to the service layer. No schema migrations on the config table.
Step 4: Make it configuration-driven (optional)
For even more flexibility, move the annotation into a configuration file so that Maker-Checker can be toggled without code deployments:
YAML
maker-checker:
  enabled-operations:
    - operation: USER_CREATE
      endpoint: POST /api/users
      enabled: true
    - operation: CONFIG_UPDATE
      endpoint: PUT /api/configurations/{id}
      enabled: true
    - operation: ROLE_DELETE
      endpoint: DELETE /api/roles/{id}
      enabled: false    # Not yet ready for dual control
Why this works for retrofitting
| Concern | How it's addressed |
|---|---|
| Existing schema changes? | None. Business tables are untouched |
| Existing API contracts? | Preserved. Clients still call the same endpoints |
| Big-bang rollout risk? | Eliminated. Enable one operation at a time |
| Rollback if something breaks? | Remove the annotation or toggle the config flag |
| Testing burden | Minimal. Only the annotated endpoints need Maker-Checker testing |
The key insight is that the queue-based interceptor pattern treats Maker-Checker as a cross-cutting infrastructure concern rather than a per-entity feature. This makes adoption incremental, reversible, and non-disruptive.
Build your dual-control system
Maker-Checker is a trust architecture that builds accountability, auditability, and resilience into your platform. Implementing it correctly requires expertise in architecture, security, and database design.
Opcito's Security Product Engineering team has built Maker-Checker systems for financial platforms and regulated enterprises. They can help you navigate the architectural decisions and avoid common pitfalls during production deployment.
For a technical consultation, contact Opcito's engineering experts to discuss your implementation strategy.


Related Blogs