Posted By

User authentication is necessary to safeguard sensitive data and functionalities by ensuring only authorized users have access. It also enables personalization of the user experience and facilitates accountability by tracking user actions within systems. Additionally, compliance with regulatory requirements and building trust with users are key drivers for implementing robust authentication mechanisms.
When considering top-tier tools for modern web application development, FastAPI and JSON Web Tokens emerge as prime candidates. FastAPI boasts high-performance API development in Python, while JSON Web Tokens ensure secure authentication data transmission between client and server.
Let's delve into the critical role of user authentication. We'll explore a step-by-step code walkthrough to set up FastAPI, create access tokens, and seamlessly integrate JWT for robust authentication. Additionally, we'll uncover effective testing methods and address JWT token limitations, while implementing solutions like token revocation, refreshing, and Role-Based Access Control (RBAC).
For engineering leads and security architects evaluating API authentication strategies, the choice of tooling has downstream consequences beyond the initial implementation. Poorly implemented authentication is one of the most common entry points for API-level attacks — and fixing it post-launch is significantly more expensive than getting it right during development. FastAPI combined with JWT gives teams a well-documented, widely adopted pattern that is straightforward to audit, easy to test, and compatible with modern DevSecOps pipelines. If your team is standardizing API security practices across microservices, this is a solid foundation to build on.
Why is authentication important for secure APIs?
User authentication is like a website's guardian, ensuring that only the right people get access. It's all about checking if someone is who they say they are. This can involve using passwords, fingerprints, or two-step authentications. The best part about authentication is that it protects important information, keeps data safe, and stops random folks from sneaking into places they shouldn't be. But, if we don't set it up right, it's like leaving the front door open – risky and not a good idea.
With the growing use of microservices and distributed architectures, APIs can no longer be ignored. Ensuring secure APIs through proper authentication prevents misuse and keeps applications resilient.
Why is FastAPI the best choice for building secure Python APIs?
FastAPI is a highly-regarded premier web framework. Users love it because it is speedy, easy to use, and comes with features like creating API documentation automatically through OpenAPI and JSON Schema. It's competent at handling many things simultaneously, thanks to its support for programming tricks like asynchronous coding and type annotations in Python. FastAPI's mix of speed, simplicity, and modern features makes it the go-to choice for developers who want to build robust and scalable web apps. It is super easy to understand and can tackle even the trickiest tasks, making it a favorite in the web development world. For teams comparing FastAPI vs Flask or FastAPI vs Django REST Framework, FastAPI's native async support and automatic OpenAPI docs give it a clear edge for building high-performance, secure APIs at scale.
Why choose JWT over API keys and OAuth2 for FastAPI authentication?
JSON Web Token (JWT) is an open standard (RFC 7519) that defines a compact and self-contained way for securely transmitting information between parties as a JSON object. JWT is widely used for token-based authentication because it is lightweight, stateless, and easy to integrate with frameworks like FastAPI.
- JWT provides a secure and compact format for user information and authentication.
- They contain all user information in the encoded payload, avoiding excessive queries.
- If not using JWT, other standard authentication options include API keys or OAuth2.
- JWT is chosen over API keys due to the ability to encode rich claims like user roles. (This makes JWT the best fit for distributed systems where passing user context across service boundaries without hitting a central session store is a hard requirement.)
- OAuth2 is more complex and centred around authorization, while JWT focuses on authentication.
Compared to other methods like sessions or API keys, JWT fits perfectly into microservices architectures and DevSecOps pipelines where scalability and statelessness are required.
Note: For enterprises looking to strengthen authentication and cloud-native security, explore Opcito’s Cloud Security and Monitoring services.
How do you set up FastAPI and JWT in a Python project?
To set up authentication in FastAPI with JWT, you need to first create a project structure and install dependencies.
Project file structure:
myproject
├── main.py
├── requirements.txt
└── venv
main.py - The main Python file that contains the FastAPI app and routes. This file starts the server and runs the application.
requirements.txt - This text file lists all the Python package dependencies required for the project. It allows easy installation of the dependencies using pip install -r requirements.txt.
In our case, we'll have the following packages in our requirements.txt
fastapi~=0.109.0
uvicorn~=0.26.0
pyjwt~=2.8.0
passlib~=1.7.4
venv/ - This directory contains the Python virtual environment for isolating the project dependencies. The virtual environment was created using python -m venv venv. Use source venv/bin/activate to activate your created Virtual environment.
Let's break down the provided code for FastAPI JWT setup:
## Import necessary modules we import necessary modules, including FastAPI, OAuth2PasswordBearer for token handling, JOSE for JWT decoding, and passlib for password hashing.
from FastAPI import FastAPI, HTTPException, Depends
from FastAPI.security import OAuth2PasswordBearer
from jose import JWTError, jwt
from passlib.context import CryptContext
from datetime import datetime, timedelta
from typing import List
## Create FastAPI app instance
app = FastAPI()
## Set up secret key, algorithm, and token expiration time
SECRET_KEY = "your_secret_key"
ALGORITHM = "HS256"
ACCESS_TOKEN_EXPIRE_MINUTES = 30
- The SECRET_KEY parameter is a critical component in the JWT authentication setup. It acts as the secret cryptographic key used to create and verify the token's integrity. This key should be kept confidential and known only to the server. Using a strong, unique secret key is essential for preventing unauthorized parties from tampering with or forging tokens.
- The ALGORITHM parameter specifies the cryptographic algorithm used to sign the JWT. JWTs can be signed using various algorithms, such as HMAC (Hash-based Message Authentication Code) or RSA (Rivest–Shamir–Adleman). The choice of algorithm depends on the security requirements of the application.
- The variable ACCESS_TOKEN_EXPIRE_MINUTES appears to be defining the expiration time (in minutes) for an access token.
## Define a User class for authentication. The User class represents the user model.
The __init__ method is responsible for initializing instances of the User class. When a new user is created, their username and password are provided as parameters and stored as attributes of the instance.
class User:
    def __init__(self, username: str, password: str = None):
        self.username = username
        self.password = password
Take the example user data for demonstration. Here, fake_users_db holds example user data. You can integrate a database like SQLite if you want.
fake_users_db = {
    "testuser": {
        "username": "testuser",
        "password": "$2b$12$E22vUvFK2UjsiAQY6BY0J.x6vZr6Hm9X8/Jfz/uhH2I8noX86.3aG",  # hashed password
    }
}
## Define a dependency to get the current user from the token. We have created the get_current_user function, which extracts user information from the JWT token.
The get_current_user dependency serves an essential purpose in the JWT authentication flow:
It allows validating the JWT token and extracting user information from it on every request.
Here's why it's needed:
- JWT tokens encode user identity and other claims as an encrypted payload.
- On every request, we need to decode the JWT token from the Authorization header to validate it and get user information.
- Doing JWT decoding on every request manually would be repetitive.
- FastAPI dependencies provide an elegant way to execute logic before each request.
So, get_current_user dependency:
- Automatically extracts and decodes the JWT token from the Authorization header using OAuth2PasswordBearer.
- Decodes the JWT token using the secret key to validate it.
- If valid, it returns the decoded user information.
- If invalid, it raises a credentials exception.
- This handles JWT decoding and validation on each request.
So, it encapsulates JWT decoding logic in a reusable way across routes.
Now let’s dive into the code,
# Create an OAuth2PasswordBearer instance
oauth2_scheme = OAuth2PasswordBearer(tokenUrl="token")
def get_current_user(token: str = Depends(oauth2_scheme)):
    credentials_exception = HTTPException(
        status_code=401,
        detail="Could not validate credentials",
        headers={"WWW-Authenticate": "Bearer"},
    )
    try:
        # Decode the JWT token and extract the username
        payload = jwt.decode(token, SECRET_KEY, algorithms=[ALGORITHM])
        username: str = payload.get("sub")
        if username is None:
            raise credentials_exception
    except JWTError:
        raise credentials_exception
    return User(username=username, password=None)
## Now let's create the access token. The create_access_token function generates a JWT token with an optional expiration time.
def create_access_token(data: dict, expires_delta: timedelta = None):
    to_encode = data.copy()
    if expires_delta:
        expire = datetime.utcnow() + expires_delta
    else:
        expire = datetime.utcnow() + timedelta(minutes=15)
    to_encode.update({"exp": expire})
    encoded_jwt = jwt.encode(to_encode, SECRET_KEY, algorithm=ALGORITHM)
    return encoded_jwt
## The pwd_context = CryptContext() line is used to set up password hashing with bcrypt for secure password storage.
pwd_context = CryptContext(schemes=["bcrypt"], deprecated="auto")
## Now let's create a route to obtain a token. The /token route validates user credentials, creates an access token, and returns it.
@app.post("/token")
async def login_for_access_token(form_data: dict):
    user = fake_users_db.get(form_data["username"])
    if user and form_data["password"] == user["password"]:
        # If credentials are valid, create and return an access token
        token_expires = timedelta(minutes=ACCESS_TOKEN_EXPIRE_MINUTES)
        access_token = create_access_token(data={"sub": user["username"]}, expires_delta=token_expires)
        return {"access_token": access_token, "token_type": "bearer"}
    # If credentials are invalid, raise an HTTPException
    raise HTTPException(status_code=401, detail="Invalid credentials")
## Now /todos/ route is our protected route requiring authentication through the get_current_user dependency.
@app.get("/todos/", response_model=List[str])
async def read_items(current_user: User = Depends(get_current_user)):
    try:
        # Replace this with your actual logic to fetch todos
        todos_data = ["Buy Vegetables", "Read a book", "Learn FastAPI"]
        return todos_data
    except Exception as e:
        print(f"Exception in read_items: {e}")
        raise HTTPException(status_code=500, detail="Internal Server Error")
## Run the app using uvicorn, uvicorn will load app and run server
if __name__ == "__main__":
    import uvicorn

    uvicorn.run(app, host="127.0.0.1", port=8001)
How do you test the JWT implementation in FastAPI using Postman?
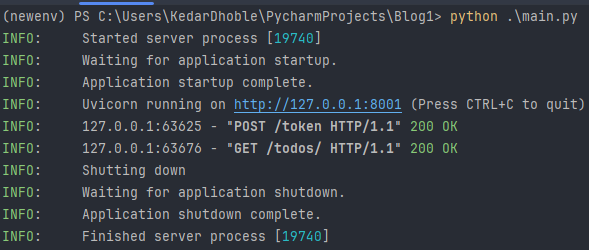
Step 1: Start the FastAPI server by running the main Python file from your terminal with the command python main.py.
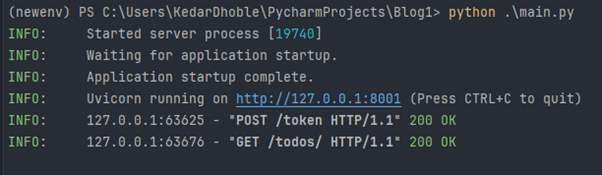
Step 2: Acquire a JWT token by sending a POST request to the /token endpoint with a valid username and password in the request body as raw JSON.
- Request Method: POST
- Body: RawJSON :
{
"username": "testuser",
"password": "your_actual_plain_text_password"
}
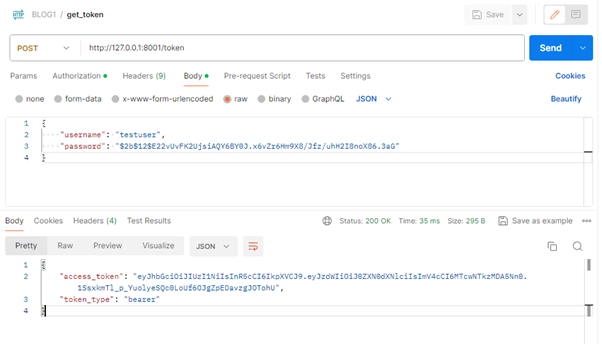
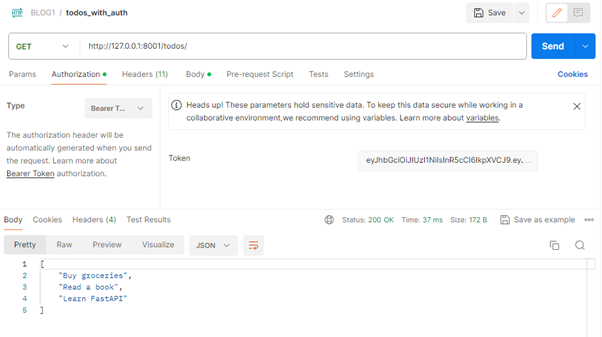
Step 3: After getting the Token follow below steps
- Create a new request in Postman.
- Request method: GET
- URL: http://127.0.0.1:8001/todos/
- In the "Authorization" tab:
- Choose "Bearer Token" as the type.
- In the "Token" field, paste your JWT token.
- Click "Send" to make the request and if the JWT is correct you’ll get the authorization.
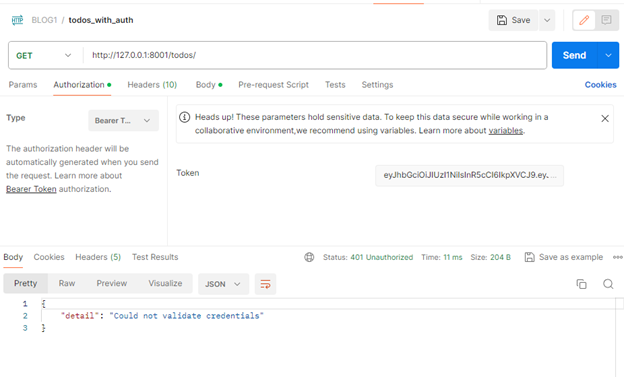
Below are failing cases:
- If you don’t pass the authorization token that you got from the get token API, you may see this response.
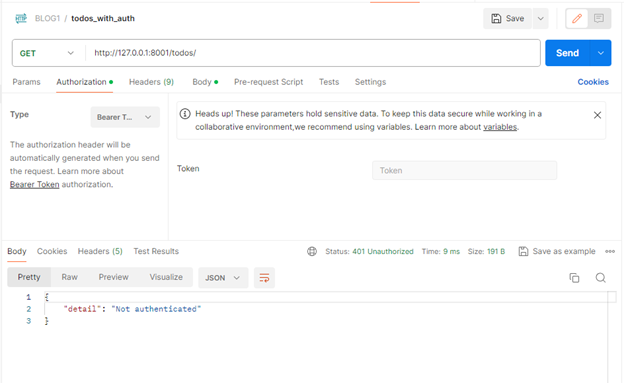
- If you pass the wrong authorization token that you got from the get token API, you may see this response.
Step 4: Check the server-side logs. You should see a "200 OK" HTTP response code printed for the authorized request on success.
Step 5: To stop the FastAPI server, press 'Ctrl+C' in the terminal window where it is running.
Now, let's explore the limitations of JWT tokens and solutions to tackle them.
What are the top limitations of JWT tokens you need to know?
- Token revocation: JWT tokens, once issued, cannot be easily revoked before their expiration. This presents a challenge in scenarios where immediate revocation is necessary, such as when a user logs out or experiences a security breach. For applications in regulated industries — fintech, healthcare, or enterprise SaaS — this limitation needs an explicit mitigation strategy before you go to production.
- Stateless nature: JWT tokens are stateless, meaning any changes in the server state are not reflected until the token expires. This limitation can be problematic when handling scenarios that require real-time access management.
- Payload size: The information stored within a JWT token is encoded directly into the token itself. As a result, if an application requires a significant amount of user-related data, the payload size can become a concern.
How do you solve the most common JWT token limitations in FastAPI?
Token Revocation
from fastapi import FastAPI, Depends, HTTPException
from fastapi.security import OAuth2PasswordBearer

app = FastAPI()

# Simulated OAuth2 scheme for token validation
oauth2_scheme = OAuth2PasswordBearer(tokenUrl="token")

# Blacklist for revoked tokens
token_blacklist = set()

# Dependency to check token revocation
def is_token_revoked(token: str = Depends(oauth2_scheme)):
    """
    Dependency function to check if a token is revoked before processing a request.
    """
    if token in token_blacklist:
        raise HTTPException(status_code=401, detail="Token has been revoked")
    return token

# Route to revoke a token
@app.post("/token/revoke")
async def revoke_token(token: str = Depends(oauth2_scheme)):
    """
    Route to revoke a token and add it to the blacklist.
    """
    token_blacklist.add(token)
    return {"detail": "Token revoked successfully"}

# Example secure route using the token revocation check
@app.get("/secure-data/")
async def get_secure_data(current_user: str = Depends(is_token_revoked)):
    """
    A secure route that requires a valid token.
    """
    return {"message": "This is secure data!"}
Refreshing tokens
Token refreshing is an effective approach to tackle token expiration without inconveniencing users with repeated logins. The provided code snippet generates a new access token without requiring users to re-enter their credentials. This helps maintain a seamless user experience.
## The /token/refresh generates a new access token if the current user is authenticated.
@app.post("/token/refresh")
async def refresh_token(current_user: User = Depends(get_current_user)):
    token_expires = timedelta(minutes=ACCESS_TOKEN_EXPIRE_MINUTES)
    new_access_token = create_access_token(data={"sub": current_user.username}, expires_delta=token_expires)
    return {"access_token": new_access_token, "token_type": "bearer"}
- It's important to note that token refreshing introduces the concept of a refresh token, a separate token responsible for acquiring new access tokens. The refresh token is longer-lived than access tokens, enhancing security by minimizing the exposure of user credentials.
Role-Based Access Control (RBAC)
Implementing Role-Based Access Control allows fine-grained control over user permissions.
# Example roles
class UserRole:
    ADMIN = "admin"
    USER = "user"
# Update the User class with roles
class User:
    def __init__(self, username: str, password: str, role: str):
        self.username = username
        self.password = password
        self.role = role
# Update the /todos/ route to check user roles
@app.get("/todos/", response_model=List[str])
async def read_items(current_user: User = Depends(get_current_user)):
    try:
        # Check if the user has the required role
        if current_user.role == UserRole.ADMIN:
            # Admin-specific logic
            return ["Manage Todos"]
        elif current_user.role == UserRole.USER:
            # User-specific logic
            todos_data = ["Buy Vegetables", "Read a book", "Learn FastAPI"]
            return todos_data
    except Exception as e:
        print(f"Exception in read_items: {e}")
        raise HTTPException(status_code=500, detail="Internal Server Error")
Now, the /todos/ route checks the user's role and provides different responses based on their permissions.
While JWT-based authentication secures application access, organizations also need broader protection across cloud environments. That’s where CNAPP comes in, bringing runtime visibility, compliance, and threat detection at scale. Whether you're building a greenfield API or hardening an existing one, getting JWT authentication right in FastAPI is one of the best investments your team can make in long-term API security.
How can Opcito help you build and audit secure FastAPI authentication?
Implementing user authentication in FastAPI with JWT tokens provides a secure and efficient solution. By addressing the limitations and applying best practices, developers can create robust authentication systems that meet the needs of their applications. Remember to thoroughly test your authentication mechanisms and adapt the provided code to fit the specific requirements of your project. Opcito’s experts are ready to help you design, implement, and audit secure authentication architectures. Write to us at contact@opcito.com and we'll support you.