


Posted By

Have you ever built a cloud application that uses multiple Virtual Private Clouds (VPCs) in AWS? But then a question arises – what if these isolated VPCs need to interact with each other privately, without compromising security? This is where VPC peering comes to the rescue. In this blog, we'll delve into the world of VPC peering and explore how it establishes a secure, private network connection between your VPCs, acting as a dedicated bridge within the AWS cloud.
What is VPC peering?
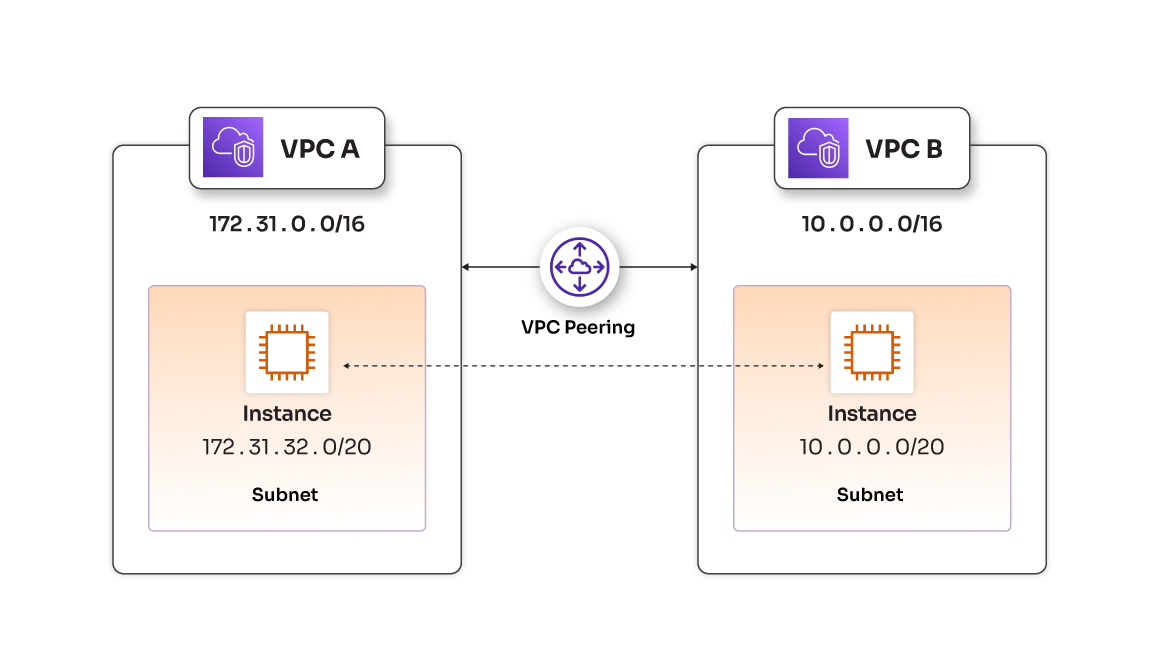
VPC Peering in AWS establishes a secure and private network connection between two VPCs, acting as a bridge within the AWS cloud. This allows resources in separate VPCs to communicate directly, eliminating the need for public internet exposure and enabling seamless communication.
Benefits of VPC peering
VPC peering offers several advantages.
- Enhanced security: By keeping traffic off the public internet, VPC peering minimizes the risk of unauthorized access.
- Seamless communication: Resources in peered VPCs can interact as if they were on the same network, fostering smooth application functionality.
- Flexibility: You can establish VPC peering connections between your own VPCs, or even connect to VPCs in other accounts or different AWS regions.
Steps to setup VPC peering
Let's dive straight into the detailed steps to secure VPC peering in AWS
Task 1: Create custom VPCs
Creating custom VPCs, such as VPC A and VPC B, allows you to define your virtual networks within AWS, establishing secure and isolated environments for your resources. Each VPC is uniquely identified by a specific CIDR block, ensuring avoidance of IP address conflicts with other networks. Additionally, by including public subnets within VPCs, the foundation is set for hosting resources that require direct internet access, thus enhancing the overall versatility of each VPC. The separation of VPCs, illustrated by VPC B mirroring VPC A's structure, is crucial for maintaining distinct workloads or applications within the AWS environment. This design allows for the independent hosting of multiple applications, showcasing the flexibility offered by AWS VPCs.
Step 1. Create First Custom VPC (VPC A) (custom-vpc-01)
To start, let's create the first custom VPC:
| Attribute | Value |
| Name | custom-vpc-01 |
| CIDR block | 172.31.0.0/16 |
| Tenancy | Default |
| IPV6 CIDR Block | No IPV6 CIDR Block |
Next, create a public subnet for custom-vpc-01:
| Attribute | Value |
| Name | vpc-01-pub-subnet |
| VPC | custom-vpc-01 |
| Availability Zone | <Select an AZ> |
| CIDR Block | 172.31.32.0/20 |
Step 2. Create Second Custom VPC (VPC B) (custom-vpc-02)
Now, let's create the second custom VPC with the following parameters:
| Attribute | Value |
| Name | custom-vpc-02 |
| CIDR block | 10.0.0.0/16 |
| Tenancy | Default |
| IPV6 CIDR Block | No IPV6 CIDR Block |
Create a public subnet for custom-vpc-02:
| Attribute | Value |
| Name | vpc-02-pub-subnet |
| VPC | custom-vpc-02 |
| Availability Zone | <Select an AZ> |
| CIDR Block | 10.0.0.0/20 |
Step 3. Internet Gateways and Route Tables
Internet Gateways (IGWs) act as the entry and exit points for network traffic. By attaching IGWs to the VPCs and configuring route entries, we establish the groundwork for internet connectivity. This step ensures that resources within each VPC can communicate with the internet and other networks.
Create two Internet Gateways and attach them to the respective VPCs:
- IGW for vpc-01-pub-subnet: custom-vpc-01-igw
- IGW for vpc-02-pub-subnet: custom-vpc-02-igw
Add route entries (0.0.0.0/0 for IGWs) to the Route Tables of both VPCs.
Step 4. EC2 Instances and Testing
The deployment of EC2 instances in public subnets of both VPCs simulates real-world scenarios. Testing internet access for these instances ensures that the networking configuration is correct and that resources within the VPCs can reach external services. To test this, create two EC2 instances in each public subnet and SSH into them. Confirm internet access for each instance.
Step 5. Bastion Hosts/Gateway Hosts and VPC Communication
Attempting to SSH from VPC A to VPC B showcases the isolation of VPCs in the absence of VPC peering. This step serves as a clear demonstration of the need for VPC peering to establish communication between the two VPCs.
To verify, Attempt to SSH from custom-vpc-01 to custom-vpc-02 using the VPC2 private IP address. This should fail, highlighting the need for VPC peering.
Task 2: Creating VPC Peering Connection
Step 1. Create VPC Peering Connection
The creation of a VPC peering connection is a pivotal step in enabling secure communication between VPC A and VPC B. This connection acts as a bridge, allowing traffic to flow seamlessly between the two isolated networks. By navigating to the VPC Peering Connections section, we initiate the process and await acceptance from the peer VPC.
Follow below steps to create connection:
- Go to the VPC Dashboard.
- Navigate to "Peering Connections" under VPC and click on "Create Peering Connection.”
- Configure the peering connection with the following details:
- Peering connection name tag: peering-con
- VPC (Requester): custom-vpc-01 (Select "My Account" and the Same Region)
- VPC (Accepter): custom-vpc-02
- After creating the peering connection, check that the status is "Pending Acceptance." Confirm this by selecting "Actions" → "Accept Request."
Step 2. Routing Entries
Adding routing entries to the Route Tables of both VPCs is essential for directing traffic through the peering connection. This step ensures that the VPCs know how to reach each other's CIDR blocks, establishing the foundation for inter-VPC communication.
Add routing entries to both VPCs' Route Tables:
| Source VPC | Destination VPC | Destination CIDR | Target (Peering Connection) |
| custom-vpc-01 | custom-vpc-02 | 10.0.0.0/20 | [Peering Connection ID] |
| custom-vpc-02 | custom-vpc-01 | 172.31.32.0/20 | [Peering Connection ID] |
In this table:
• Source VPC represents the VPC initiating the traffic.
• Destination VPC represents the VPC receiving the traffic.
• Destination CIDR is the CIDR block of the destination VPC.
• Target is the peering connection associated with the destination VPC. Replace Peering Connection ID with the actual [Peering Connection ID] established between two VPCs.
Task 3: Creating VPC Endpoints and API Gateway
VPC Endpoints enhance security by allowing direct, private communication with AWS services. Creating endpoints for the API Gateway in both VPC A and VPC B ensures that resources within these VPCs can interact with the API Gateway securely, without traversing the public internet.
Configuring an API Gateway for testing purposes provides a practical use case for VPC connectivity. By making the API endpoint private and associating it with VPC endpoints, we ensure that only resources within the specified VPCs can access the API Gateway, adding an extra layer of security.
Follow below steps for configuring VPC and API Gateway:
Step 1: Create VPC Endpoints for API Gateway
- Navigate to the VPC Dashboard.
- Go to "Endpoints" and select "Create Endpoint."
- Configure the Endpoint with the following details:
- Service Name: com.amazonaws.region.execute-api (API Gateway)
- VPC: custom-vpc-01 and custom-vpc-02
- Enable Private DNS Name: Select if you want DNS resolution for the endpoint.
- Repeat the entire process for both VPCs.
Step 2: Create an API Gateway for Testing
In the API Gateway Console, create a new API, define endpoints, methods, and integrations as needed. Make the API endpoint private and associate it with VPC endpoints. Deploy the API, note down endpoint URLs for testing in both VPCs.
Task 4: Verification
Step 1. Testing VPC Endpoints within VPCs
Use tools like curl or wget from EC2 instances within each VPC to ensure access to API Gateway endpoints via VPC endpoints.
Step 2. Testing Communication between VPCs via VPC Peering
Confirm communication between VPCs by attempting to access API Gateway endpoints in one VPC from an EC2 instance in the other VPC using the VPC endpoint DNS name.
Try it out today
This comprehensive guide demonstrates the successful implementation of VPC peering, enabling secure and private communication between AWS VPCs. By following these steps, you will established a robust network infrastructure and tested connectivity through VPC endpoints and API Gateway.

