Posted By

Amazon Elastic Compute Cloud (EC2) instances play a pivotal role worldwide, being utilized by millions of users. They serve as the backbone for hosting critical applications and services, while ensuring their robustness and accessibility. Imagine a system where potential issues are identified proactively, downtime is minimized, and operational efficiency is optimized. Health checks enable Amazon EC2 Auto Scaling to identify unhealthy instances and terminate them.
This blog explains the process of setting up EC2 health check alerts using Lambda, CloudWatch, and SNS—empowering you to take control of your instances' well-being.
Why automated health checks?
Before diving into the technical details, it's crucial to understand how why automated health checks for your EC2 instances are essential. Here are the benefits:
- Proactive issue detection: Automated health checks can detect issues in real-time or at predefined intervals, allowing you to take corrective actions before they affect your applications.
- Cost reduction: By automating alarms, you can prevent prolonged downtime, which can lead to significant revenue loss or increased operational costs.
- Efficiency boost: Manual health checks are time-consuming and error prone. Automation frees up your team to focus on more critical tasks.
- Improved reliability: Automating health checks ensures consistency and reliability. Human errors can be reduced significantly.
Usually the objective is to establish an alert system whenever an EC2 instance encounters a health status failure within the AWS account. This system should be configured to send email notifications to a specified email address on failure. This proactive setup ensures timely awareness and facilitates a prompt response to any issues affecting the health of EC2 instances across the entire AWS account.
We attempted to configure this alert system using different methods, encountering challenges along the way:
- AWS-CLI: We ensured that AWS CLI installed and configured with the necessary IAM permissions to create alarms. But even when the alarm was properly configured, it was stuck in “insufficient state”. So, we moved with the next solution.
- Using AWS Cloud-Watch alarms (metric wise): If there are a smaller number of instances, an alarm can be set for each instance with the desired metric, but for greater number of instances, it is not a feasible solution.
- Configure Lambda function: The above two solutions were not working in our case as the number of instances were high. So, we opted to use an automation or scripting approach to dynamically create alarms for each instance.
Here's a high-level outline of how you could achieve this:
Automating EC2 health check alarms with AWS Lambda
In today's cloud-driven world, managing infrastructure at scale is a challenging task. One of the most important aspects of managing cloud resources is ensuring their health and availability. Amazon Web Services (AWS) offers a range of services to simplify this challenge. AWS Lambda, a serverless compute service, is a powerful tool for automating various tasks in AWS environments. This is how you can use AWS Lambda to automate health check alarms for EC2 instances in the same region.
Prerequisites of AWS Lambda
Ensure you have the following:
- An AWS account.
- EC2 instances that you want to monitor.
- Basic knowledge of AWS services like Lambda, SNS (Simple Notification Service), and CloudWatch.
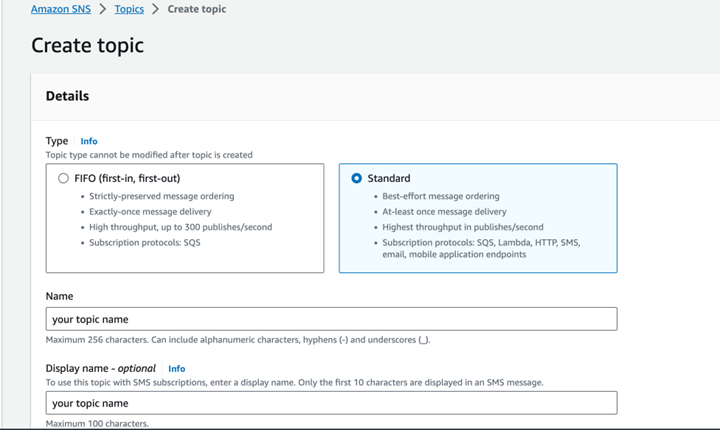
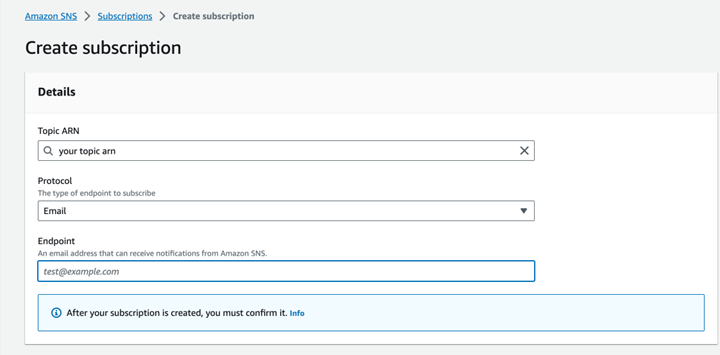
Step 1: Create an SNS Topic
The first step is to set up a Simple Notification Service (SNS) topic that will be used to send notifications when alarms are triggered.
- Go to the AWS Management Console and navigate to the SNS service.
- Click on "Create Topic" and provide a name and display name for your topic. You can leave the other settings as default.
- Once the topic is created, note down its ARN (Amazon Resource Name). You will need this when configuring your Lambda function.
Step 2: Create an IAM Role for Lambda
To allow your Lambda function to interact with EC2 instances and publish messages to the SNS topic, you need to create an IAM (Identity and Access Management) role with the necessary permissions.
- Go to the AWS Management Console and navigate to the IAM service.
- Click on "Roles" in the left-hand menu and then click "Create Role."
- For the use case, select "Lambda" as the service that will use this role, then click "Next: Permissions."
- In the permissions search box, type "AmazonEC2ReadOnlyAccess" to attach the read-only EC2 permissions policy. This policy allows the Lambda function to describe EC2 instances.
- Additionally, you will need to attach the policy "AmazonSNSFullAccess" to allow the Lambda function to publish messages to the SNS topic.
- Complete the role creation process by specifying a name for your role and adding any necessary tags. Finally, click "Create Role."
Step 3: Write the Lambda Function
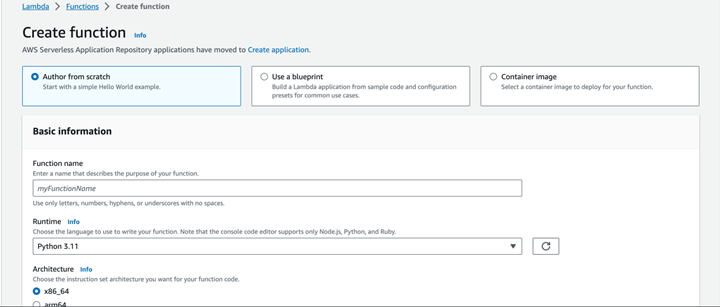
Now, it's time to write the Lambda function that will perform the health checks and trigger alarms when necessary. We'll provide a Python example using the Boto3 library, which is the AWS SDK for Python.
Python.py
import boto3

def lambda_handler(event, context):
    # Initialize AWS clients
    ec2_client = boto3.client('ec2')
    sns_client = boto3.client('sns')

    # Get all EC2 instances in the region
    response = ec2_client.describe_instances()
    instances = []
    for reservation in response['Reservations']:
        instances.extend(reservation['Instances'])

     # Check each EC2 instance and publish alarm to SNS if needed
    for instance in instances:
        instance_id = instance['InstanceId']
        instance_status_check = None
        system_status_check = None

        # Check status checks from EC2 API (for example, for status check failures)
        status_check_response = ec2_client.describe_instance_status(
            InstanceIds=[instance_id]
        )
        if 'InstanceStatuses' in status_check_response and len(status_check_response['InstanceStatuses']) > 0:
            instance_status_check = status_check_response['InstanceStatuses'][0]['InstanceStatus']['Details'][0]['Status']
            system_status_check = status_check_response['InstanceStatuses'][0]['SystemStatus']['Details'][0]['Status']

        # Check health criteria and publish to SNS if needed
        if (instance_status_check == 'failed' or system_status_check == 'failed'):
            sns_client.publish(
                TopicArn='<YOUR_SNS_TOPIC_ARN>',
                Subject=f"EC2 Instance Health Alarm: {instance_id}",
                Message=f"The EC2 instance {instance_id} in <your_region> has a health issue. Instance Status Check: {instance_status_check}, System Status Check: {system_status_check}."
            )
                # you can customize you message
Please replace 'YOUR_SNS_TOPIC_ARN' with the actual ARN of the SNS topic you created in Step 1. Additionally, adjust the health check criteria to match your specific requirements.
Step 4: Set Up the Lambda Trigger
Now that you have your Lambda function ready, you need to configure a trigger to schedule when it should run. In this example, we'll use Amazon CloudWatch Events.
- Go to the AWS Management Console and navigate to the Lambda service.
- Select your Lambda function from the list.
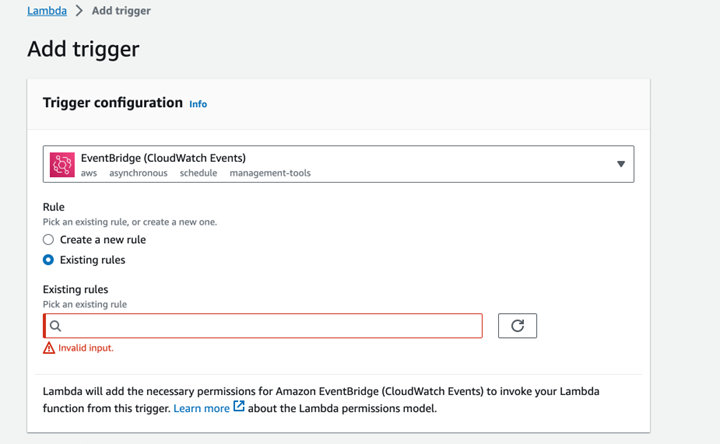
- Click on the "Add trigger" button on the Lambda function's detail page.
- In the "Trigger configuration" page, choose "CloudWatch Events" as the trigger type.
- In the "Rule" dropdown, click "Create a new rule."
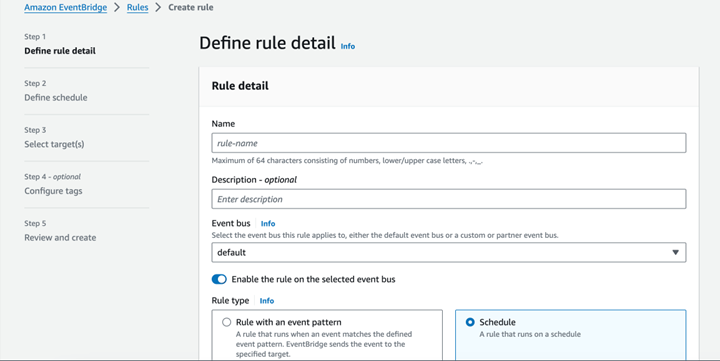
- In the "Create Rule" page, configure the event rule settings:
- Rule Name: Provide a name for your CloudWatch Events rule.
- Description: Optionally, add a description for the rule (optional).
- Rule Type: Choose "Event Source" as the rule type.
- Event Source: Choose "EventBridge (default)" to use the default EventBridge service.
- Event Type: Choose "Schedule" for a time-based schedule.
- Schedule Expression: Define the schedule expression using cron or rate expressions. For example, to run the Lambda function every hour, you can use the rate expression rate (1 hour). Cron Expression: 0 * * * ? *
- Click on the "Add" button to add the CloudWatch Events trigger to your Lambda function.
- After adding the trigger, click on the "Save" button to save the changes.
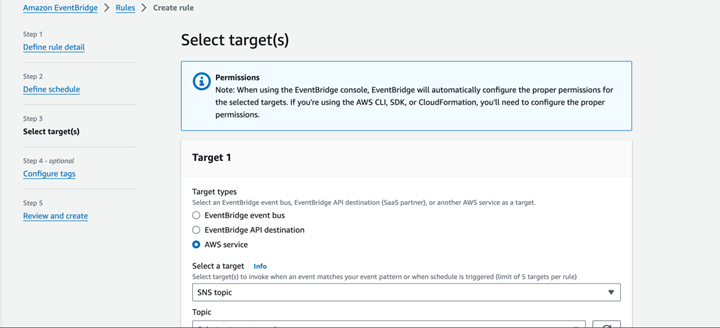
Your Lambda function is now set up with a CloudWatch Events trigger that will invoke the function based on the schedule you defined.
Maximize your operational efficiency with Lambda
Automating health checks for your EC2 instances using AWS Lambda is a crucial step towards ensuring the reliability and availability of your applications. By proactively monitoring the health of your instances and triggering alarms when issues are detected, you can minimize downtime and improve the overall efficiency of your operations. Remember that you can customize the health check criteria and scheduling to meet your specific requirements.
This proactive approach can save you time, money, and headaches in the long run, allowing you to focus on what truly matters—building and delivering great applications for your users.