Posted By

Configure and Create Nginx AWS ELB cluster using SaltStack on AWS
In order to increase the availability of your application across regions, most of us invest in load balancers that will act as an interface between all clients and the actual application. Load balancers act as a gateway by automatically distributing traffic across multiple server instances in the cloud while ensuring the servers are overworked or starved.
AWS, with its wide army of web services, provides efficient load balancing in the form of an Elastic Load Balancer (ELB). All AWS EC2 instances (across regions) that are provisioned for the functioning of your application are registered with ELB. Furthermore, if an instance fails, ELB reroutes the traffic to remaining live instances, thus, also contributing to fault-tolerant architecture for your application.
ELB is all fun and games till you decide to scale the application up. While it functions delightfully for fewer VMs, it starts bungling when you scale up to 100 VMs. The biggest issue clients tend to experience is high latency when connecting to web applications.
There are quite a few workarounds for avoiding this situation altogether. On could always use AWS Autoscaling to handle this problem, or some suggest using AWS Route 53. However, one method that grants more exclusive control to the developer is using Nginx servers to fine-tune ELB performance while using SaltStack to orchestrate the complete application architecture.
Using SALT is not mandatory with this approach but is highly recommended. It ensures an efficient automation process that guarantees uniform configuration across VM instances with considerably less headache.
Let us explore this method further:
Configuration
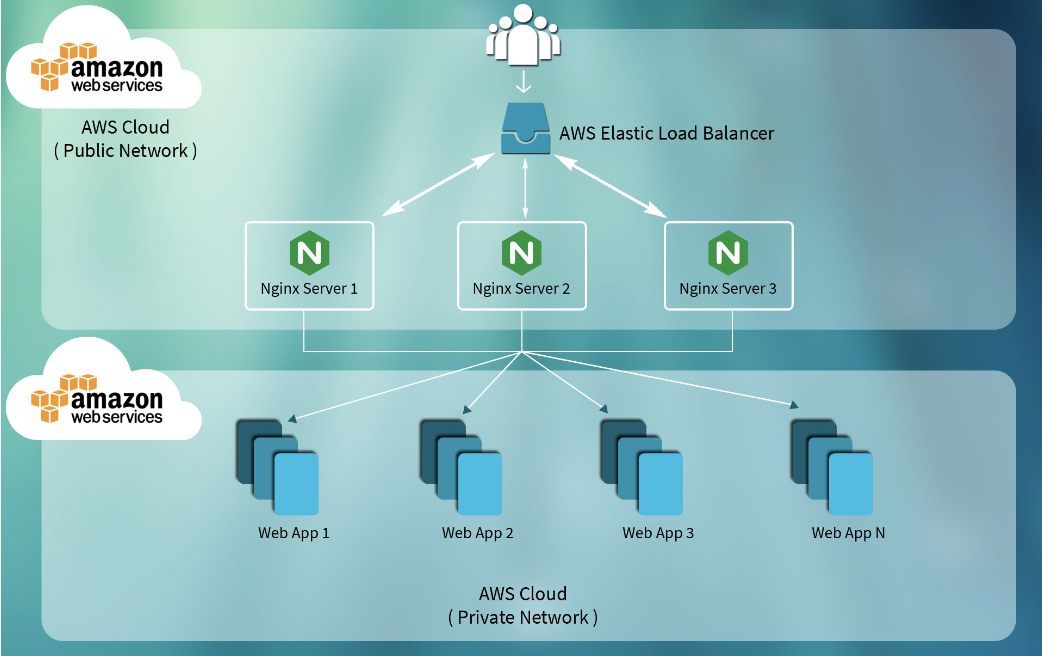
Before we use SaltStack or Nginx servers, they must be configured to our application. Then the instances are registered on AWS ELB with the help of their Salt states. The following diagram depicts the architecture of the system.
Configuring SaltStack:
SaltStack is simple enough to run in minutes, scalable enough to manage tens of thousands of servers, and fast enough to communicate with each system in seconds. The following steps are the main points in the process:
Deploying EC2 instances with Salt Cloud
Before we begin, I must mention that this tutorial requires some knowledge of Amazon’s EC2 service. If you haven’t deployed anything with EC2, getting familiar with it before you begin is beneficial. In addition, some basic knowledge of Saltstack will be important as well.
Requirements:
- Understanding of EC2 key pairs and security groups
- EC2 access key ID and secret access key
- Saltstack basic knowledge (Please refer to this link)
Firstly, we begin with creating cloud profiles for EC2 and Nginx VMs. Nginx servers will serve as the SALT minions in this approach.
Your file should follow this format, and remember this is written in YAML, so formatting saves lives.
Let’s set up the profile to provide more “ec2-specific” configuration options for an Nginx VM.
/etc/salt/cloud.profiles.d/ec2-profile.conf:
 ec2-profile:

  provider: ec2-provider-use1c

  subnetid: subnet-d13229a5

  image: ami-60b6c60a

  size: m3.medium

  ssh_username: ec2-user

  securitygroupid: sp-98b6f9e0
Create the same cloud profile for the remaining Nginx VMs.
Also, please note the following settings are always required for each EC2 virtual machine:
/etc/salt/cloud.providers.d/ec2-provider.conf:
ec2-provider-use1c:

  minion:

    master: <master-ip-address>

    master_type: str

  private_key: //root/test.pem   (private key from AWS key pair we'll be using)

  keyname: test   (AWS key pair name we'll be using)

  ssh_interface: private_ips

  location: us-east-1

  availability_zone: us-east-1c

  ssh_username: ec2-user

  provider: ec2

  id: 'aws access key ID'    For e.g. ABCDEFGH1234IJKLMN5P

  key: 'aws secret access key'  For e.g abCDeFG/2SPSPSPSPS+4pmABC+86bDaYH
Create the same profile for the remaining VMs so that it can be used to spin up instances.
Running Salt Cloud in debug mode will reveal information about a deployment that would otherwise not be obvious. This can be used to check up on our deployment:
sudo salt-cloud -p ec2-profile-nginx-use1c <AWS_NGINX_VM> -l debug
Configuring Nginx:
Consider the architecture diagram mentioned above. Like the diagram, let us consider that only 2 Nginx servers are required for our application. Add the required NGINX configuration as explained in this guide.
/srv/salt/nginx-configuration/init.sls
download-nginx-rpm:

  cmd.run:

    - name: "wget http://nginx.org/packages/rhel/6/noarch/RPMS/nginx-release-rhel-6-0.el6.ngx.noarch.rpm"

    - cwd: /tmp

extract-rpm:

  cmd.run:

    - name: "rpm -ivh nginx-release-rhel-6-0.el6.ngx.noarch.rpm"

    - cwd: "/tmp"

install-rpm:

  cmd.run:

    - name: "yum install nginx -y"

    - cwd: /tmp

activate-nginx-service:

  cmd.run:

    - name: "chkconfig nginx on"

copy-c2id-conf-file:

  file.recurse:

    - source: salt://nginx-conf/c2id-conf

    - name: /etc/nginx/conf.d

    - force: True

copy-locations-conf-file:

  file.recurse:

    - source: salt://nginx-conf/locations-conf

    - name: /etc/nginx/conf

    - include_empty: True

    - dir_mode: 755

copy-nginx-conf-file:

  file.recurse:

    - source: salt://nginx-conf/nginx-conf-file

    - name: /etc/nginx

    - force: True

nginx:

  service.running:

    - enable: True
Configuring AWS ELB:
Now we need to create an AWS ELB salt state file with a user-defined name.
/srv/salt/aws-elb/init.sls
Ensure aws-elb ELB exists:

    boto_elb.present:

        - name:

        - region: us-east-1

        - subnets:

            - subnet-af3229db

            - subnet-c25b5f84

        - security_groups:

            - sg-4c143a34

        - keyid: 'aws access key ID'    For e.g. ABCDEFGH1234IJKLMN5P

        - key: 'aws secret access key'  For e.g abCDeFG/2SPSPSPSPS+4pmABC+86bDaYH

        - listeners:

            - elb_port: 80

              instance_port: 80

              elb_protocol: HTTP

              instance_protocol: HTTP

        - health_check:

            target: 'HTTP:80/'

        - attributes:

            cross_zone_load_balancing:

              enabled: true

            access_log:

              enabled: true

              s3_bucket_name: '<AWS-Bucket-Name>'

              s3_bucket_prefix: '<AWS-Bucket-Prefix>'

              emit_interval: 5
Now, let’s create AWS Elastic Load Balancing with this command:
| sudo salt 'salt' state.sls aws-elb <ELB_NAME> -l debug |
Adding AWS VMs to the AWS Elastic Load Balancer:
We need the AWS VM ID (instance ID) to add instances to the AWS ELB. So we can get the required information using boto_ec2.find_instances connection module for Amazon EC2 since this module accepts explicit EC2 credentials. Dynamic credentials are then automatically obtained from AWS API; no further configuration is necessary.
/srv/salt/ aws-elb-add-vms-to-elb/create-elb-init-sls.sh
#!/bin/sh

> /srv/salt/aws-elb-add-vms-to-elb/init.sls

echo "add-instances:" >> /srv/salt/aws-elb-add-vms-to-elb/init.sls

echo "  boto_elb.register_instances:" >> /srv/salt/aws-elb-add-vms-to-elb/init.sls

echo "    - name: $1" >> /srv/salt/aws-elb-add-vms-to-elb/init.sls

echo "    - instances:" >> /srv/salt/aws-elb-add-vms-to-elb/init.sls

shift 1

for vm_name in $@

do

    instance_id="$(echo `sudo salt salt boto_ec2.find_instances name=$vm_name` | rev | cut -f1 -d ' ' | rev)"

    echo $instance_id

    if [ "$instance_id" = "False" ]; then

        echo "Invalid Argument:: $vm_name"

        exit 128

    fi;

        echo "      - $instance_id" >> /srv/salt/aws-elb-add-vms-to-elb/init.sls

done

echo "    - keyid: 'aws access key ID'" >> /srv/salt/aws-elb-add-vms-to-elb/init.sls

echo "    - key: key: 'aws secret access key'" >> /srv/salt/aws-elb-add-vms-to-elb/init.sls
Get salt-minion, i.e., AWS Nginx VM ID, by using the following command:
sudo sh /srv/salt/aws-elb-add-vms-to-elb/create-elb-init-sls.sh <ELB_NAME> <AWS_NGINX_VM1> <AWS_NGINX_VM2> . . . . .
Registering with ELB
Now that everything has been configured and set up, we register the EC2 VMs with ELB. For this, we need the following Salt State:
/srv/salt/aws-elb-add-vms-to-elb/init.sls
add-instances:

 boto_elb.register_instances:

 - name: <hostname>

 - instances:

    - <instance_id>

    - <instance_id>

 - keyid: 'aws access key ID'

 - key: 'aws secret access key'
Note: Name, instance ID, and AWS credentials for the VMs must be extracted at runtime and appropriately substituted in the above file.
Finally, add and register all Nginx VMs to the AWS Elastic Load Balancer by using the below command:
sudo salt 'salt' state.sls aws-elb-add-vms-to-elb <ELB_NAME> -l debug
In the above Salt State file, we get the AWS instance name and ID from the create-elb-init-sls.sh file. As mentioned earlier, dynamic credentials, for instance, are automatically provided to this init.sls file.
Finally, you can check if your AWS ELB has two or more VMs registered with AWS ELB.
/root/saltstate_aws_elb.sh
Final thoughts
Using SaltStack for deployment in the above approach ensures uniform and seamless configuration of the set up on each server instance. Considering the immense size and complex architecture this approach aims at, SaltStack ensures you don’t have to comb through configuration files for 100 VMs for a single error (eek!) because each VM instance is configured the same way. loop
Using Nginx service, in particular, (along with AWS ELB) grants more control to the developer. Load balancing across multiple application instances is a commonly used technique for optimizing resource utilization, maximizing throughput, reducing latency, and ensuring fault-tolerant configurations.
It is possible to use Nginx as a very efficient HTTP load balancer to distribute traffic to several application servers and improve the performance, scalability, and reliability of web applications with Nginx.
What do you feel about this approach? Reach out to us in the comments section!