Posted By

In our quest for faster application development, we have invented, tested, and implemented several practices that have revolutionized the way we develop applications. Continuous Integration (CI) is one such DevOps practice, which has augmented the speed of application development by coupling skills of developers with an arsenal of tools. Jenkins is a popular CI tool used to automate complex tasks. As the infrastructure grows, you have to start thinking about securing and load balancing CI/CD tools with Jenkins, which is the heart of any DevOps culture.
Amidst all the comforts it brings to the DevOps pipeline, a single point of failure in Jenkins can break down your whole DevOps process. Hence, it is important to ensure that your Jenkins is fool-proof. Now there are multiple ways to achieve this. You can use enterprise Jenkins offerings, but it will add to the cost. For me, the simplest one that I would recommend is configuring Jenkins High Availability with two Jenkins masters, in which one will always be active to serve builds and another will be passive. The passive or inactive master will get activated if the master that was active earlier goes inactive. Want to know how to set this up? I have got you covered. Before going through the actual setup and configuration, let’s have a look at the prerequisites for this setup -
- AWS Account with access to EC2 and EFS
- Three instances - one for HA proxy and two with Jenkins installed
- Knowledge of EFS (Elastic File System) on AWS
- Knowledge of HAProxy.
Now, before jumping onto the actual setup process, let’s walk through some basic concepts that we will be using further -
What is High Availability (HA)?
When we say high availability, we are referring to systems that can operate continuously without failure for a long time. The term implies that the system has been tested thoroughly to stand any sort of failure. Jenkins is a crucial component of DevOps, and its downtime may have adverse effects on the DevOps environment. To overcome these, we need a high availability setup for Jenkins.
How HAProxy works?
- The user's web browser sends a request to the load balancer over port 80, which is assigned to commonly used HTTP, using the fully qualified domain name such as http://jenkins.domain.com
- The Domain Name System (DNS) reaches the IP address of the domain name entered and fetches data from there.
- If a load-balancer server is unavailable, the request to that server will be timed out. If the load balancer is available, then according to the availability of the machine, it routes requests.
- Referencing the load-balancer pool in its configuration file, HAProxy determines the application server to which the client request has to be routed. This server receiving the request is usually a part of the auto-scaling array comprising dedicated application servers.
- HAProxy forwards this request to the server port referenced in its configuration file (generally port 80).
What is Elastic File System (EFS)?
The EFS service on AWS is similar to the NFS service on Unix systems wherein the mount point is created on network topology and can be shared with multiple systems at the same time. We are going to configure EFS with Jenkins master machines so that both masters can store and access Jenkins jobs from EFS.
Jenkins HA Setup
Our Jenkins HA setup will look like this -
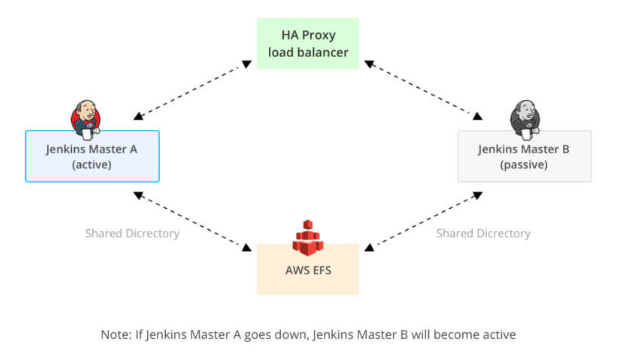
Now let’s see how we are going to configure HAProxy.
As shown in the diagram above, the first tier is the HAProxy. Whenever there is an incoming request for the build, it will first reach the HAProxy. Then, it will decide the machine to which the request can be routed. Here, one of the masters will be in the active state to serve requests and the other one will be passive. Whenever there is a problem with the active master, and it goes down, the other master will become active, and requests will resume. These requests will then be served by the master that has become active. HA proxy communicates with nodes mainly with the help of tokens that are called heartbeats on active and passive links.
The second tier is the Jenkins master setup, wherein both masters have the same configuration and share Jenkins home for high availability. So, the project created on one Jenkins master will be available for the second master as well once the configuration is reloaded. For reloading the configuration on the second master, type “/reload” at the end of the Jenkins URL and then hit enter.
E.g., http://myjenkinsserver.com:8080/reload will reload the configuration without restarting.
The third tier is the EFS mount point on AWS that is shared over VPC with both Jenkins masters. It is a kind of network file system that can be configured on a single VPC and can be shared with multiple subnets in that VPC.
Steps for the setup:
We need to set up the EFS provisioning before configuring Jenkins. Here is how you can provision EFS on AWS - https://aws.amazon.com/efs/. Once EFS is configured, the next step will be to configure Jenkins instances to use the provisioned EFS. The configuration steps are pretty simple. All we need to do is ssh both Jenkins instances, i.e., Jenkins A (Active) and Jenkins B (Passive) and add the entry given below in the /etc/fstab file.
fs-******.efs.us-east-2.amazonaws.com:/ /var/lib/jenkins/jobs nfs defaults 0 0
fstab is a system configuration file on Linux and other Unix-like operating systems that contains information about major filesystems. It takes its name from the file systems table and it is located in the /etc directory.
Note :
- The first field is the DNS name with “root (/)” of EFS share.
- The second field is the path to be mounted /var/lib/jenkins/jobs.
- The third field is a type of filesystem.
Once you complete the above changes in the fstab file, perform the following steps.
- Stop Jenkins Service using the command,
systemctl stop jenkins
- Mount EFS volume using the command,
mount -a
- Validate if the EFS is mounted,
mount: shows if /var/lib/jenkins/jobs mounted or not
- Once EFS is mounted, change the ownership to Jenkins using the following command,
chown -R jenkins:jenkins /var/lib/jenkins/jobs
- Start Jenkins Service using the command,
systemctl start jenkins
Once you finish the configuration on Jenkins A, ssh to Jenkins B instance and perform the same steps. Then, validate mounts using the “mount -a” command. Now that we have finished the configuration part, let’s validate the configuration and access Jenkins A web console. Then, add a free-style job “Java-test”. First, we will test the data replication between these two Jenkins instances. We have created a test job on Jenkins A. As we are using a shared file system, the same should be reflected on Jenkins B. You can quickly log in to Jenkins B web console and check that the same job gets created on this Jenkins instance. Let's check it quickly with ssh to Jenkins B instance. Then, run the command given below:
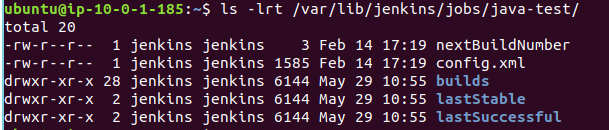
Log in to the Jenkins B console using a public IP or Domain name, and you will see the same “java-test” job on the console once you reload the configuration. You can write the reload script and run it every minute through cron so that the configuration will always be updated. Now, Jenkins A and Jenkins B have redundant data in both instances. But what if one Jenkins instance goes down? How can we achieve active-passive synchronization between Jenkins instances? The answer is a High Availability setup wherein both Instances are configured in the HA configuration file. So let’s move to the next part configuring HAProxy setup on a separate instance which will be front-facing for both Jenkins instances. Let’s see how we can achieve that -
HAProxy Setup
- Go to https://aws.amazon.com/ec2/
- Launch the instance with the basic configuration required and download the PEM key. Once the instance is in the ready state, log in to the instance.
sudo apt-get update

sudo apt install -y haproxy
- edit file “/etc/haproxy/haproxy.cfg” as per the content below:

- haproxy.cfg is the main configuration file for HA proxy setup where we will be mentioning endpoints (IP addresses or hostnames) on nodes on which we have to set up HA.
systemctl start haproxy : start haproxy

ps -ef | grep haproxy : check if haproxy running
Once the high availability setup is done, we will have to test it. For this, we can stop Jenkins A and try to access it with the help of a domain name or IP address, which is common for both machines. If you are able to access Jenkins console, all your Jenkins jobs/user and complex CI/CD pipelines created are accessible. The idea here is HA will use a single domain or IP address configured in Route 53 to communicate with both Jenkins instances.
This is it; our highly available Jenkins setup is ready. It will reduce Jenkins downtime from a few hours to a few minutes. Considering that we have mission-critical applications running on production, downloading Jenkins backup takes at least 1 to 1.5 hours from an S3 bucket and restoring takes 15 to 20 minutes. So this is the best solution for Jenkins that will help administrators to reduce manual efforts and the time taken. Let us know your thoughts on this Jenkins HA setup, Happy coding!