Posted By
APIs (Application Programming Interfaces) are one of the essential components of software today. Most projects use APIs to communicate efficiently with each other. In a microservice-based application, APIs enable effective communication between the different microservices. Organizations use standard technologies such as REST, SOAP, gRPC, and GraphQL to fulfill their API design requirements. REST is one of the most popular ways of developing APIs. gRPC is another commonly used methodology used to develop client-server-based applications. REST is more scalable and flexible, while gRPC has a smaller payload and is faster. What if we could combine the two technologies to get the best of both? And for fun, why not add a MongoDB backend to store and retrieve data?
Let’s see how to do that in detail, but first, some information about why use Go, MongoDB, and a little background.
Why use GO?
Now why use GO for API implementation?
- It’s much more reliable and has a more incredible speed of response compared to other languages.
- Concurrency can be ensured through the use of goroutines and effectively using server resources.
- GO runs directly on the hardware, unlike Java which runs on a virtual machine.
- It has numerous built-in features, which makes it apt for developing APIs.
MongoDB
MongoDB is an open-source NoSQL database. The hierarchy of data storage is as follows:
Database -> Collection -> Document
A document contains key-value pairs. Documents are stored in collections, which are, in turn, stored in a database.
Now, I will try to explain how we can use Go REST API with gRPC with a simple example of designing APIs to perform CRUD operations (Creating, Reading, Updating, and Deleting) for managing users. We will store the user data in MongoDB, which will run as a Docker container. The gRPC message format will be defined using .proto files. The protoc compiler will take in the definitions described in the .proto files and generate API clients and server stubs in a language of our preference. In our case, we will be generating the source code in GO. Now, to add RESTful functionality to our APIs, we will use the gRPC-gateway plugin of the protoc compiler to generate a reverse-proxy server that translates HTTP calls into gRPC. Now, our API has both REST and gRPC functionalities. We will use the GO Mongo driver to connect our GO application to MongoDB and perform operations on it.
Application Architecture
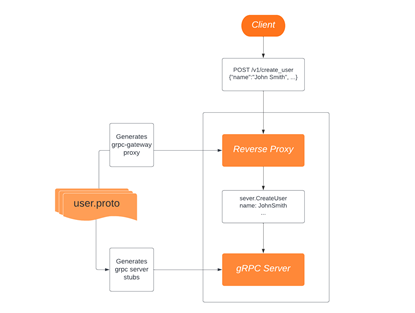
The image above represents the flow of our API. First, we create the proto file with the API design. Then using the protoc compiler, we generate the code stubs for the gRPC gateway server and the gRPC server. We modify the gRPC server code stubs according to our needs and start the server. So, when the client sends a POST request, it's translated into an RPC request. The gRPC server then processes the request and returns the response to us through the reverse proxy.
Now comes the actual programming part. Let’s see what the pre-requisites are.
Pre-Requisites
1. Install GO (v1.18) and GOPATH and add GOBIN set.
2. Install Docker.
Installations
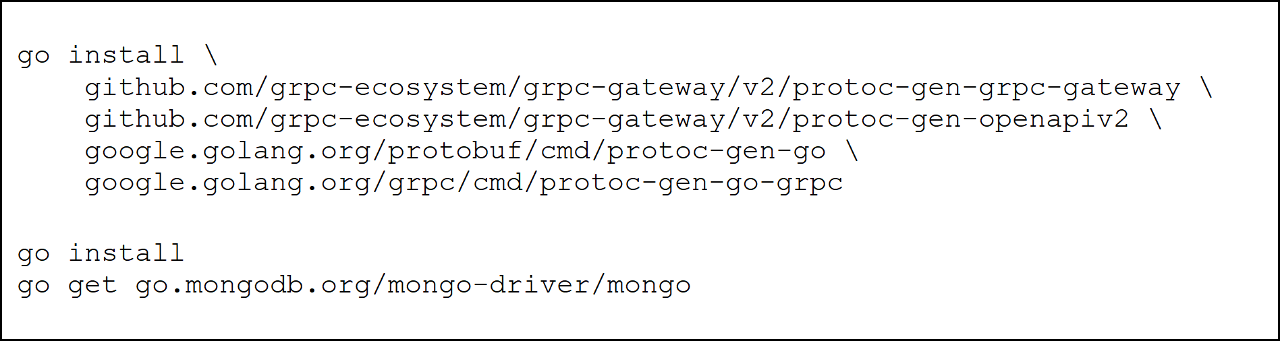
The following steps will download and install the required binaries in our $GOBIN and also install the GO MongoDB driver.
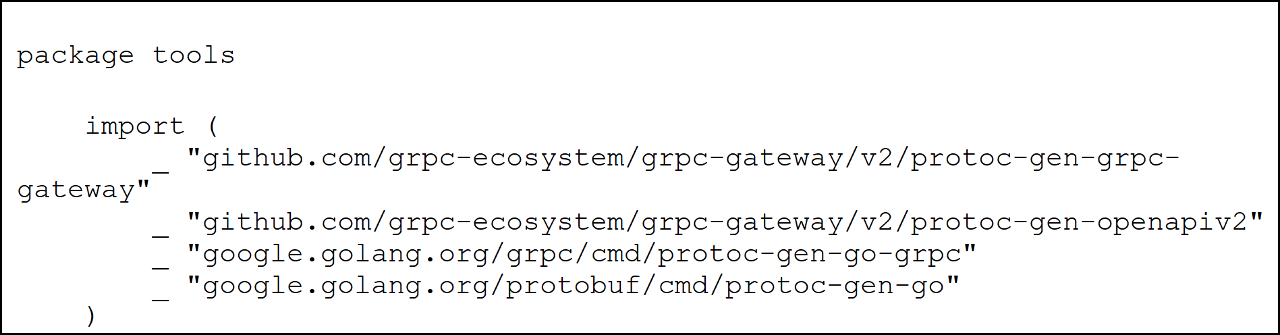
- Create a file named tools.go and add the following:
- Run go mod tidy
- Run
Setup to generate gRPC stubs
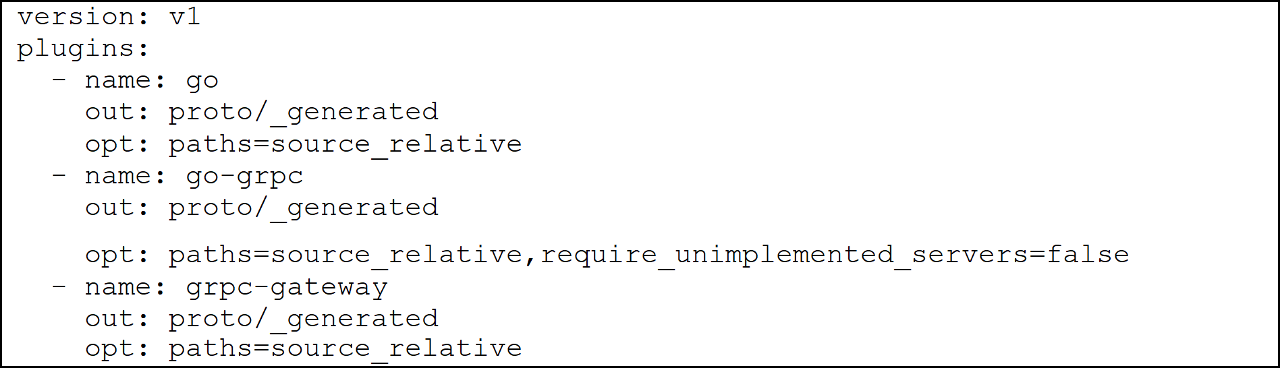
To generate the API client and server stubs, we will create a buf.gen.yaml file with the instructions to find the installed binaries and the location to generate the files.
- Run buf mod init
- Add the following to the buf.yaml file. We will need to provide third-party protobuf files to the protobuf compiler to generate the grpc-gateway stubs.

- Create buf.gen.yaml using the following:
- Run buf mod update
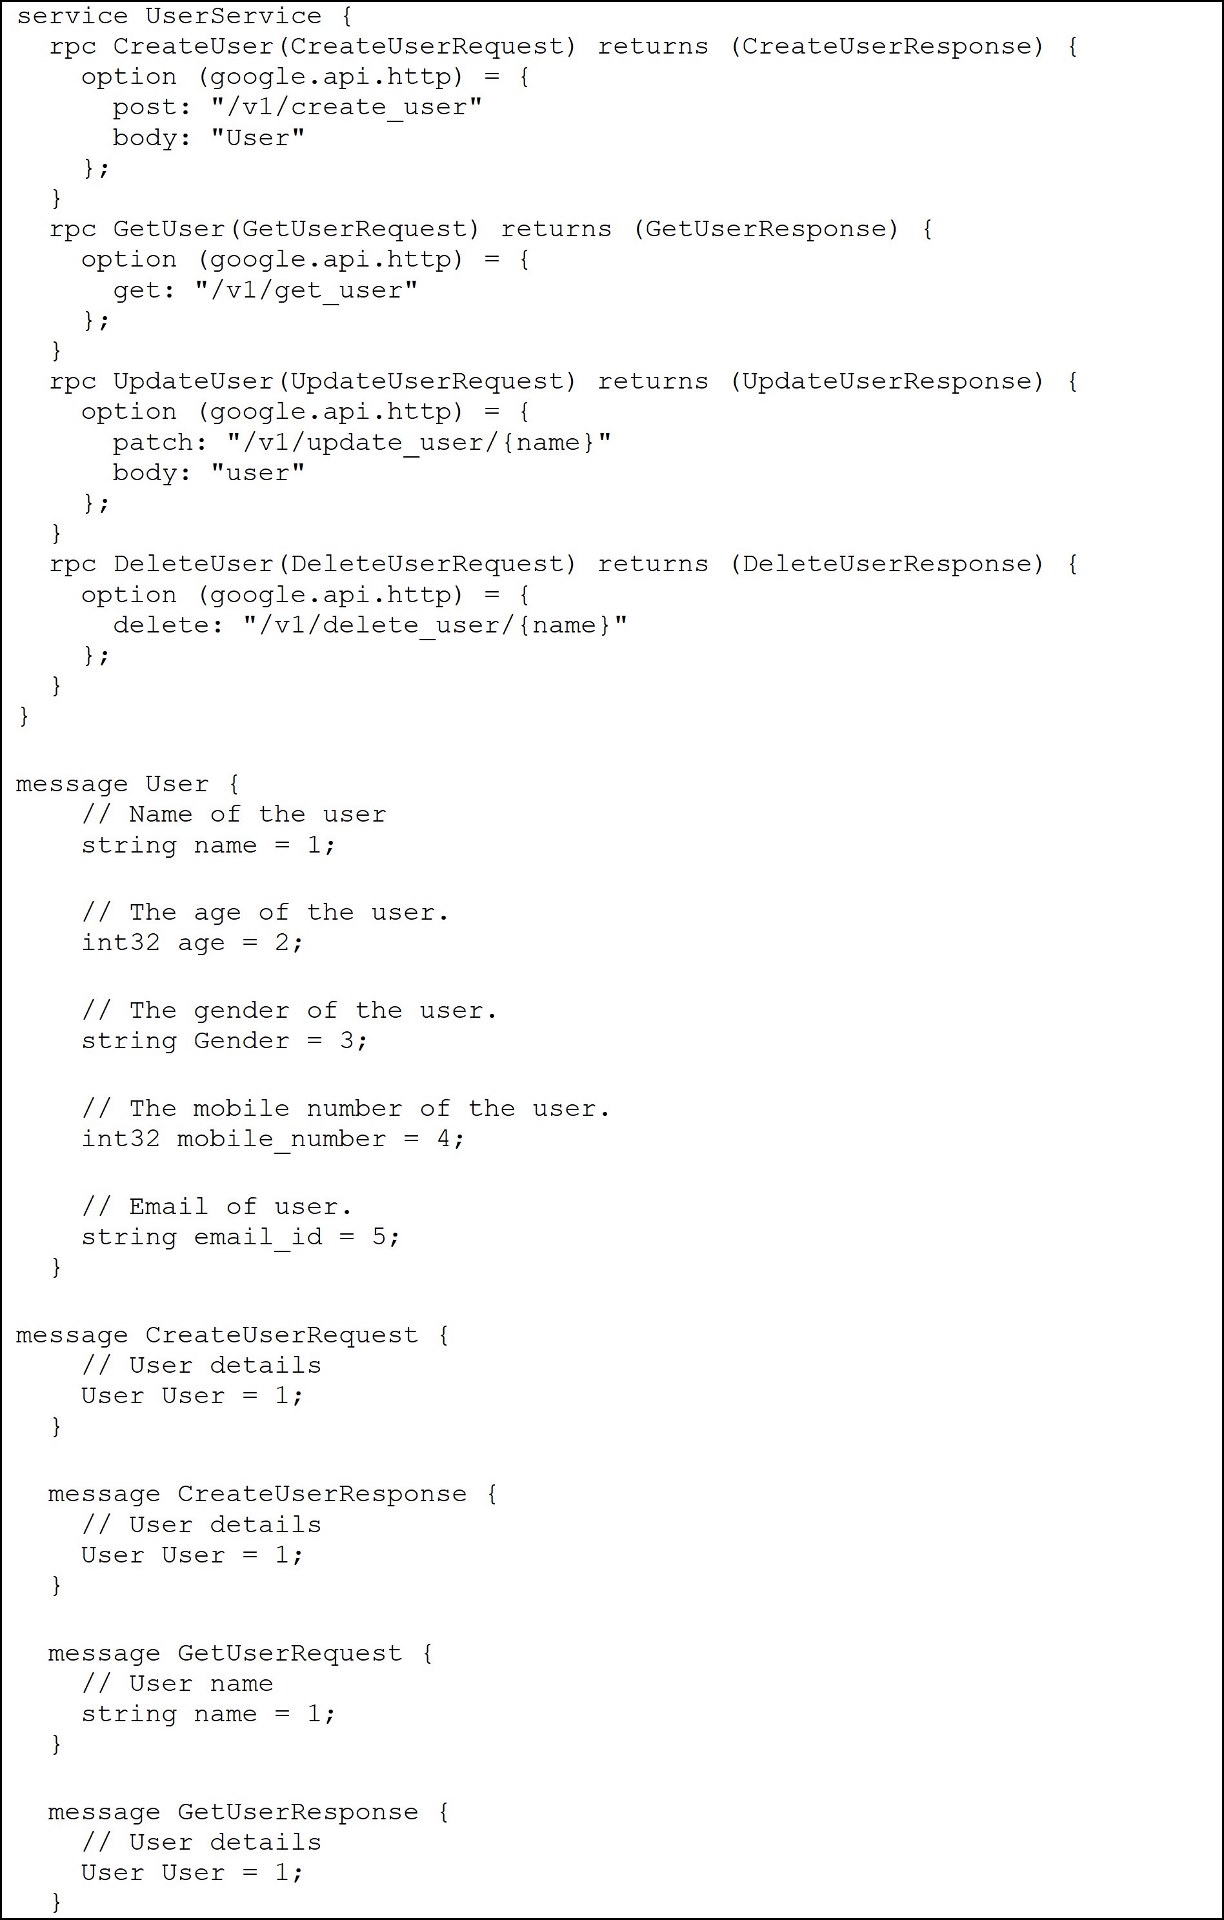
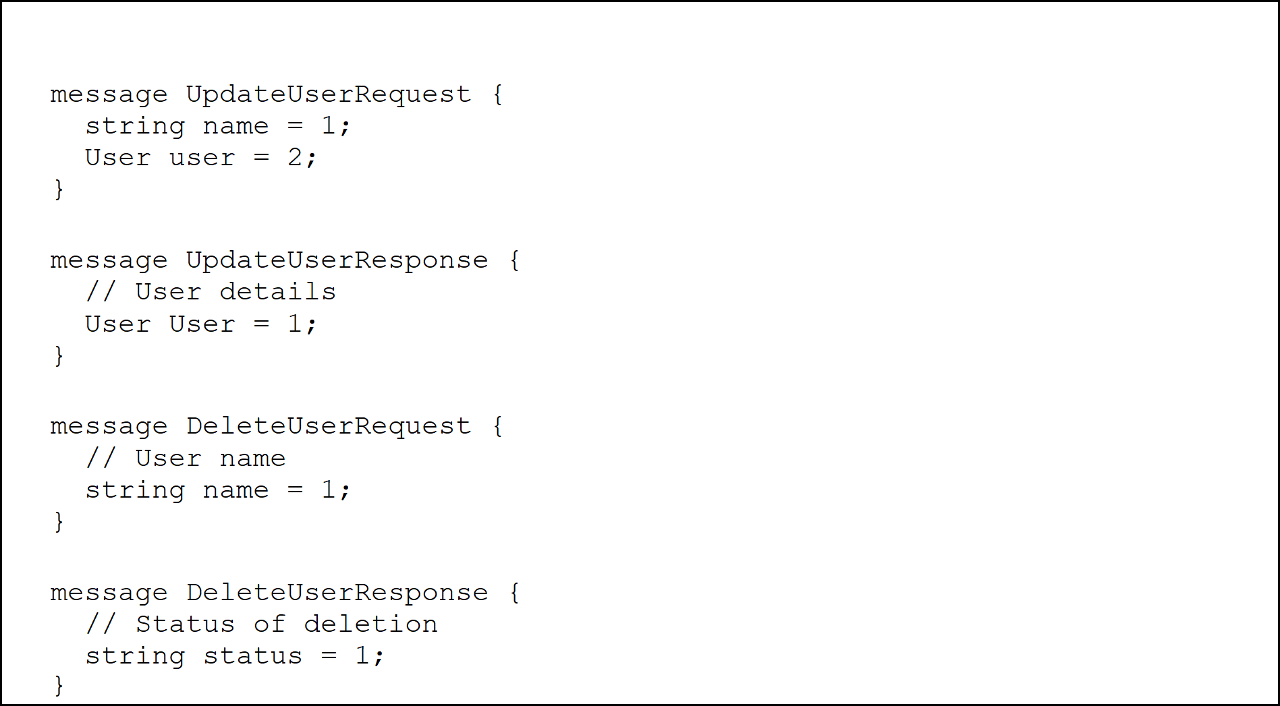
Create proto file
The RPC service calls are defined for create, delete, update, and get user. We also define the URL paths and the HTTP methods. For each API we define the message format, what we would like the API to return, and the request to the endpoint.
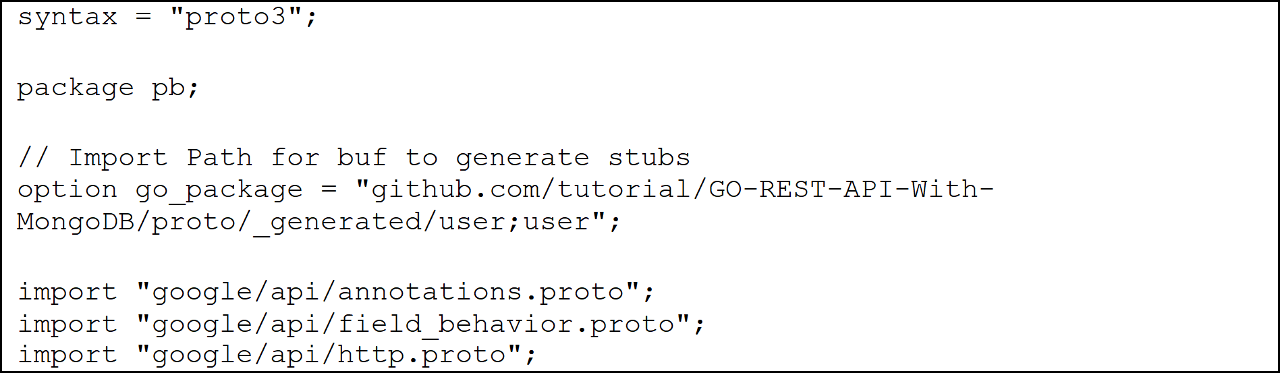
The 3 import statements ensure that the third-party protobuf files are used by the protobuf compiler to generate grpc-gateway stubs.
Once the proto file is created, we can generate the protobuf stubs using buf generate. This will generate a couple of files with code that we should not edit. It generates:
- user.pb.go - a file that contains protocol buffer code populate, serialize, and retrieve request and response message types.
- user.grpc.pb.go - which contains an interface type that servers can implement with the methods defined in our proto file.
- User.pb.gw.go - which contains the reverse proxy definitions to translate gRPC into RESTful JSON APIs.
Creating the Server
This is a two-step process:
(For the full code, please refer to my GitHub repo: https://github.com/J0NES007/go-application)
1. We need to implement the UserServiceServer interface that was generated by the protoc compiler based on our proto definitions. Implementing this interface means we can access its methods CreateUser, UpdateUser, GetUser, DeleteUser and write our logic to define what happens in these methods.
2. Running a gRPC server to listen to requests and create our reverse proxy server to translate JSON to gRPC.
Step 1: Implementing UserServiceServer interface and defining server methods
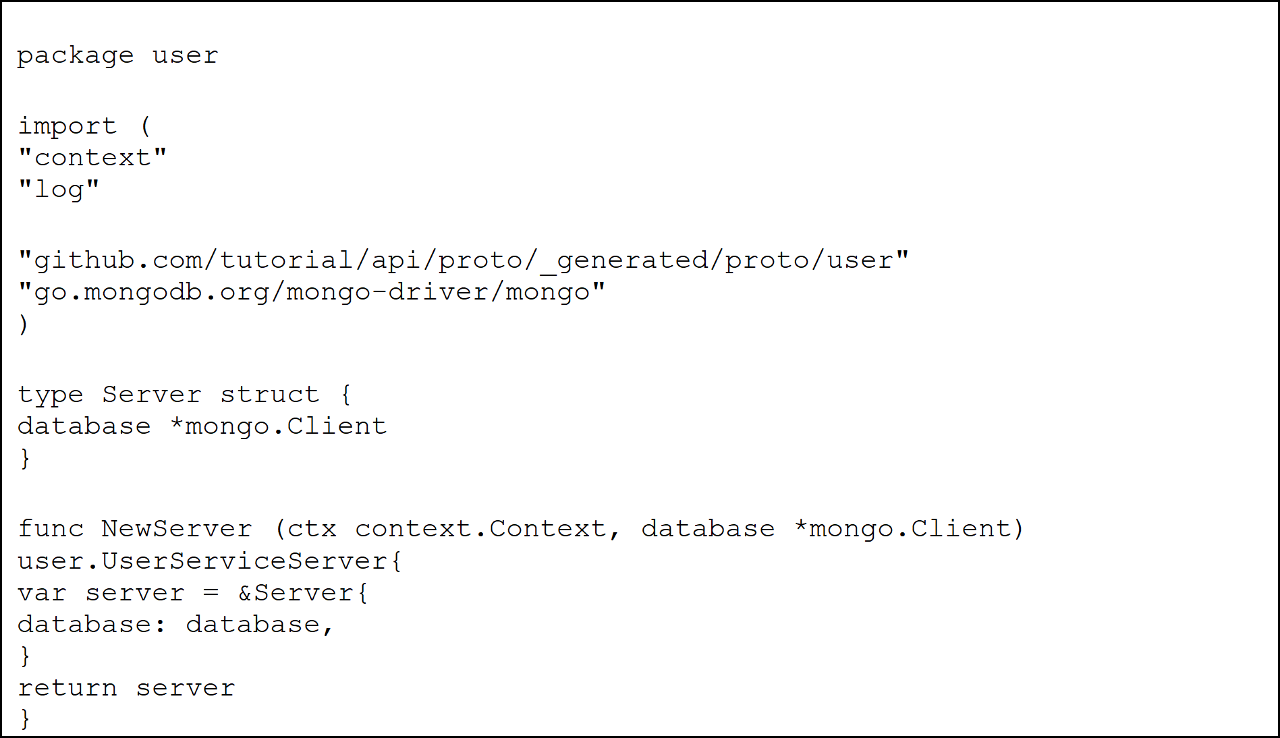
We can create a server struct with the database as a field which we will initialize with the Mongo client when we start the server. This server struct implements the UserServiceServer interface in user.pb.go which contains all of the methods that we had defined in our proto file such as CreateUser, UpdateUser, GetUser, DeleteUser.

Let's look at the CreateUser method. The method is passed a context object for the RPC along with the client’s GetUserRequest. This returns a GetUserResponse protocol buffer object with the response information and error. In this method, we write our logic to populate MongoDB with the User data and return the data to the client. This method, in turn, calls createUser method which contains the actual logic to populate our DB.
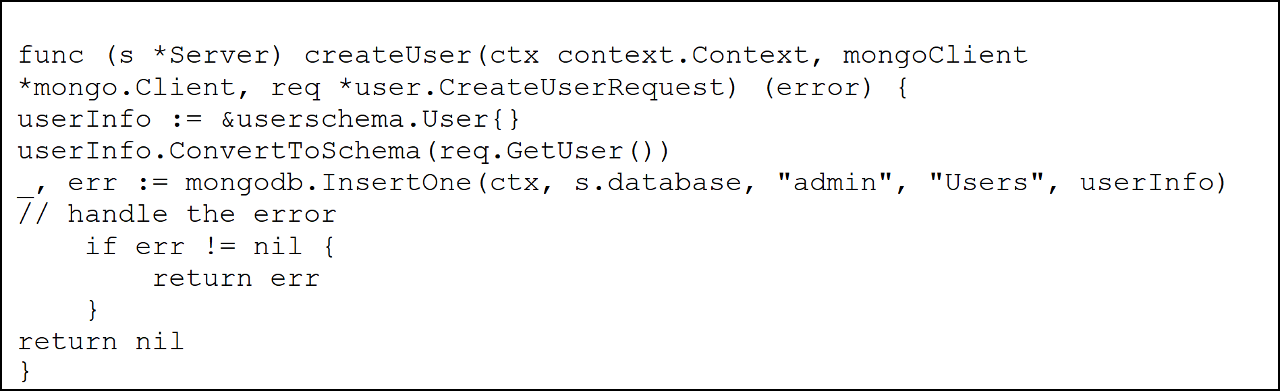
This function first converts the user data received in protocol buffer format to MongoDB schema before it can be stored in it. We then insert the data into the admin database in the Users collection.
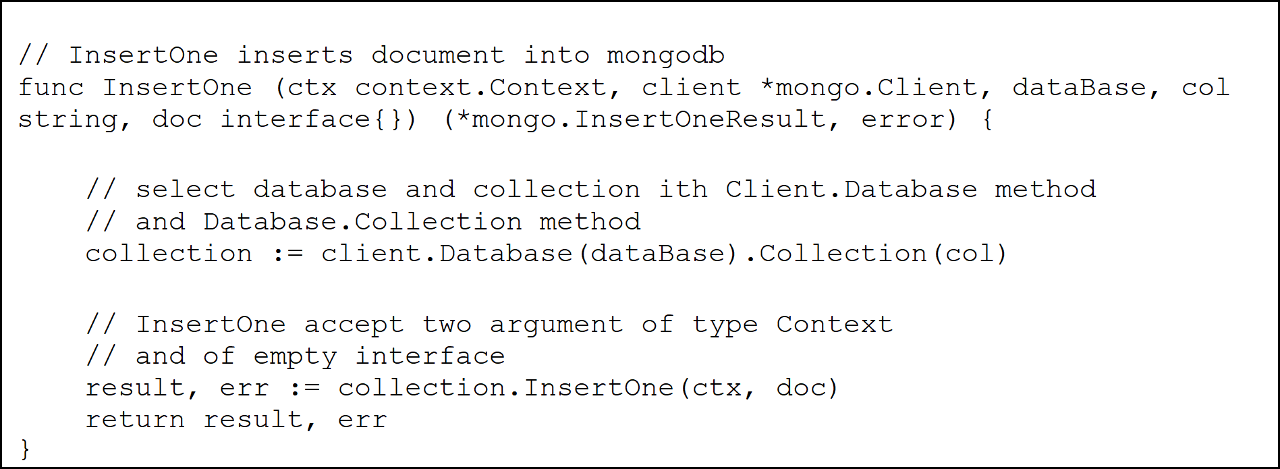
The InsertOne function uses the Mongo client to insert the document into the DB.
Other functions have also been defined for performing Get, Update, and Delete operations on the DB.
So far, we have defined the CreateUser endpoint. In the same way, we can define the GetUser, UpdateUser, DeleteUser methods as well.
Step 2- Start server
We will now define the main file which will start the gRPC server, start the reverse proxy server, and connect to MongoDB.
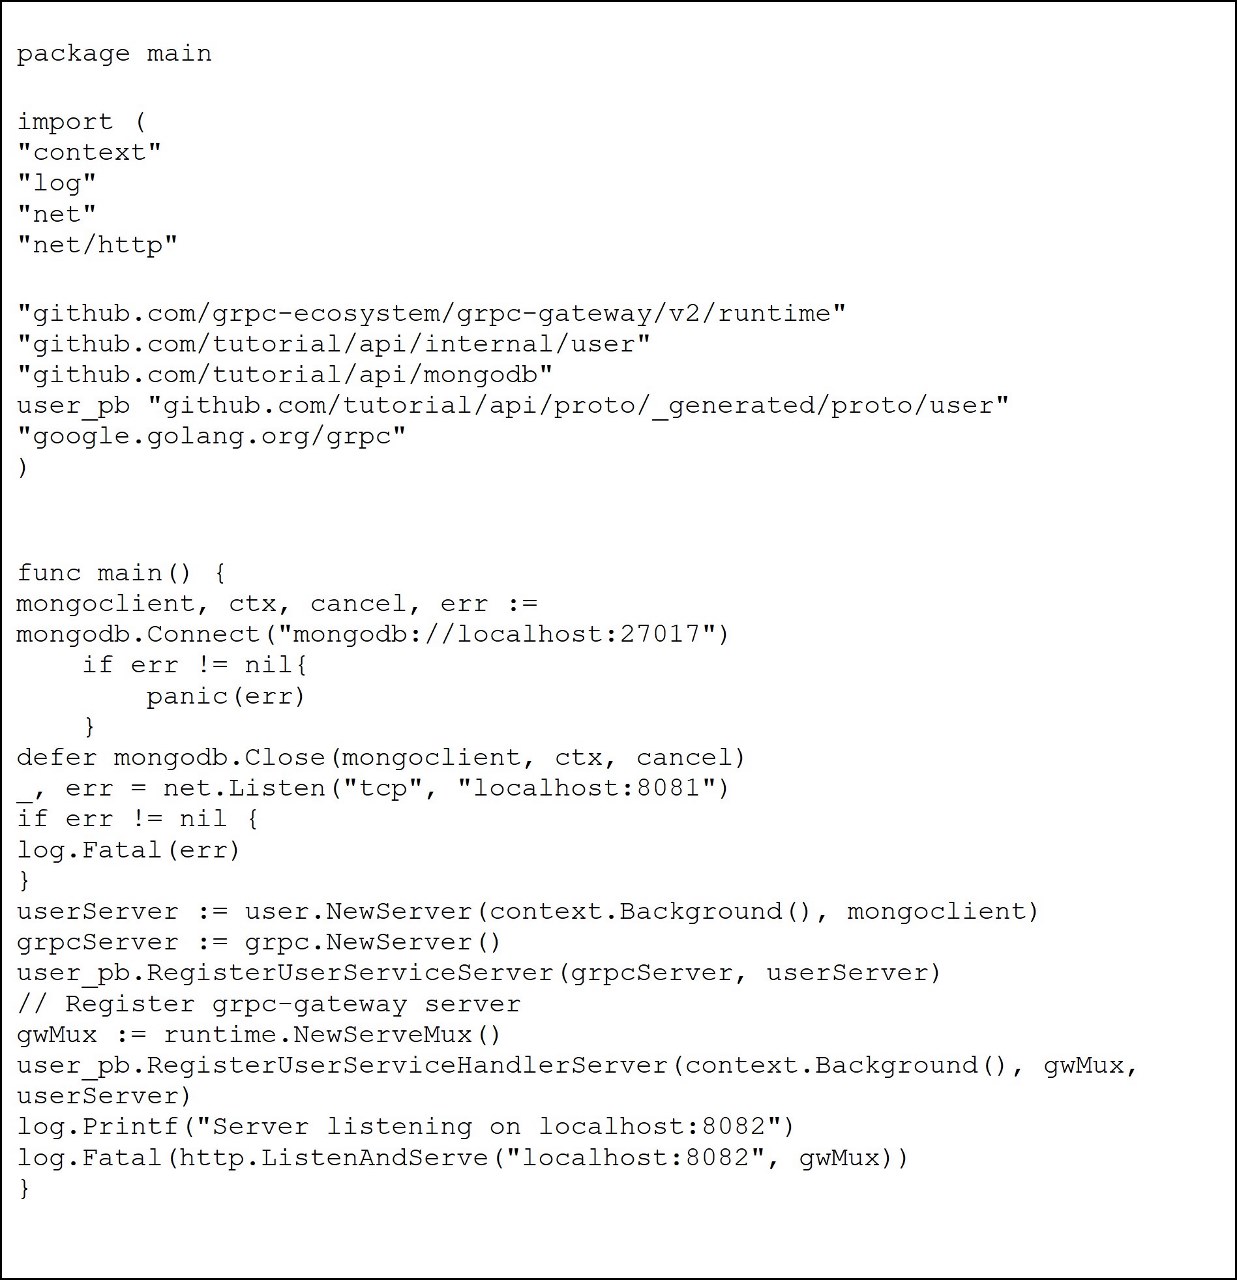
First, we connect to MongoDB and get the mongoClient. We then call the user.NewServer() function defined previously to initialize the server with the mongoClient. Finally, we start our GRPC server and reverse proxy server which will be listening on localhost:8082. Now, we can send HTTP requests to this address - http://localhost:8082 followed by the respective URIs to call APIs.
Test the API
Now that our API is ready, it’s time test it. Here are the steps:
-
Clone this GitHub repo in your GOPATH:

-
Run docker run -d -p 27017:27017 --name mongodb mongo:latest to start a MongoDB Docker container.
-
Go to the cloned GitHub repo and cd into the cmd/user folder.
-
Run go build . to create an executable
-
Run this executable using ./user.
Now our MongoDB is running on localhost:27017 and server is running on localhost:8082. We can send requests to the server using postman as shown below:
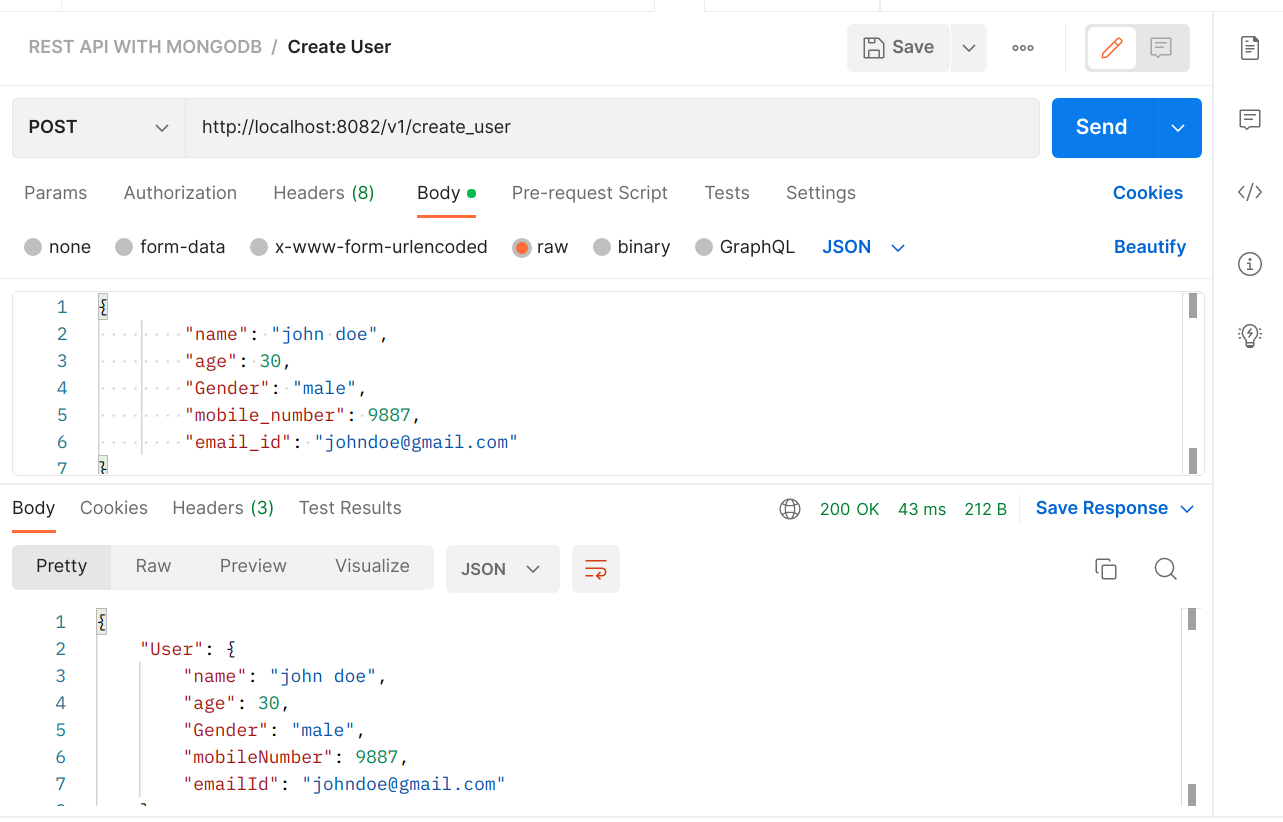
We send a POST request to the /v1/create_user endpoint with the user details. This inserts the data into MongoDB and returns the inserted data.
We can use Mongo compass to connect to our database and view the documents.
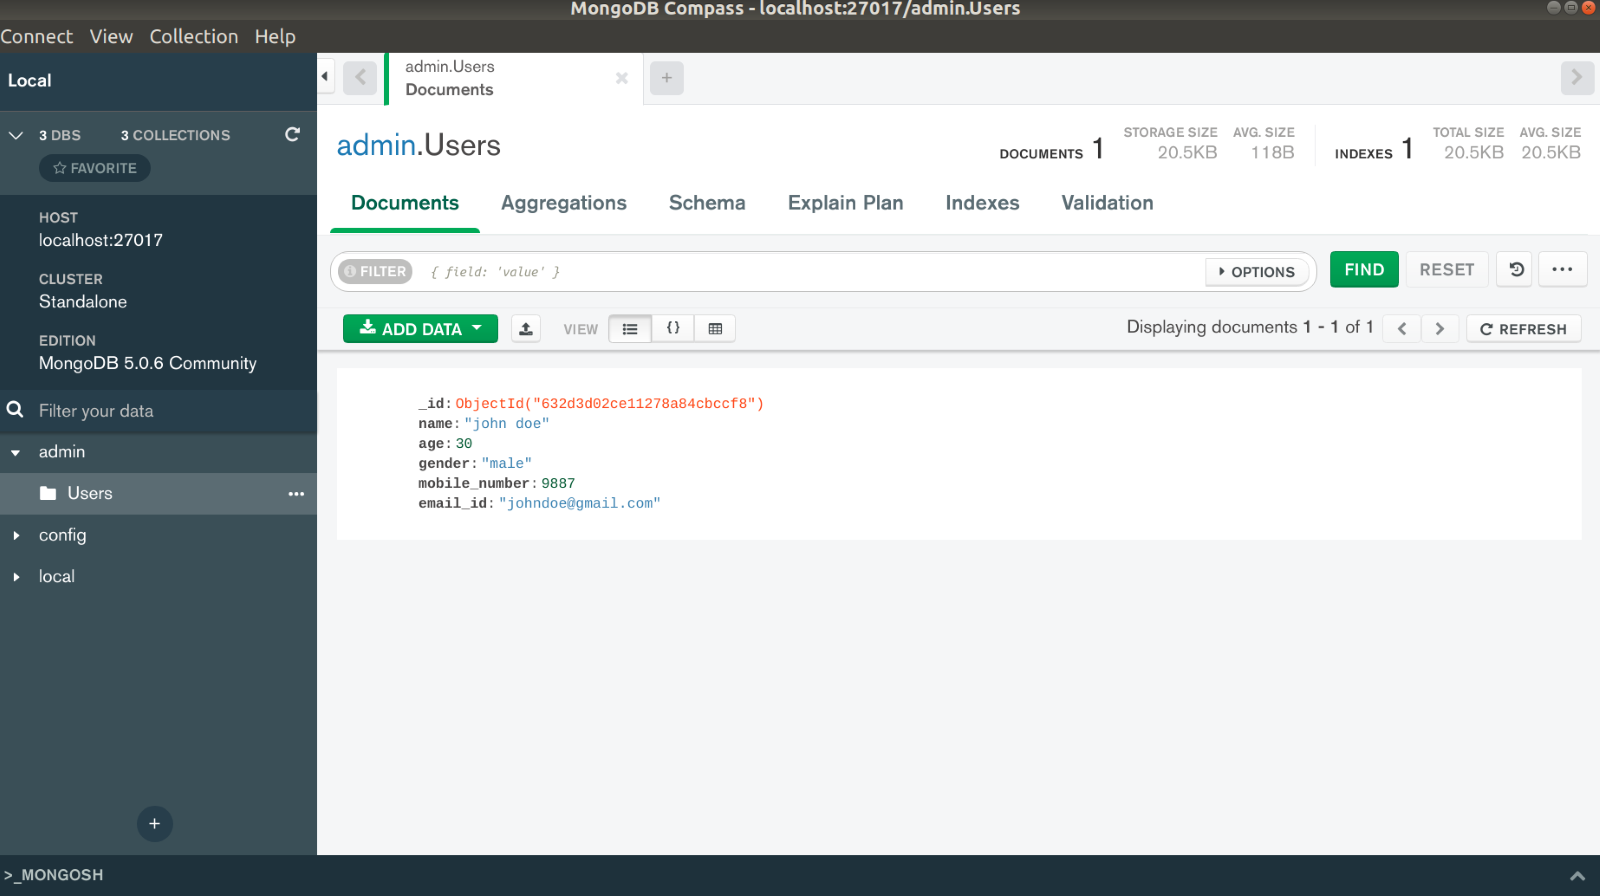
The above image shows the document inserted into the Users collection in the admin database.
Import the Postman collection to test the remaining APIs.
And we’re done!
This is one of the easiest ways to create API definitions using proto files, generate code stubs using protoc, configure and run a gRPC server and a gRPC gateway server, and perform operations on MongoDB. For the full code, click here. Try it, and if you face any issues, feel free to comment or contact us directly at contact@opcito.com, and we’ll be happy to help you.