Posted By

Imagine having a code quality assistant that tirelessly examines your codebase, offering guidance on potential issues and providing actionable recommendations. That's precisely what SonarQube reports deliver.
What is SonarQube?
SonarQube is a static code analysis tool that scans your source code, identifies potential bugs, code smells, & vulnerabilities, and provides actionable feedback for improvement. It supports various programming languages and integrates seamlessly with popular build tools and continuous integration (CI) systems. It generates detailed reports that present a holistic view of code quality metrics and provide developers with actionable feedback. These reports offer a wide range of information, including:
- Bugs and vulnerabilities: SonarQube analyzes the codebase for potential bugs and security vulnerabilities. The reports highlight specific instances where coding practices may introduce bugs or expose vulnerabilities.
- Code smells: Code smells are indicators of poor design or implementation choices that might hinder code maintainability. SonarQube detects these code smells and provides recommendations for refactoring and improving code quality.
- Code coverage: SonarQube measures the percentage of code covered by tests. This metric helps developers understand the effectiveness of their testing efforts and identify areas of the codebase that require additional testing.
- Duplication: Code duplication can lead to maintainability issues and increase the chances of introducing bugs. SonarQube identifies duplicate code snippets and presents them in the reports, enabling developers to eliminate redundancy and improve code quality.
- Complexity: SonarQube analyzes the complexity of the codebase, identifying methods or classes that are excessively complex. High complexity can make code difficult to understand and maintain. By highlighting such areas, SonarQube reports guide developers in simplifying and improving the design of their code.
Benefits of SonarQube
- Improved code quality: By identifying bugs, vulnerabilities, code smells, and areas of complexity, SonarQube reports help developers improve the overall quality of their code.
- Early detection of issues: SonarQube scans the codebase during the development process, allowing issues to be identified early. This enables developers to address problems at their root.
- Facilitates refactoring: SonarQube reports provide actionable feedback on code smells and duplication, guiding developers in refactoring their code to improve its structure and maintainability.
- Encourages best practices: SonarQube reports enforce coding standards and best practices by highlighting deviations from established guidelines.
Note: Click here to know more about SonarQube's analysis reporting details.
How to set up SonarQube and generate reports:
To set up SonarQube there are a few pre-requisites that include:
• Docker
• Java Development Kit (JDK)
Steps to set up SonarQube:
The method of installing SonarQube using Docker involves using containerization technology to run SonarQube in an isolated environment. Here's are the basic steps involved in the SonarQube setup; for more detailed information, visit the official docs of SonarQube.
Step 1: Pull the SonarQube Docker image
docker pull sonarqube
Step 2: Start a SonarQube container
docker run -d --name sonarqube -p 9000:9000 sonarqube
Step 3: Access SonarQube
After the container is up and running, you can access SonarQube in your web browser by visiting http://localhost:9000. This will connect to the SonarQube instance running inside the Docker container.
Using Docker to install SonarQube provides several advantages, including easier deployment, portability, and isolation from the host system. It simplifies the setup process and ensures SonarQube runs consistently across different environments.
Step 4: Configure SonarQube
Log in to the SonarQube web interface using the default credentials (admin/admin). You will be prompted to change the admin password upon the first login. Follow the instructions to set a new password.


Step 5: Create a new SonarQube project
After logging in, create a new SonarQube project by clicking on the "Create new project" button. Provide a unique project key and name for your project.


Step 6: Choose how you want to analyze your project after setup.

Step 7: Generate an analysis token
Once the project is created, generate an analysis token by navigating to "Project Settings" > "Analysis Method" > "Generate" under the "Project Administration" section. Copy the generated token, as you will need it in the next step.

Setting up SonarScanner
Follow these steps to install SonarScanner on Ubuntu:
- Step 1: Download and extract SonarScanner
Visit the SonarScanner download page: https://docs.sonarqube.org/latest/analysis/scan/sonarscanner/. Choose the appropriate version of SonarScanner for your system (e.g., Linux). Right-click the download link and select "Copy link address". In the terminal, navigate to the directory where you want to download SonarScanner. Download the SonarScanner ZIP file using `wget` followed by the copied link address. For example: `wget <paste_download_link> - Step 2: Extract the SonarScanner archive
Extract the downloaded ZIP file using the `unzip` command. For example: `unzip sonar-scanner-cli-<version>.zip`. This will create a directory with the extracted files. - Step 3: Set up SonarScanner configuration
Open the `sonar-scanner-<version>/conf/sonar-scanner.properties` file in a text editor. - Configure the SonarQube server details by uncommenting and updating the `sonar.host.url` property to point to your SonarQube server. For example: `sonar.host.url=http://localhost:9000`. - Step 4: Add SonarScanner to PATH
Open the `~/.bashrc` file in a text editor. Add the following line at the end of the file: `export PATH=" <path_to_sonar_scanner_directory>/bin:$PATH"`. Save and exit the file. Run `source ~/.bashrc` in the terminal to apply the changes.
Step 5: Verify the installation
Open a new terminal and run `sonar-scanner -h`. If the installation is successful, you should see the SonarScanner help menu.
Generate reports using SonarQube
Analyze your codebase using SonarScanner. Open a terminal or command prompt in your project directory and execute the following command, replacing <token>, <your-project-key>, <project-directory> with your project data:
sonar-scanner \
  -Dsonar.projectKey=<your-project-key>
  -Dsonar.sources=<project-directory>\
  -Dsonar.host.url=http://localhost:9000
  -Dsonar.login=<token>

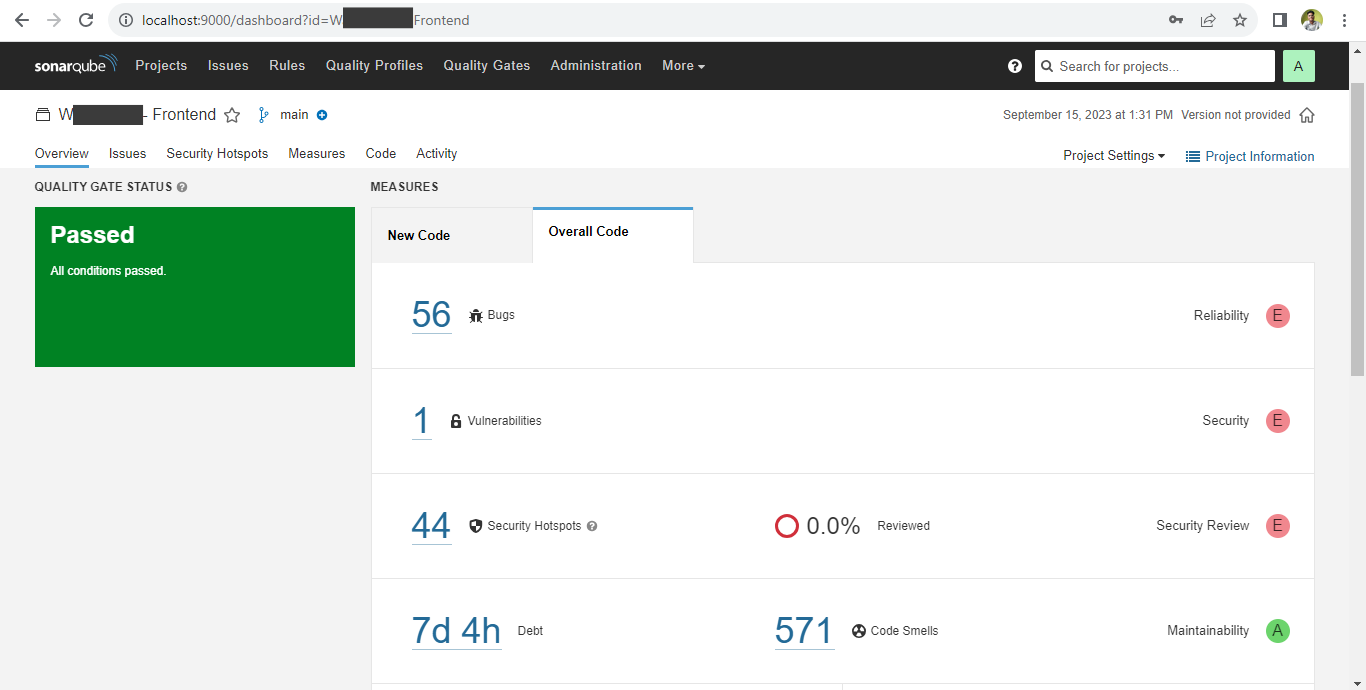
You will be able to see the SonarQube report of your code base.

In the ever-evolving landscape of software development, where code quality is paramount, SonarQube reports emerge as a steadfast ally. SonarQube empowers developers to continuously refine and deliver efficient code. With SonarQube by your side, the road to code quality excellence is well-lit. Here's to clean, efficient, and secure code!


Related Blogs