Posted By
The use of add-ins elevates the overall Office experience for many Microsoft Office users. There are more than 2,000 add-ins for Microsoft Office 365. The Office add-in platform allows for multiple development options, of which the Word add-in is one. To interact with the content in a Word document, you can utilize add-in commands that extend the Word UI and start task panes to run JavaScripts. All codes that you choose to run on the web browser will run in a Word add-in. In short, you can extend the Microsoft Word functionalities with add-ins. There are multiple Word add-ins that you can select from the Office Store. Some popular ones include Wikipedia, Emoji Keyboard, and Font Finder.
In one of Opcito's recent business engagements, I came across an add-in automation requirement, and I found it remarkably interesting. The primary reason was the difference between automating an add-in and automating a web or a desktop application. When I tried to do my research, I could not find anything on the topic; not a single video or anything on eLearning sites, even the leading tech bloggers, had very little information.
After a lot of R&D and trial and error, I finally discovered an approach to automate it with Appium's WinAppDriver. I implemented this in Node.js using open-source automation tools and technologies. It’s best to have the correct combination of different tools and their versions. I will explain my add-in automation setup in this blog.
Pre-requisite: Tools, versions, and dependencies
You would need to install the following tools along with the specified versions:
- WinAppDriver 1.1.3.0,
- Node.js 8.17.0,
- npm 6.13.4,
- Appium 1.15.1,
- Download Visual Studio 2017 with workload “Desktop development with C++” and Windows SDK 10 using the Visual Studio installer. Do not forget to turn on the developer mode on your system.
Once all the tools are installed. Follow the steps below to install the required dependencies:
- Open command prompt in admin mode and go to the location of the project folder
- Run command “npm install fsevent@2.1.3 -f”
- Run command “npm install windows-build-tool@5.2.2”
-
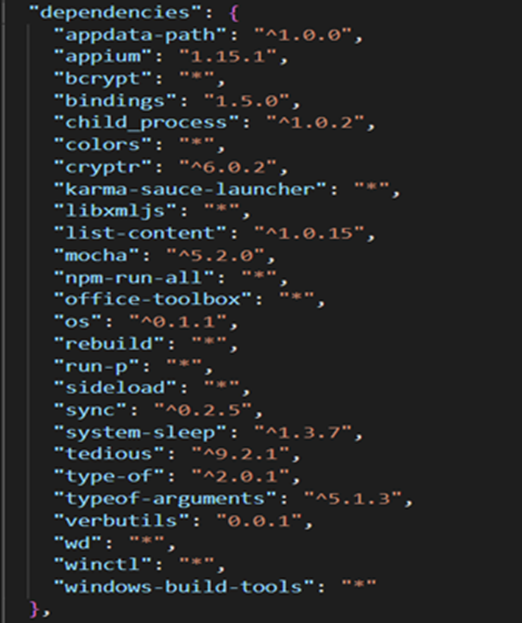
Make sure you have all dependencies with the proper version number in the package.json file of the project.
Here are the required dependencies:
-
Run command “npm install” to install all dependencies.
A node module folder will be created after successfully running the npm install command, and the project’s folder structure will look like this:

Initiating driver
I have used the WD library as NodeJS Webdriver/Selenium 2 client in this setup. This library is meant to be a malleable implementation of the Webdriver protocol in Node.
By default, the host address is 127.0.0.1, and port 4723 is used. WD promiseChainRemote is used to define the type of driver.
Here, I am fetching the window handle of the already opened Word file and attaching it to the driver with the help of the “appTopLevelWindow'' capability. Once focus is set, the driver is initialized with the init() method.

Inspecting elements
To inspect the Microsoft Word add-in elements, you need to use inspect.exe. The tool is Windows-based and allows you to choose & view any UI element along with its accessibility data. You can view control patterns, Microsoft UI Automation properties and Microsoft Active Accessibility (MSAA) properties. I mostly use the Name or Automation Id property to get the element.
For example, let us find out the properties of the insert tab of a Word file using the inspect tool. When you inspect it using inspect.exe, the window of the inspecting tool will look like the screenshot below. You can use the value of the property Name to access the element.
In this example, you can access the insert tab using the ""elementByName"" method as follows: driver.elementsByName("Insert")

Test Framework used
Here, I am using Mocha as a test framework. Mocha is a feature-rich, open-source JavaScript test framework that runs on Node.js and in the browser. It makes asynchronous testing simple and exciting. Mocha tests run serially. It helps you with accurate and flexible reporting while it maps uncaught exceptions to the right test cases.
After opening the add-in, the setup method explained above is called to set focus on the Word file. Finally, using the driver instance, you can call the “elementByName” method to access the add-in element and perform a click on it.
Code snippet-

Running Test
- Before executing the test, ensure you have the scripts below and configure them in your package.json file.
- In the screenshot below, in the command “mocha ./TestCases/Test.js --timeout 2000”, “Test.js” would be the name of your test file.

- To execute this test, open the command prompt, go to the location of the project folder and run the command “npm run appium.” This will start the Appium server.
- Open another instance of the command prompt, go to the project folder's location, and run the command "npm test" to run your test.
Voila! You have just automated the Microsoft Word Add-in for a richer and smoother data and workflow experience. You can easily create or edit agreement/contract templates using this method. I would recommend restrictions at various stages, and grant data access to only authorized personnel for security reasons. Let me know your experience with this method in the comments section. Happy automating!